Getting version 1 onto an iPhone or Android device is the easy part.
The hard part is the last 5%: backend behavior, real-device bugs, payments, store metadata, privacy details, and App Store or Google Play approval.
This guide follows the no-code path from app brief to public release, with each step tied to the launch needs that usually get complicated late.
TL;DR
- A no-code app still needs clear requirements: audience, version 1 features, data, and launch path.
- Native apps fit store distribution, subscriptions, push notifications, and phone-first experiences.
- AI and no-code builders can generate the first build, but core flows should work before you add payments, with real-device testing before launch.
- App Store and Google Play review go smoother when signing, metadata, screenshots, and beta access are planned early.
Build with Bilt: Start in Bilt for a native iOS and Android launch. Our platform connects the first build to live preview, backend, payments, and store deployment.
No-code app basics
No-code app builders turn visual inputs or plain-language prompts into screens and logic, without manual Swift, Kotlin, or React Native work.
The work still has 3 parts: data, screens, and logic. A no-code or AI builder handles the underlying code, but the app still needs clear requirements.
A good first pass includes:
- Audience: who the app is for and what job the app helps them finish.
- Core features: the few actions users must be able to complete in version 1.
- Design direction: colors, layout references, images, and brand assets.
- Launch path: testing, payments, beta access, App Store review, and marketing.
No-code also does not remove the product process. You still validate the idea, test on real devices, fix rough edges, and keep improving after launch.
Non-technical builders get stuck in the same places:
- Authentication: sign-up, login, password reset, and account security.
- Payments: subscriptions, paywalls, checkout, and refund handling.
- Databases: user profiles, saved content, permissions, and relationships between data.
- Deployment: builds, signing, TestFlight, Google Play, and App Review.
With Bilt, the mobile path runs from live preview to backend, payments, and store deployment. Plan for those launch pieces before version 1 gets too far.
Native, PWA, or web app
Choose the app format before choosing a builder. The format determines where users find the app, what device features the app can use, and how much deployment work remains.
For a public consumer mobile app, native is the safest path. PWAs and web apps can work well, but they solve a different distribution problem.
| Format | What it means | Best fit | Main tradeoff |
|---|---|---|---|
| Native app | Compiles to iOS and Android binaries for the App Store and Google Play. | Consumer apps, paid apps, apps with camera, GPS, push notifications, or subscriptions. | More launch steps, including signing, store metadata, and review. |
| PWA | Runs in a mobile browser with an installable home-screen shortcut. | Simple apps where browser access is enough and app-store discovery is not needed. | Limited device access and no standard App Store listing. |
| Web app | Opens like a website in a mobile browser. | Internal tools, admin dashboards, content portals, and desktop-heavy workflows. | No installation flow, no store listing, and fewer native mobile features. |
Use these rules of thumb:
- Choose native when the app needs store distribution, subscriptions, push notifications, or a phone-first experience.
- Choose PWA when avoiding store review matters more than native features.
- Choose web app when the product is mainly an internal tool, dashboard, or browser-based workflow.
Cross-platform frameworks like React Native and Flutter reduce the work of building for both iOS and Android from one codebase. That is why prompt-led builders that generate native output are different from web-only builders with mobile previews.
Bilt fits the native path because it helps with the exact launch steps native apps add: backend, payments, live preview, signing, and store deployment. Choose tools that support published iOS and Android apps from day 1.
1. Scope and choose tools
Do one small reality check before you open an app builder. A founder can waste a week polishing screens for an idea that should have died in a 30-minute conversation.
Run this validation checkpoint before you pick a tool:
- Talk to people who match your intended user.
- Ask whether they deal with the problem often enough to want an app.
- Ask whether they would pay for the app, or what would make the app worth paying for.
- Ask them to point out why the idea might fail.
- Write down every objection; objections are free product research before you spend money.
Define the first version in one sentence:
- The user
- The problem
- The day-one action that proves the app is worth opening again
For a recipe app, day one might be “busy parents save one 20-minute dinner.” For a habit app, day one might be “parents complete one check-in and see a streak.”
Before choosing between a visual builder and a React Native/Expo path, split your app into three parts:
- Data: What information does the app store?
- Screens: What does the user see, tap, or type?
- Logic: What happens after each action?
Match the tool type to the first version, rather than the dream version:
| App type | Tool type to consider | Fit |
|---|---|---|
| Simple directory, list, or tracker | Visual no-code builder | Good when the app mainly displays or edits simple data. |
| Forms, bookings, or internal workflows | Form-based no-code tool | Good when the app collects information and routes it somewhere. |
| Native iOS and Android app from prompts | AI-prompted mobile builder like Bilt | Good when you want a native app foundation without writing code. |
| Admin panels or team tools | Low-code platform | Good when someone on the team can handle occasional logic rules. |
| Custom logic or device features | Mobile-first AI builder or developer help | Good when the first version needs more than a simple canvas. |
From here, the steps focus on the native path because that is the path Bilt is built for: one app foundation that works on iOS and Android, with launch support built in.
One more check before the first build: confirm you can export your work later, including source code, data, and the assets you supplied. Step 9 covers ownership in full.
If you already have a stable web app, web-to-app conversion can be faster. Use that route only when the web product is already validated.
2. Write the app brief
Write the brief like you are handing the first build to a sharp junior developer. Clear inputs beat a giant feature wish list every time.
Keep the brief to five parts:
- Target user: Name the user and the moment they open the app.
- Core features: List the first 3-5 features as user actions.
- Design feel: Describe how crowded or calm the screens should feel.
- Assets: Add the files you already own, especially logos and product photos.
- Constraint: Name one feature the first build should exclude, such as social feeds.
Use a brief this concrete:
Build a native habit tracker for busy parents.
- Main action: Complete a daily check-in in under 30 seconds.
- Feature 1: Streak counter.
- Feature 2: Push reminder.
- Feature 3: Weekly summary.
- Data: Save check-ins and streak history.
- Tech preference: React Native/Expo-style native app; use Firebase only if backend storage is needed.
- Exclude: Social feeds for now.
That brief tells the builder what to make and what to ignore. The 30-second check-in sets a screen-size constraint a generic “habit app” prompt never gives.
Keep the first brief narrow. Add subscriptions later, after the first version proves the day-one action works.
If you have brand assets, describe exactly where they belong:
- Use the uploaded 1024×1024 icon file as the app icon and welcome-screen mark.
- Use green and white as the main colors, with high contrast for bedtime use.
- Keep the interface minimal, with large buttons and labels under 3 words.
- Use the attached product photos on the home screen only.
Bilt uses the plain-English brief as the starting point for the app. You can skip wireframes and developer tickets for the first build.
Clear prompts still matter. A tight brief gives us the app’s purpose and core screens before you start refining through conversation.
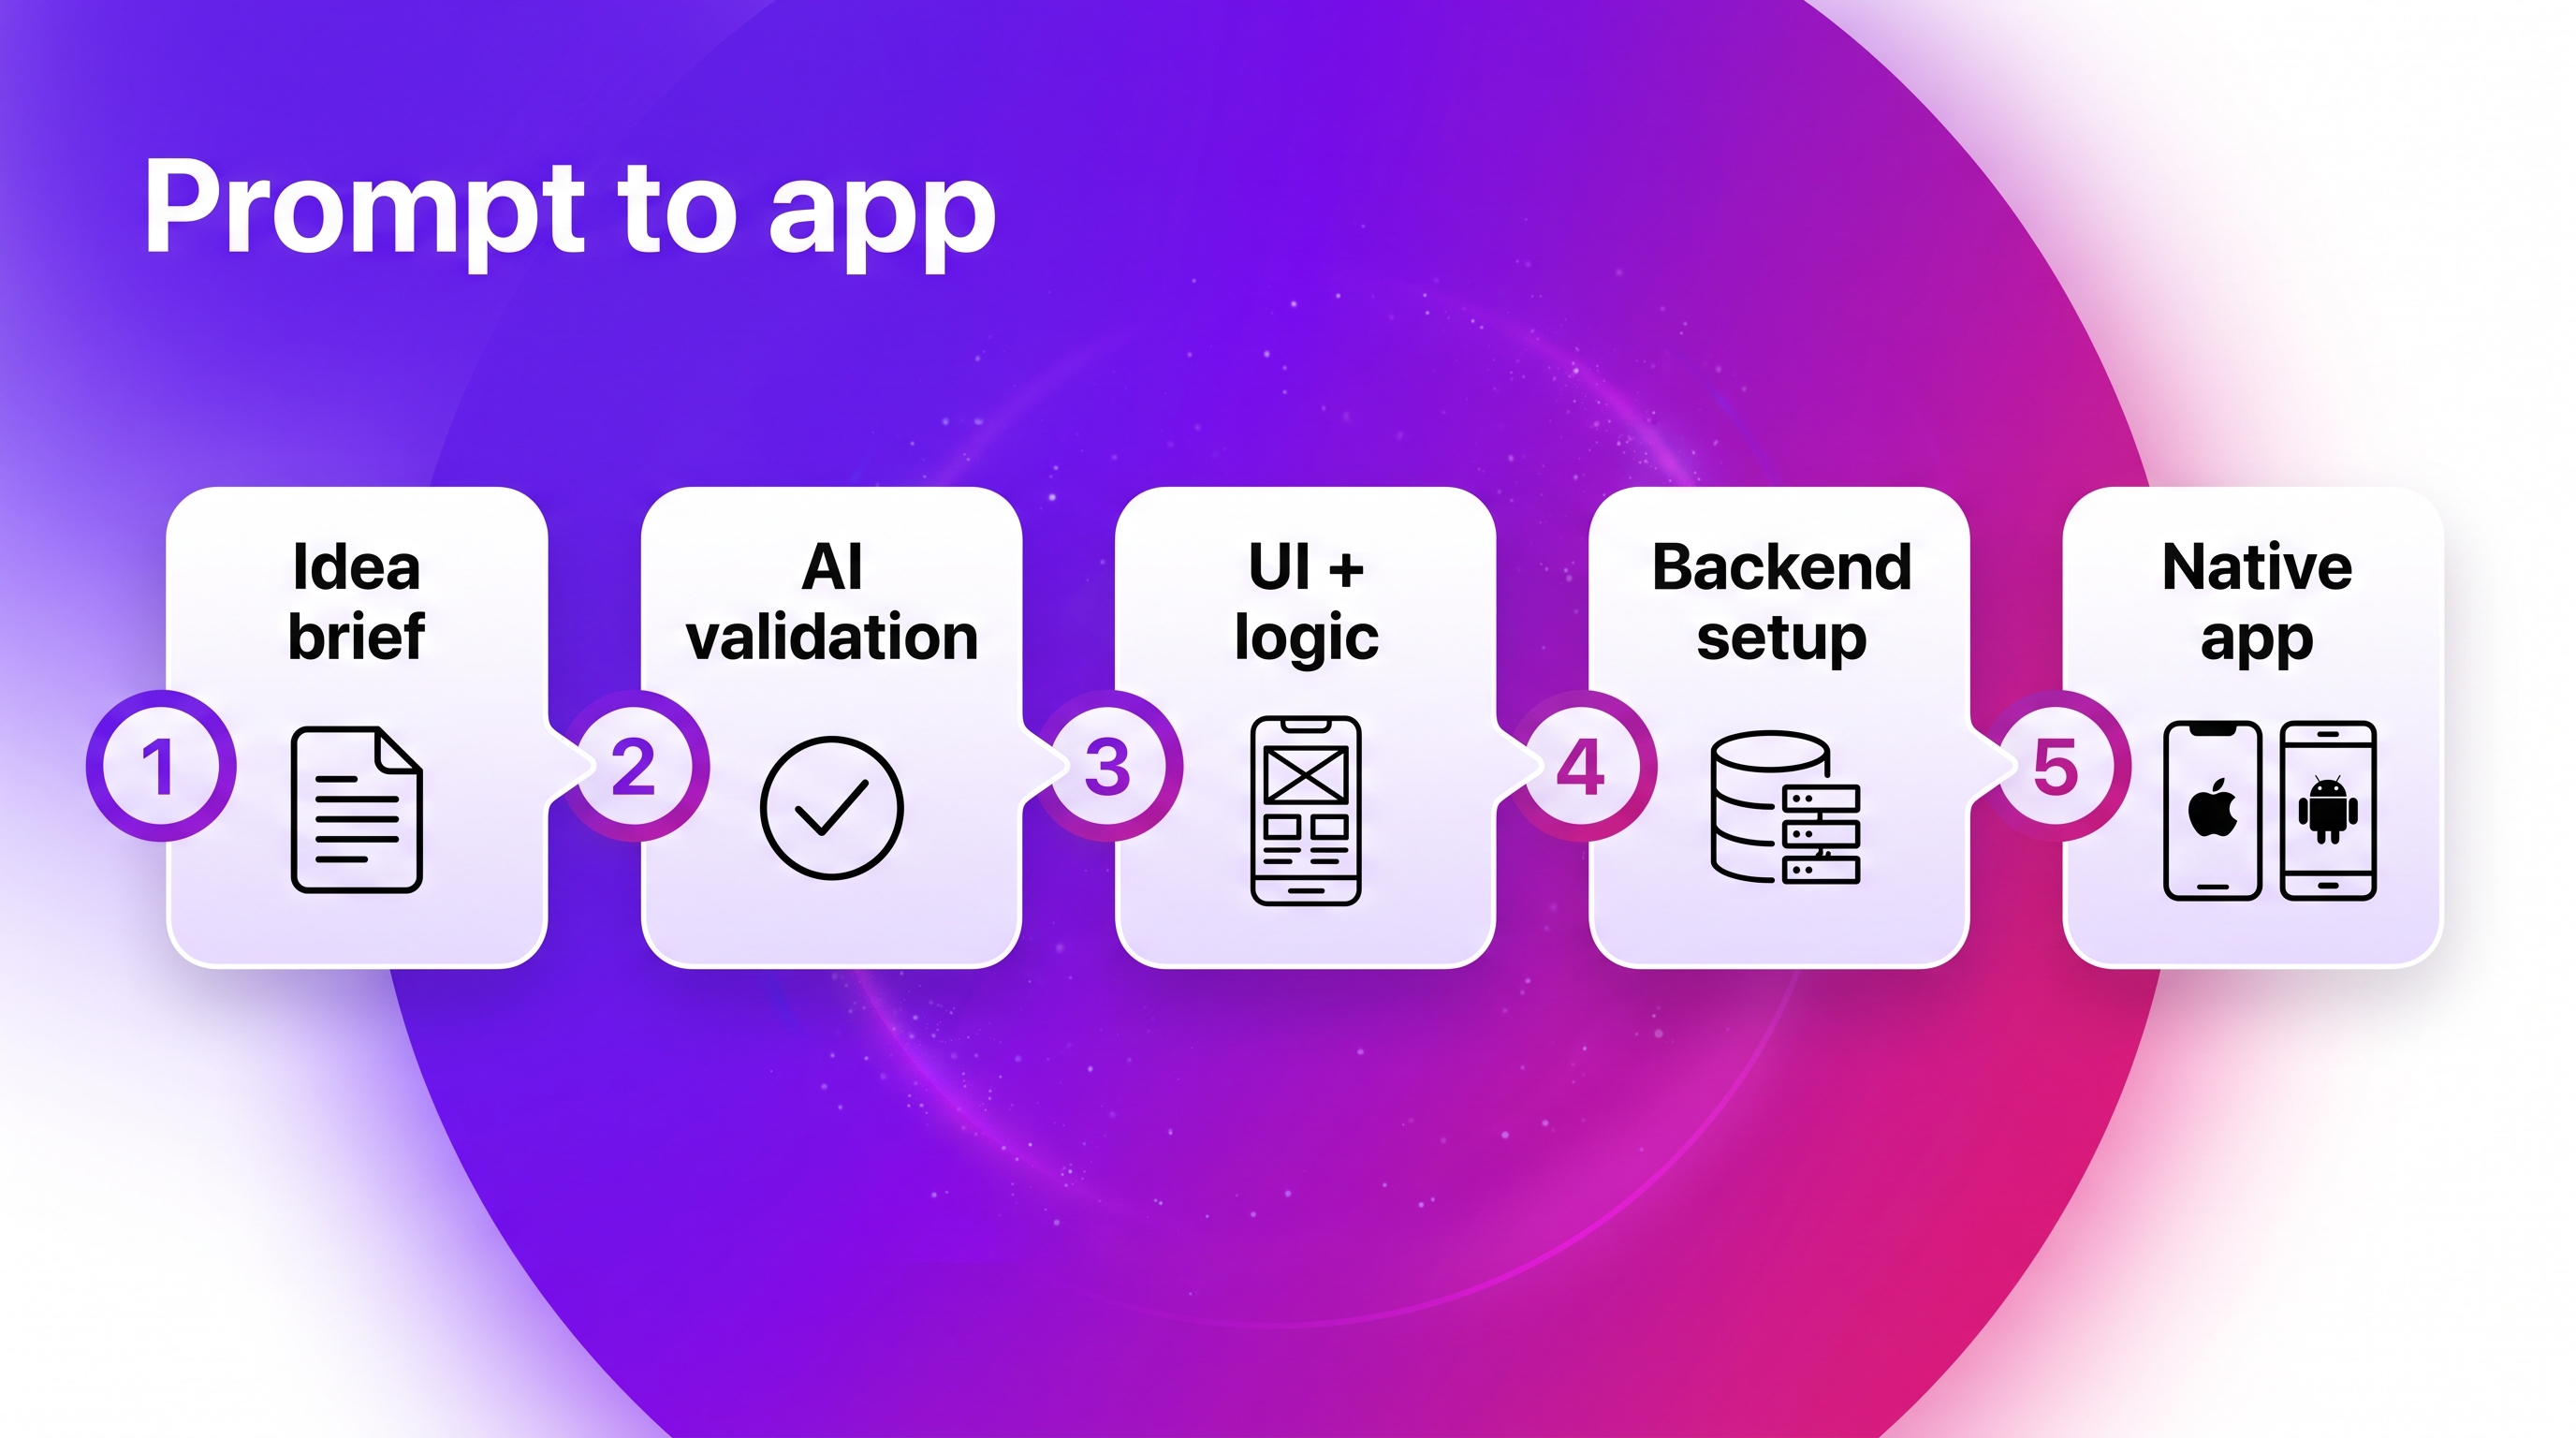
3. Generate the first build
Once the brief is boringly clear, send it to Bilt. We use the prompt to create a native React Native foundation for iOS and Android.
Send the same inputs every time:
- The app idea in one plain-English paragraph, with the target user named.
- The core 3-5 features from your brief, written as user actions.
- The design direction, including colors and layout style.
- Any logos or product images you already own.
From those inputs, Bilt generates the app foundation:
- Initial screens
- Core feature logic
- Backend structure
- A native React Native codebase for iOS and Android
Review the first build as a prototype. Your job is to find mismatches between the brief and the screen.
Use a simple first-build checklist:
- Tap through every main screen.
- Complete the day-one action.
- Compare colors, button labels, spacing, and screen order against the brief.
- List the first 3-5 fixes you want us to make next.
- For the habit tracker, the first check is blunt: can a tired parent complete a check-in and see a streak without reading instructions?
Move to refinement when the core action works. If it does not, rewrite the next prompt around the mismatch you can see on screen.
4. Set data and backend
Think of the backend as the app’s memory. It keeps users signed in, saves their records, and lets photos or messages show up again after the app closes.
Tell Bilt what your app needs to remember in plain English. We turn that into the backend, so you are not wiring tables, endpoints, or login flows by hand.
Quick choice: Start built-in unless you already know you need a separate backend.
- Built-in backend: We handle sign-ins, saved data, photo and file uploads, notifications, location features, reminders, and standard API connections.
- Modular backend: A UI builder connects to Firebase or another backend tool for login, saved data, file storage, and outside service connections.
- Tradeoff: Modular stacks can make moving platforms easier later, but they also give you another dashboard, bill, error log, and support queue to own.
Use our built-in backend when your app needs normal consumer or business features:
- User profiles and login
- Saved content, records, or messages
- Image and media uploads
- Notifications and reminders
- Connections to tools with public APIs
Bilt covers the standard stack for most consumer and business apps: user profiles, auth, storage, payments, notifications, and REST API connections.
Bring in a developer when the project moves beyond that standard stack:
- Custom hardware integration
- Real-time multiplayer at scale
- Enterprise backend migrations with 15+ custom APIs
Connect one outside service first, then test it against the core data model. Once the first connection works, move into feature and design refinement.
5. Refine features and design
Your first generated build gives you something to test. Each refinement prompt should move one screen or flow closer to the product you meant to build.
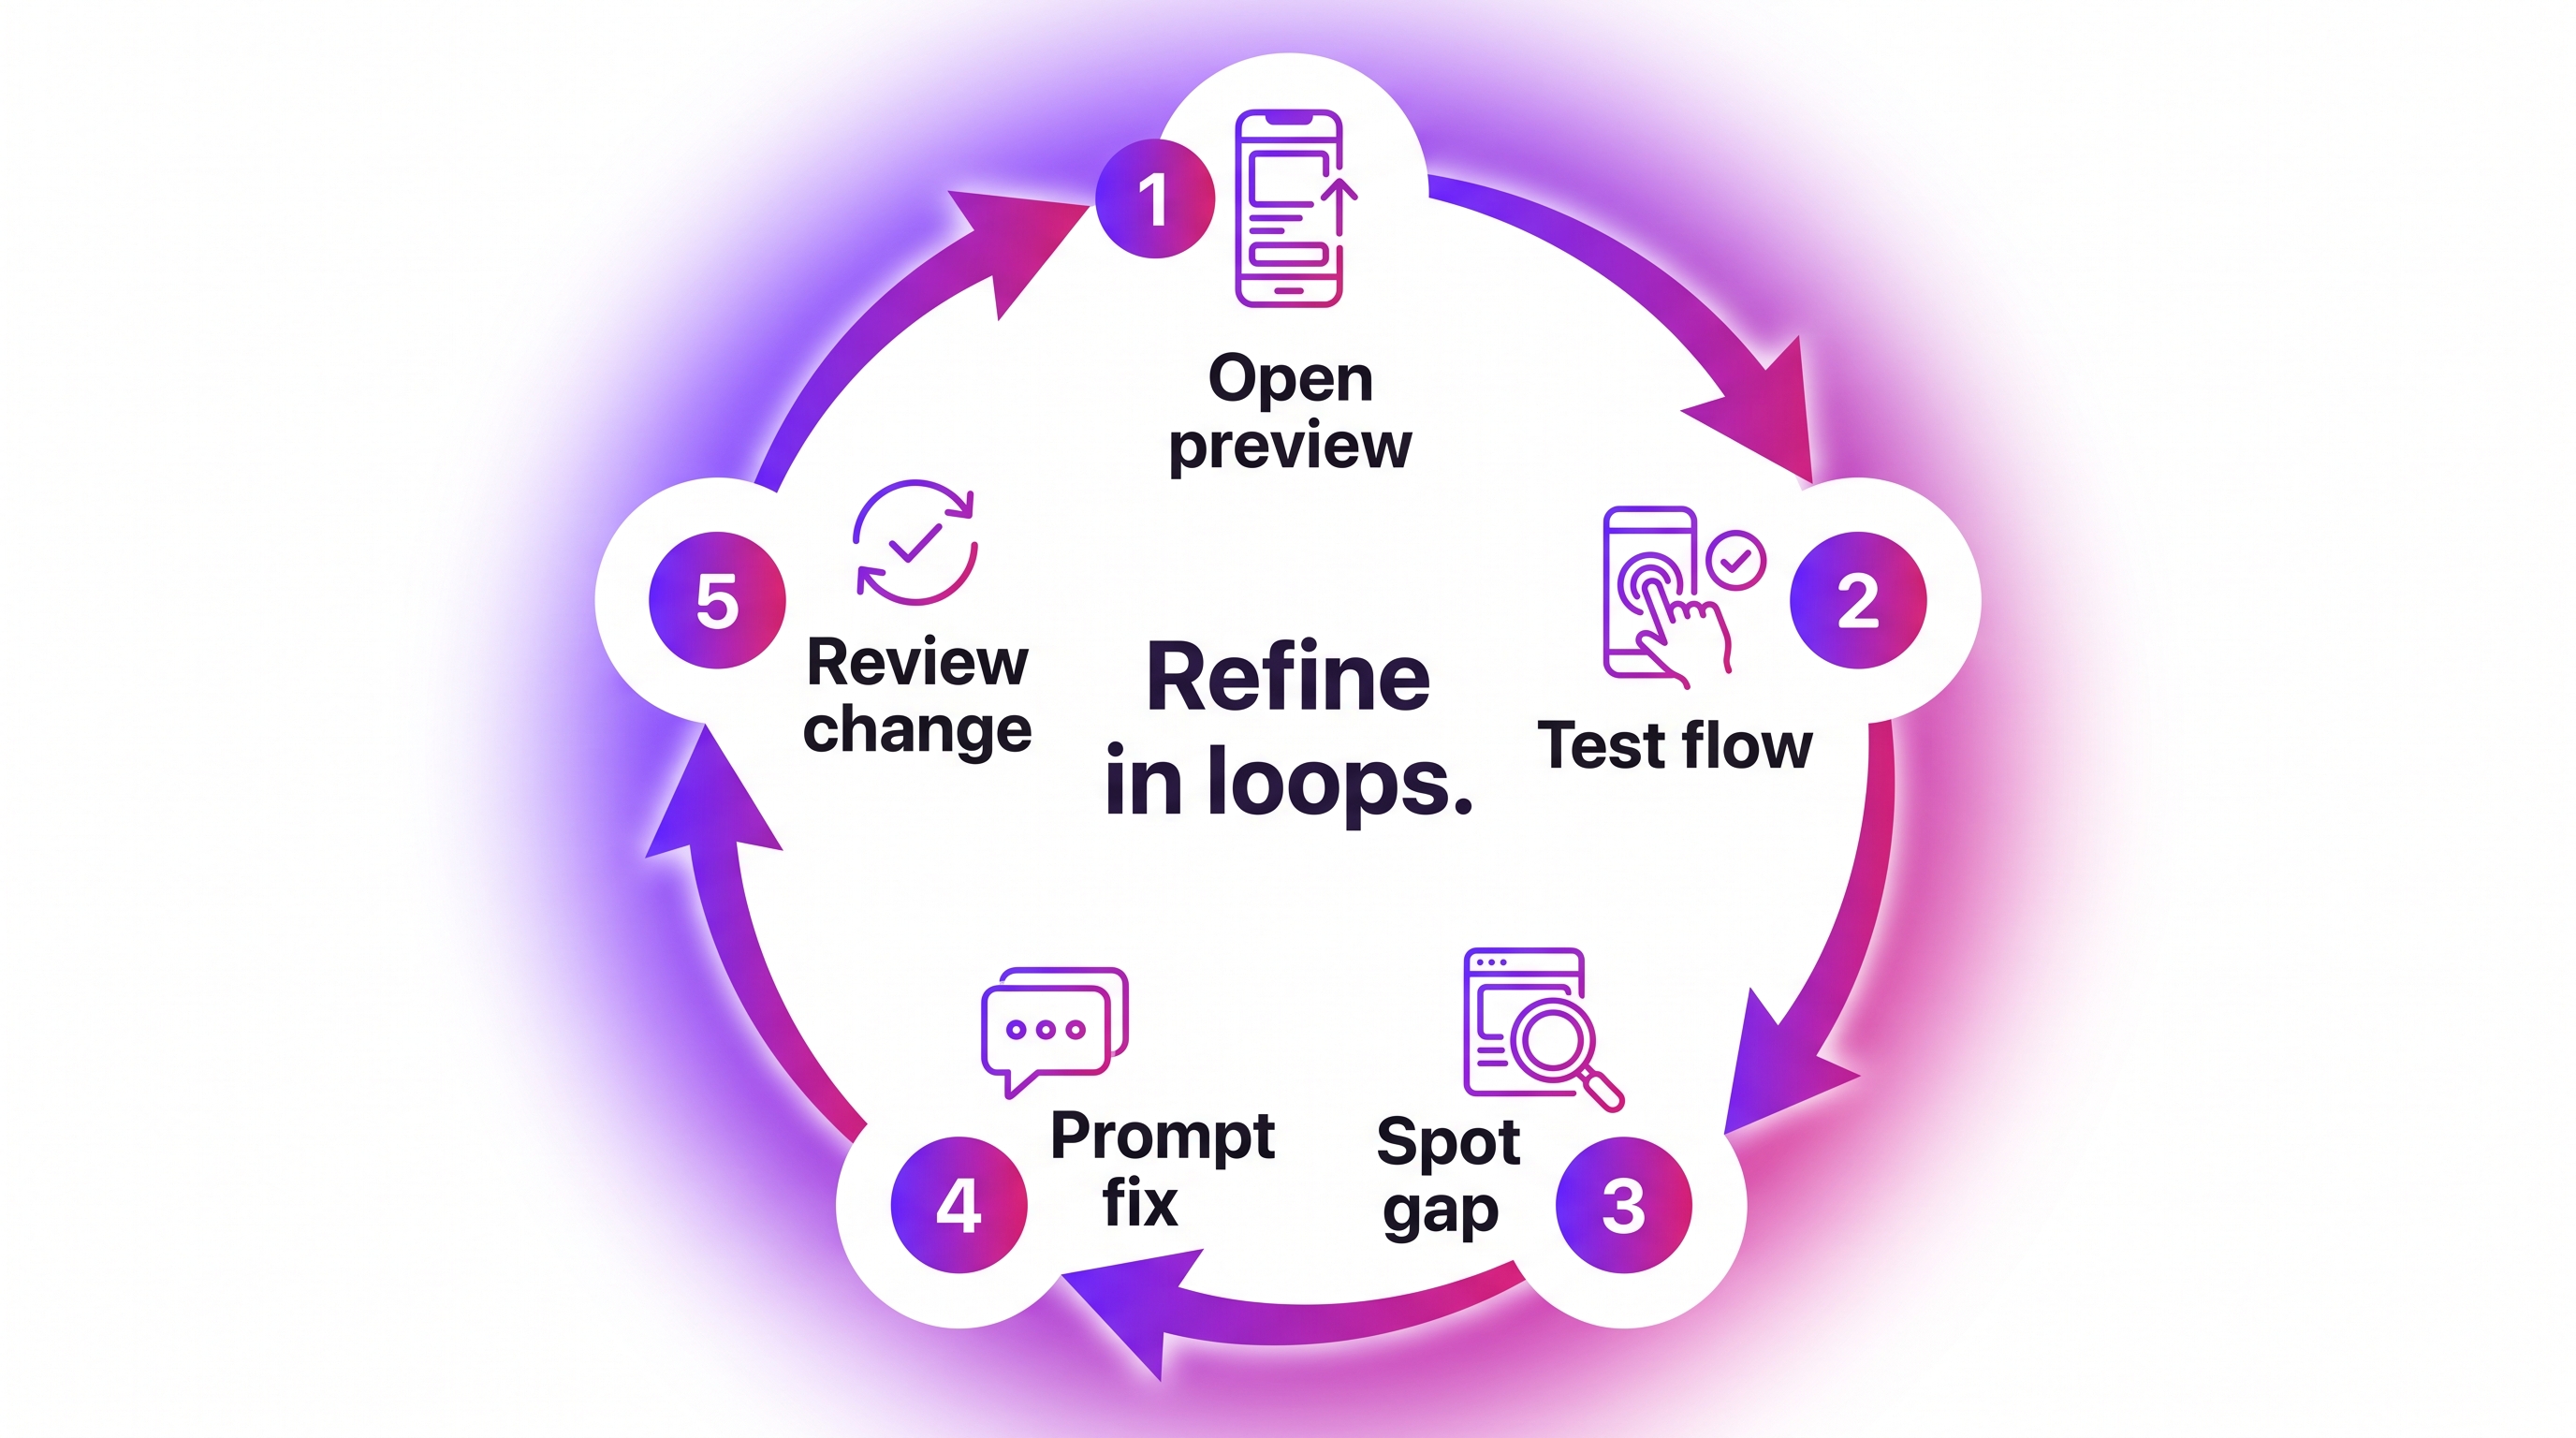
Use a tight loop so you can tell which prompt caused which change:
- Open the current preview.
- Test one flow, screen, or feature.
- Write down the exact gap.
- Ask Bilt for one scoped change.
- Check the preview again before the next prompt.
Split refinement into two jobs: what the app does and how the app feels.
- Feature logic: Fix how a habit streak, booking flow, quiz score, or saved item behaves.
- Navigation: Adjust screen order, tab labels, onboarding steps, or empty states.
- Design: Change layout, spacing, color palette, typography, images, icons, or brand assets.
Prompt Bilt the way you would brief a developer who is already inside the project. Name the screen, the current behavior, and the desired change.
Use prompts at this level of detail:
- “On the profile screen, add an edit button next to the display name.”
- “When a user completes a lesson, save the completion date and show a checkmark.”
- “Make the onboarding screen use our blue brand color and reduce the headline size.”
- “Move the subscription prompt after the user finishes their first workout.”
We keep conversation context, so earlier design choices and requirements carry forward. You still get better results when each prompt changes one thing at a time.
Broad prompts are where no-code builds get weird. Stabilize the core flows before you add payments, because a paywall makes every bug more expensive to diagnose.
6. Add payments and subscriptions
Skip payments unless the app charges for something.
Add payments for:
- Subscriptions
- Premium features
- Paid content
- One-time upgrades
Bilt Payments uses Apple and Google's native in-app purchase systems for digital purchases.
Build the commission into your price before launch:
- Apple and Google document store fees around 15-30% (Apple fees, Google fees).
- We take no additional revenue share.
Before we generate payment logic, make these choices:
- Paid access: Which screens, features, or content require payment.
- Plan structure: Monthly subscription, annual subscription, one-time purchase, or tiered access.
- Paywall timing: When users see the paywall during the app experience.
- Restore access: How returning subscribers regain paid access on a new device.
Payment stack: Use native in-app purchases for digital subscriptions; consider Stripe for physical goods or services, and RevenueCat for subscription management across iOS and Android.
Ask Bilt with a prompt this specific: “Add a monthly subscription that unlocks the advanced workout plans after the user completes onboarding.”
After Bilt adds the payment flow, paywall testing becomes a launch gate. Broken purchases can block App Store review, so test the paid flow before submission.
Check these flows before moving on:
- A new user can complete a purchase.
- Paid content unlocks immediately after purchase.
- The paywall stays closed for unpaid users.
- Subscription restoration works on a second device.
- Cancelled or expired subscriptions revoke access correctly.
Use Apple Sandbox and Google’s test purchases for end-to-end checks. When sandbox payments work, move to real-device testing before you think about launch.
7. Test on real devices
After payments work in preview, put the app on actual phones before beta. Browser previews catch layout problems, but phones expose the awkward bugs.
Run the smoke test in this order:
- Account access: Create an account, reset the password, and confirm any biometric prompt.
- Navigation: Check back gestures and tab bars on small and large phones.
- Native features: Test camera, location, push notifications, and file uploads on hardware.
- Purchase flow: Open the paywall, trigger purchase, and confirm cancel, success, and restore states.
Device shortcut: In Bilt, we use QR testing for fast checks on physical iOS and Android devices. Scan the code and open the app without touching Xcode or Apple provisioning.
For layout checks on Windows or Linux, use our browser-based iOS simulator before borrowing a Mac or opening Xcode.
Xcode still matters for iOS device logs and signing diagnostics. Once the app passes on hardware, move to a controlled beta.
8. Share a beta preview
Closed beta starts when the app is stable enough for useful feedback. Keep the first group small, fix obvious issues, then move toward App Review.
Use three layers of beta access:
- Preview links: Share the app in a browser for quick stakeholder feedback.
- Device checks: Use QR codes so testers can open the app on physical iOS and Android devices before the TestFlight build.
- TestFlight: Upload a signed iOS build to App Store Connect when Apple's beta channel is required.
Apple's TestFlight documentation lists two limits to know before App Review:
- Internal testing: Up to 100 App Store Connect team members can test quickly, with no external beta review.
- External testing: Up to 10,000 testers can join by email or public link after Apple reviews the beta build.
Beta warning: Treat tester notes as build input instead of general brainstorming.
Fix these issues before App Review:
- Crashes on launch or during the main action
- Broken onboarding steps
- Empty, loading, and error states with no next action
- Permission prompts that do not explain why access is needed
In Bilt, we show changes in the visual preview before you create the next TestFlight build.
Once beta feedback affects the roadmap, check code ownership before another tool controls your release path.
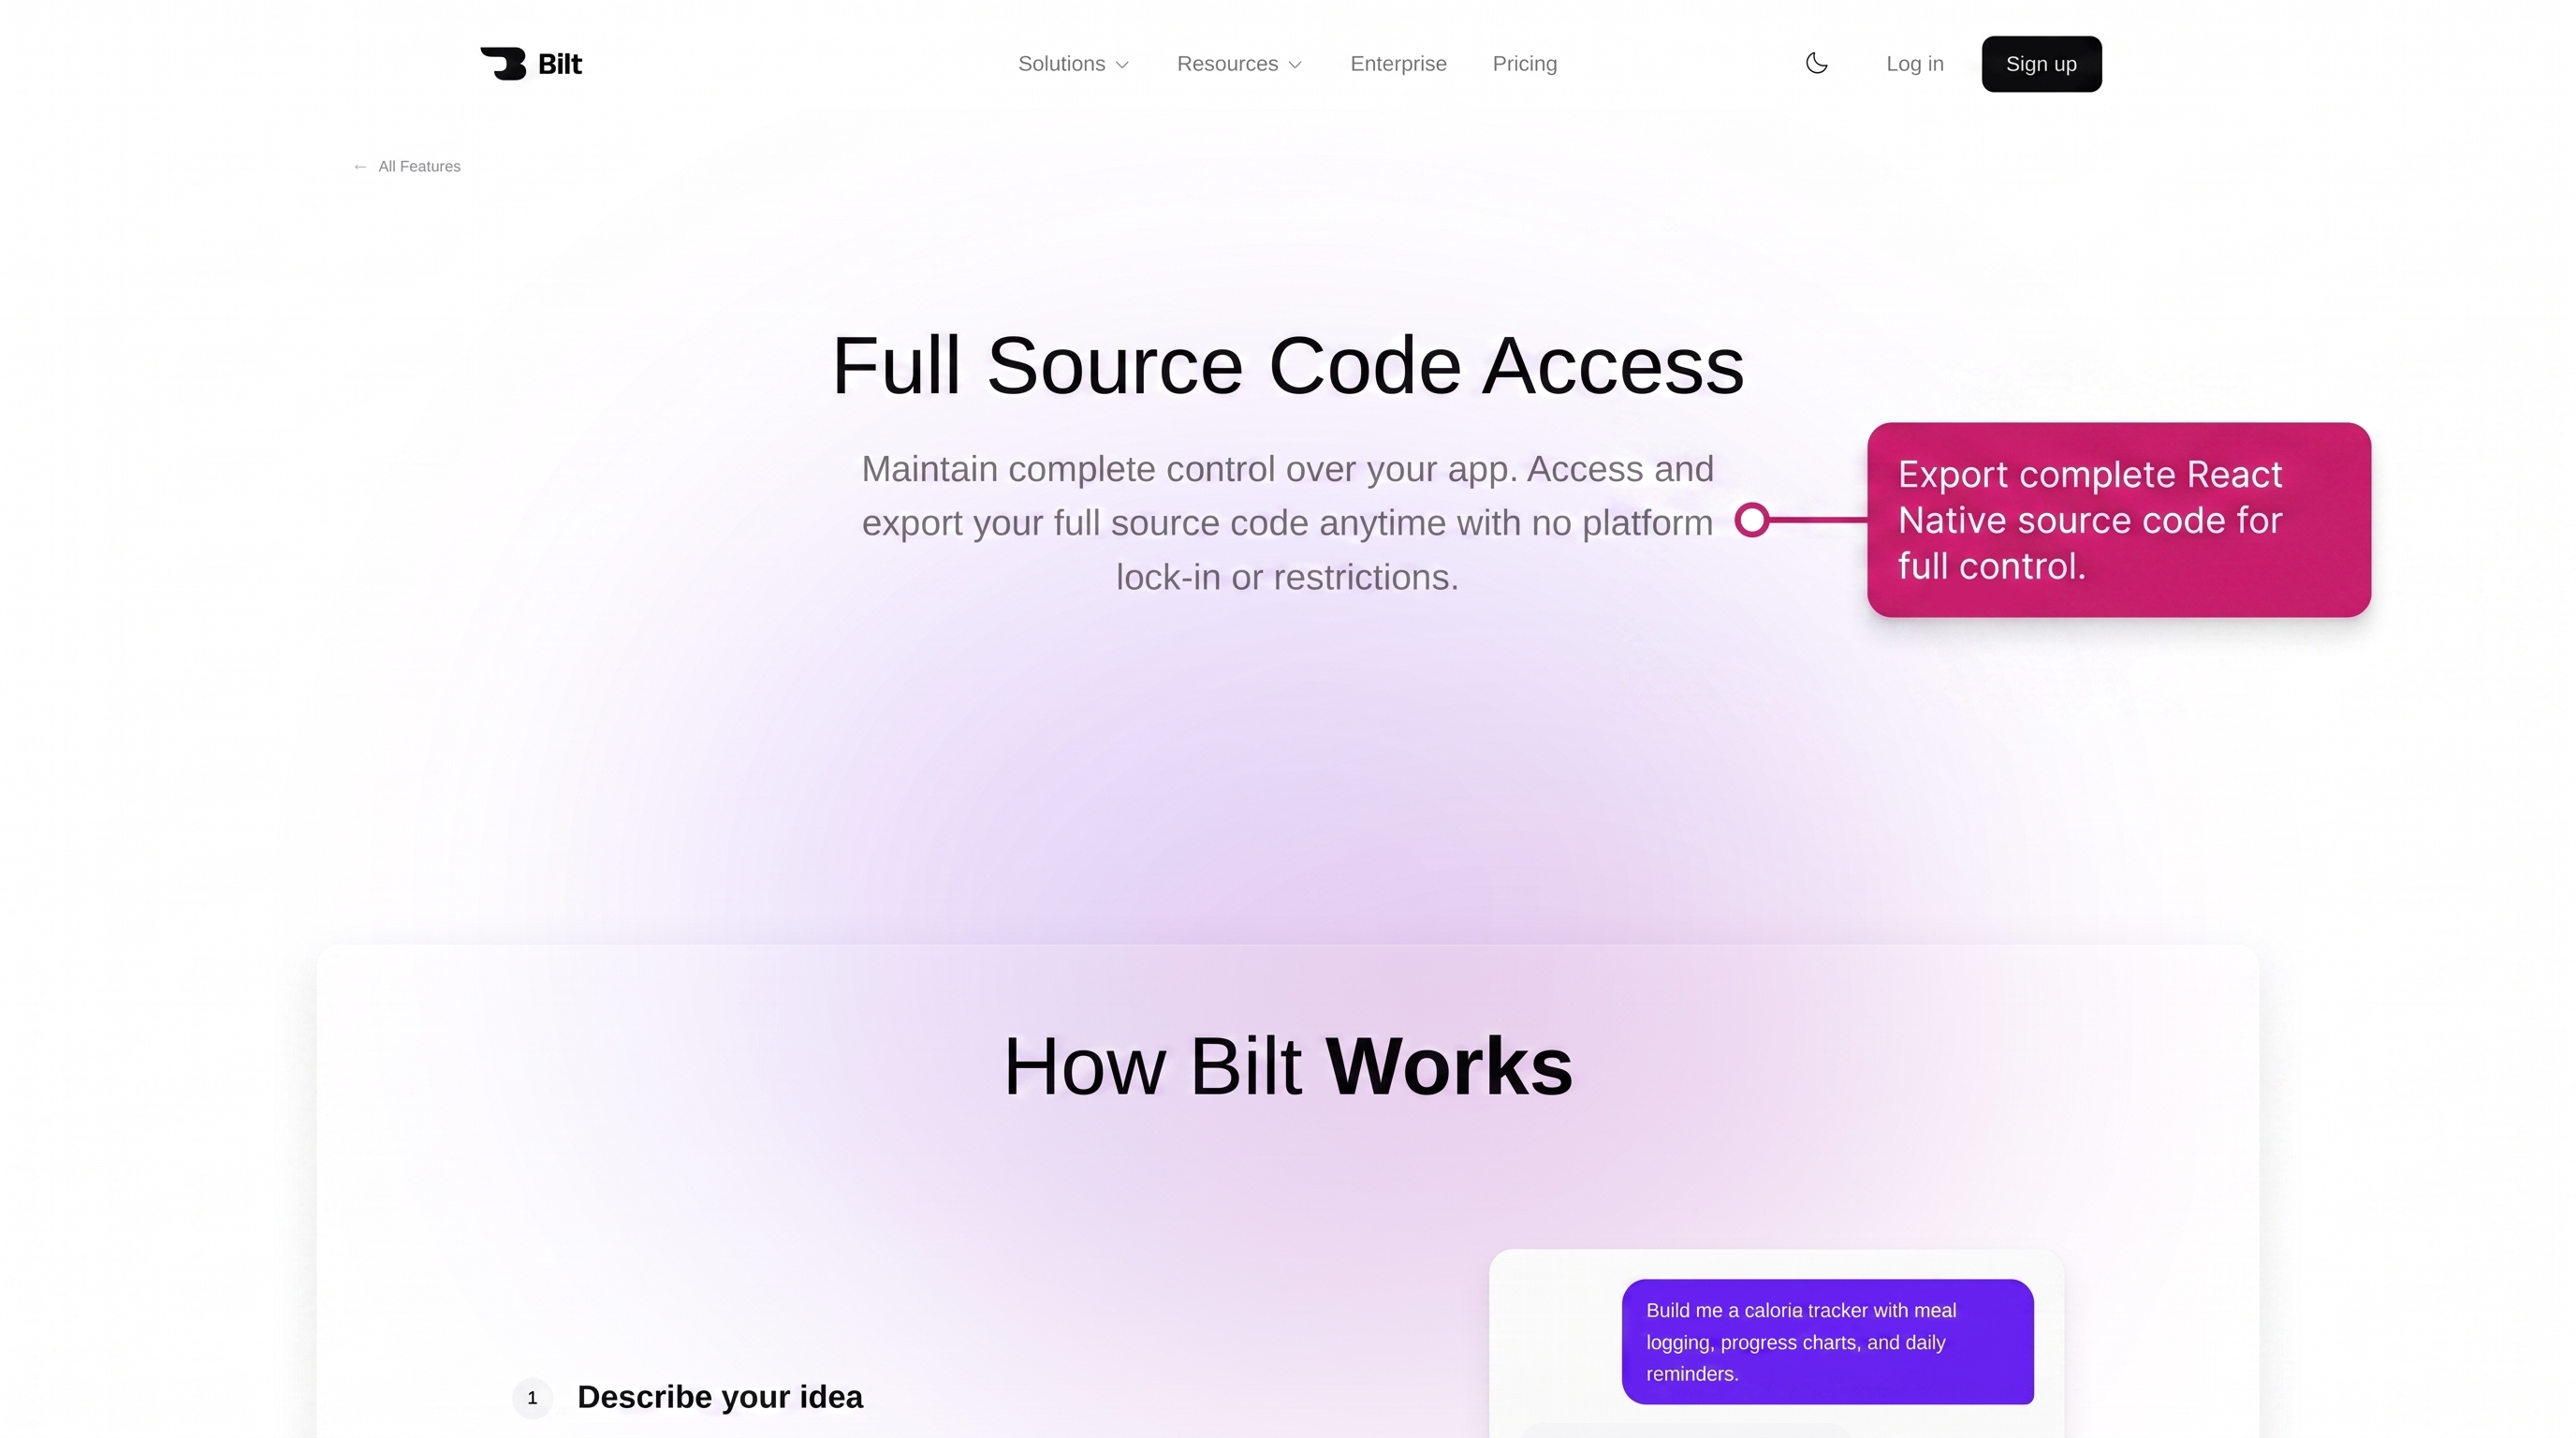
9. Protect code ownership
Check code ownership before your no-code app depends on custom logic or outside developers. The app should be able to leave the builder as source code.
Ask four plain questions before you trust the platform:
- Export: Can you download the full source codebase?
- Version control: Are changes tracked in GitHub so a developer can review diffs?
- Developer handoff: Can an outside developer open the repo and make a fix?
- Independent hosting: Can the project move outside the platform if pricing or roadmap changes?
Ownership check: Ask for the GitHub repo before you add custom auth or payments.
Waiting until migration day leaves an outside developer guessing at build settings and dependencies.
In Bilt, we give you the complete React Native source code and organize generated app code in GitHub automatically.
That keeps developer handoff clean before the last 5%: publishing, payments, and marketing.
10. Publish and market
Publishing a no-code app has two tracks: store submission and first-week marketing. Bilt handles the submission steps so you can focus on getting the word out, but the review details still matter.
Use this sequence once your final build has passed device testing:
- Create or connect your developer accounts. Google Play Console costs $25 one-time. Apple Developer Program costs $99/year.
- Run one last TestFlight or internal build check before submission.
- Complete your store listing, privacy disclosures, support details, demo account, and screenshots.
- Submit the build for review in App Store Connect and Google Play Console.
- Release publicly after approval, then watch reviews and crash signals during week one.
App Review can move quickly when metadata, privacy details, and purchase flows are complete. Common rejection triggers include:
- Crashes during launch or the main action
- Incomplete metadata or privacy mismatches
- Broken purchases or missing demo accounts
- Minimum functionality issues
Apple's Guideline 4.2 flags apps that feel like repackaged websites. If the app is mostly a WebView of existing content, expect trouble. Native interactions, device features, and real utility help separate a real app from a wrapper.
If the app requires login, create a demo account for reviewers. Include the username, password, and any paid-access instructions in App Store Connect so the reviewer can reach the full app.
If Apple rejects the app, do not guess. Read the exact rejection reason, open Resolution Center in App Store Connect, fix only what was flagged, and resubmit with a short reviewer note. Google Play timelines vary by app, account, and update type, but stable builds, accurate Data Safety answers, and working purchases help there too.
Your store listing needs to answer one question fast: what does the app do?
Prepare these assets before you submit:
- App name and subtitle: Make the purpose clear without keyword stuffing.
- Description: Put the one-sentence answer in the first line, then explain the main use cases.
- Keywords and category: Use terms your users actually search for, not internal product language.
- Screenshots: Capture the app on a real device so the UI matches what users will see.
- Privacy policy and support URL: Store reviewers expect both before approval.
Make privacy answers match what the app actually collects, including analytics, payments, location, account data, and crash reporting.
- App icon: Use a 1024x1024 PNG for iOS submission.
Test the paywall in the build you submit. A broken in-app purchase is a common rejection trigger, covered in step 6.
After your first successful release, automation can make updates less painful. Fastlane can automate build uploads and TestFlight distribution. Expo EAS Submit can reduce store submission steps for Expo-style projects. Set it up once, then future releases become a repeatable flow instead of a manual click-through.
Launch-day marketing should be simple and specific:
- Post in relevant subreddits where people already discuss the problem your app solves.
- Share the first sentence of your store description, not a vague launch announcement.
- Ask your first 10 users for an honest review during week one.
- Reply to early feedback quickly, especially when users report bugs or confusing flows.
Early reviews help App Store and Google Play understand whether real users value the app. Early complaints tell you what to fix first.
11. Measure and improve
Launch is the start of the next build cycle. Collect signals, find patterns, and ship the next version before small issues become churn.
Store reviews — look for repeated complaints about crashes, confusing screens, missing features, or failed payments.
App store stats — track installs, conversion from listing views, ratings, and country-level performance.
Payments data — if you integrated payments through Bilt, watch trials, paid conversions, refunds, and churn.
Integrated analytics — tools like Firebase can show screen views, sessions, and drop-off points.
Technical health — watch crash rate, slow screens, failed requests, and login errors.
Patterns matter more than single comments. One user requesting a feature is useful context; five users getting stuck on the same screen is a priority.
Turn each signal into an action:
- Fix crashes, broken login, failed payments, and data access problems first.
- Improve screens where users drop off before completing the main action.
- Clarify onboarding when reviews mention confusion or missing instructions.
- Add requested features only after the core flow works reliably.
In Bilt, small changes can usually start as plain-language prompts. Describe the screen, behavior, or bug you want changed, then test the updated build before submitting a new version.
For harder bugs or feature requests, use direct engineering support inside the project. That keeps the fix tied to the app you already built instead of starting over in another tool.
Review feedback daily for the first two weeks after launch. Early users find the sharp edges quickly. After that, move to a weekly review cycle.
For each improvement batch:
- Pick the fix with the strongest signal.
- Describe the change to Bilt in a scoped prompt.
- Test the updated build before submitting a new version.
- Submit the update. Review is usually lighter than the first submission, but approval still happens before users receive it.
Security checklist
Run this security checklist before you submit to App Store Connect or Google Play, not after users are already in the app. Security readiness splits into two parts: platform defaults Bilt handles for you, and settings you must configure before shipping.
Bilt handles these defaults automatically:
- Encryption at rest and in transit: App data is protected in storage and while moving between the app and backend.
- Secure auth tokens: Bilt manages token generation and storage so you do not implement auth token handling manually.
- Backend isolation: Each app’s backend environment is separated at the infrastructure level.
You still need to configure the parts tied to your app’s data, integrations, and store disclosures:
- Keep secrets out of prompts: Do not paste API keys, service credentials, private tokens, or production passwords into AI prompts.
- Set data permissions: Make sure each user role can only view, create, update, or delete the records it should access.
- Use scoped API access: Give third-party integrations the narrowest permissions possible, and use authenticated headers for external API calls.
- Enable ATT when needed: Turn on App Tracking Transparency if your iOS app uses analytics or ad-attribution SDKs that track users.
- Prepare privacy disclosures: Add a privacy policy and complete Apple App Privacy plus Google Play Data Safety forms accurately.
- Plan data deletion: Give users a way to request account or personal data deletion when GDPR or CCPA applies.
Do this review before submission, not after launch. Security mistakes are harder to clean up once real users, payments, and personal data are involved.
Costs and limits
No-code app costs usually come from 3 places: monthly builder costs, one-time store-account fees, and revenue-based payment fees. For a Bilt project, the unavoidable publishing fees are separate from your Bilt plan.
| Cost bucket | What to expect |
|---|---|
| Builder plan | Bilt has a free tier. Paid plans start at Professional for $25/month and Professional Plus for $50/month. |
| Apple Developer Program | $99/year, required to publish on the App Store. |
| Google Play Console | $25 one-time registration fee, required to publish on Google Play. |
| Native in-app purchases | Apple and Google usually take 15-30% of in-app purchases and subscriptions. |
The minimum store-account cost to publish on both iOS and Android is $124 in year one: Apple's $99 renews annually, and Google's $25 is a one-time fee.
That does not include your builder subscription, paid integrations, design assets, or any extra services you choose to use.
Limits depend on the builder and the type of app. Watch for these before you commit to a tool:
- Publishing access: Some free tiers are useful for prototyping but require a paid plan before store submission.
- Backend complexity: Basic no-code builders start to feel tight around authentication, databases, storage, API integrations, and payment logic. That is why tool choice in step 1 matters. Bilt is built for that full mobile stack from the start.
- Native requirements: Push notifications, device APIs, code signing, and App Store compliance need mobile-specific support.
- Scale edge cases: Heavy API traffic, real-time multiplayer, custom hardware, or a backend with 15+ custom APIs may need a coded setup.
Common project mistakes
The steps above work when every handoff stays connected. Projects usually get stuck when a builder wraps a website as an app, relies on one-shot prompting, skips phone testing, adds a fragile paywall, or reaches App Store submission with an unsigned build.
Bilt is built around those failure points. You describe the app in plain English, keep refining through prompts, and get native React Native output with source code you own.
Where Bilt helps:
- Native output: Bilt generates React Native apps for iOS and Android, instead of pushing you toward a web wrapper.
- Real-device testing: QR testing and live previews help you catch broken flows before App Store review.
- Payments and publishing: Bilt Payments, automated deployment, and App Store submission support reduce the manual setup that slows non-technical builders down.
Ready to build your app?
You have the full path now: scope the idea, build the first version, test on real phones, handle App Review, and keep improving after launch.
Describe your idea and Bilt builds the first version in minutes, with native iOS and Android output and no coding required. Start building free. Free to start · No credit card.
Common questions before you start
Can I build a mobile app for free?
Yes. You can build and preview for free. Publishing to the App Store or Google Play still requires developer accounts.
Bilt has a free tier, so you can create and preview an app before upgrading. To publish publicly, you still need the platform accounts:
- Apple Developer Program: $99/year
- Google Play Console: $25 one-time fee
Free tiers are best for testing the idea, shaping the screens, and checking whether the app flow makes sense.
Costs become harder to predict when a platform charges by usage, API calls, database rows, or paid publishing access. Check those limits before users start signing up.
Can no-code apps make money?
Yes. No-code apps can make money through subscriptions, in-app purchases, paywalls, ads, and paid access.
For native in-app purchases and subscriptions, Apple and Google usually take 15-30%. Bilt Payments integrates with Apple and Google’s native IAP systems, and Bilt takes no additional revenue share.
Before submission, test the money flow on real devices:
- Purchases complete successfully.
- Subscriptions unlock the correct screens.
- Restore purchase works for returning users.
- Paywalls do not block content Apple or Google expects to be free.
Fix paywall issues before App Store review. A broken restore-purchase flow or mismatched entitlement can delay approval even when the rest of the app works.
Do I own my app if I build it on a no-code platform?
App ownership depends on the no-code platform's terms. You may own the app idea, content, branding, and customer data, while the platform controls the hosting and generated code. If the platform shuts down, changes pricing, or limits export, rebuilding elsewhere can mean starting from scratch.
Before choosing a platform, check 3 ownership terms:
- IP rights: Confirm that you own the generated app, assets, and compiled output.
- Source-code export: Verify whether you can download the code on your plan, not just preview or host the app.
- Data portability: Make sure user records, files, and database content can be exported separately from the app.
FlutterFlow lets users download source code and push projects to GitHub. Bilt generates React Native source code you can export anytime, push to GitHub, or hand to a developer.
Source-code export matters. Without it, leaving a platform means starting from scratch. Your code, your call.
Why is no-code becoming popular?
Low-code and no-code adoption has been rising for years because founders and business teams want to build without waiting on engineering queues. AI prompting pushed that further by cutting the time to a first working screen from weeks to minutes.
Adoption is coming from 3 groups:
- Founders: They use prompt-based tools to turn app ideas into working prototypes.
- Business teams: They build internal apps without waiting on engineering queues.
- Developers: They use no-code and backend services to skip repetitive setup work.
The growth does not mean every app can stay no-code forever. Complex logic, API integrations, debugging, and App Store submission can still require technical help or a platform built for mobile deployment.
Tool choice matters here. A prototype builder works for testing. When the goal is a published iOS or Android app, you need a platform built for that job, like Bilt.