A learner should be able to open a lesson, understand the task, and return later without losing their work. Teachers need to see what was completed and where someone needs help. Those everyday interactions are central to making an education app useful in a classroom.
You can build a native iOS and Android app with Bilt by describing the screens and behaviors you want, then asking for changes. Getting it ready for learners also means connecting accounts and saved progress, protecting student data, and testing on real phones.
The steps below take an education-app idea through building, testing, and publishing a classroom pilot. That pilot gives teachers and learners a chance to use the app, with their feedback guiding the next release.
1. Define the brief and build path
Write a one-page brief that names the first classroom outcome and what you need to deliver it.
Define the brief around one classroom outcome. For the first version, assigning a lesson should leave a saved result the teacher can review.
Start with clear roles:
- Teacher: Creates a class, assigns lessons, and reviews learner responses.
- Learner: Opens assigned work, completes activities, and receives feedback.
- School admin: Approves access, manages school-level settings, and handles data requests.
Keep the first journey narrower than the eventual product. Write its purpose in one sentence: “A teacher assigns one lesson, and each learner can complete it with progress saved.”
List only the data that journey needs:
- Identity and access: Role, class membership, and a school-approved learner identifier.
- Learning content: Module, lesson, activity, instructions, and expected response.
- Classroom activity: Assignment status, learner response, feedback, and completion record.
- Connectivity: A small offline cache for the active lesson, plus queued responses that sync when the connection returns.
Choose a native mobile build path that supports these requirements:
- iOS and Android from the same product plan
- role-based accounts and shared classroom records
- offline lesson access with safe resynchronization
- accessible interface components and exportable source code
The brief is ready when every proposed feature supports the lesson loop or a stated school requirement. Move everything else to a later release.
2. Design the learning model and content
Before you map screens, write the learning objective and the prior knowledge it assumes. Build each lesson so a teacher can see whether learners reached that objective.
Design backward from a learning objective that a teacher can observe. A workable first brief uses these defaults:
- Learners: Middle-school students in a teacher-led classroom.
- Scope: One subject and one short unit.
- Prior knowledge: The teacher selects a starting lesson based on work already covered in class.
- Success: The learner completes a short checkpoint tied to the lesson objective.
Build the content model from reusable records:
- A module groups lessons around one unit goal.
- A lesson has one objective, an explanation, and an example.
- A practice activity stores its prompt, response format, and feedback.
- A checkpoint records whether the learner met the objective.
Place practice directly after the concept it uses. Correct responses should confirm why the answer works; incorrect responses should give a useful hint and another attempt.
Keep each result linked to its learning objective. A teacher can then see where the class struggled, not just a list of scores.
Limit first-pass personalization to choices the teacher can explain and override:
- Assign a lesson to the whole class or selected learners.
- Allow extra practice without changing the objective.
- Store accessibility preferences separately from academic performance.
Every learner should still reach the same stated objective. Wait on more advanced adaptation until the core lesson model has been used in a classroom.
3. Map the classroom MVP
Map the teacher and learner workflows first, then keep the first version to the screens needed for one complete lesson loop.
Version 1 needs only the screens that carry one lesson from assignment to review.
Teacher surfaces
- Sign-in and class roster
- Lesson assignment
- Results view with completion status and learner responses
Learner surfaces
- Sign-in or class join
- Assigned lesson
- Practice and checkpoint
- Progress confirmation
Map the classroom workflow before adding secondary screens:
- The teacher creates a class and receives a join code.
- The learner joins with a school-approved identifier.
- The teacher assigns one lesson to the class.
- The learner opens the lesson, including from the offline cache when needed.
- The learner completes practice and the checkpoint.
- The app saves responses and completion status, then syncs queued work after reconnection.
- The learner receives the feedback attached to each response.
- The teacher reviews class progress and opens individual responses when follow-up is needed.
The first classroom use should stay narrow:
- One teacher and one class
- One complete lesson with practice and a checkpoint
- School-approved devices and accounts
- A defined route for help when a learner cannot join or resume work
Keep these out of the first build:
- adaptive tutoring
- parent portals and procurement workflows
- a multi-year content library
- school-wide messaging and leaderboards
- multi-school administration
The MVP is complete when the teacher can assign, the learner can finish, and the result returns to the teacher without manual data entry.
4. Set privacy and accessibility requirements
Figure out which privacy rules apply to the learners and schools you plan to serve. Put consent and accessibility in place before you collect student data.
Set privacy and accessibility requirements before defining account fields, analytics, or interface components. Use a conservative starting position for a classroom app:
- school-managed accounts for minors
- no behavioral advertising
- no sale of student data
- collection limited to what the lesson and teacher review require
Confirm which rules apply to the schools and learners you plan to serve:
| Rule | When to review it | What it changes |
|---|---|---|
| COPPA | The app is directed to children under 13 or knowingly collects their personal information. | Review the COPPA Rule before collecting data. |
| FERPA | A covered U.S. school provides or controls education records. | Use contracts and access controls that protect education records and keep the vendor under school control. |
| GDPR | Processing falls within GDPR territorial scope, including an EU establishment or offering services to or monitoring people in the EU. | Identify the lawful basis. For consent-based online services offered directly to children, Article 8 of the GDPR sets an age threshold of 13–16, depending on the member state. |
Prepare the policy and consent artifacts before classroom use:
- A data inventory that names each field, its purpose, and who can access it
- A privacy policy written for teachers and families
- A school agreement documenting the conditions of the School Official Exception, if that is the FERPA disclosure route being used
- A parental consent flow where applicable
- A retention schedule and process for access, correction, export, and deletion requests
Use WCAG 2.2 Level AA as the classroom interface baseline. The first five checks follow that baseline; the touch-target check uses platform guidance:
- Contrast: At least 4.5:1 for normal text and 3:1 for large text or interface controls.
- Text size: Content remains readable and usable when text is resized to 200%.
- Input: Every activity works with keyboard or switch access, with a visible focus state.
- Screen readers: Controls have meaningful names, roles, states, and reading order.
- Media: Provide transcripts for audio-only lessons and captions for prerecorded video with audio. Add audio description when necessary visual information is not conveyed in the soundtrack.
- Touch targets: Follow Apple accessibility guidance for 44×44-point targets and Android accessibility guidance for 48×48-dp targets.
Store shared classroom records on the server and encrypt device caches. Delete queued responses only after the server confirms receipt; keep lesson caches according to the retention policy.
If a learner signs out before syncing, protect the queued work from the next account and show how to finish syncing. Never silently discard unsynced responses.
Document four storage decisions for every student-data field:
- where it lives
- how long it remains
- which roles can access it
- how the school can export or delete it
5. Build the first native prototype
Describe one complete classroom path in plain English, then test and refine the native iOS and Android prototype it produces.
1. Start with one complete classroom path
Start with the classroom job, the people using it, and the smallest complete learning path. Tell Bilt what students and teachers should see, then name the screens and actions that make that path work.
Build a native classroom app for secondary students. Include lesson modules, flashcards, quizzes, and a progress screen with clear next steps.
Keep the first pass focused on that path. Accounts and saved learner progress come after the screens and interactions make sense together.
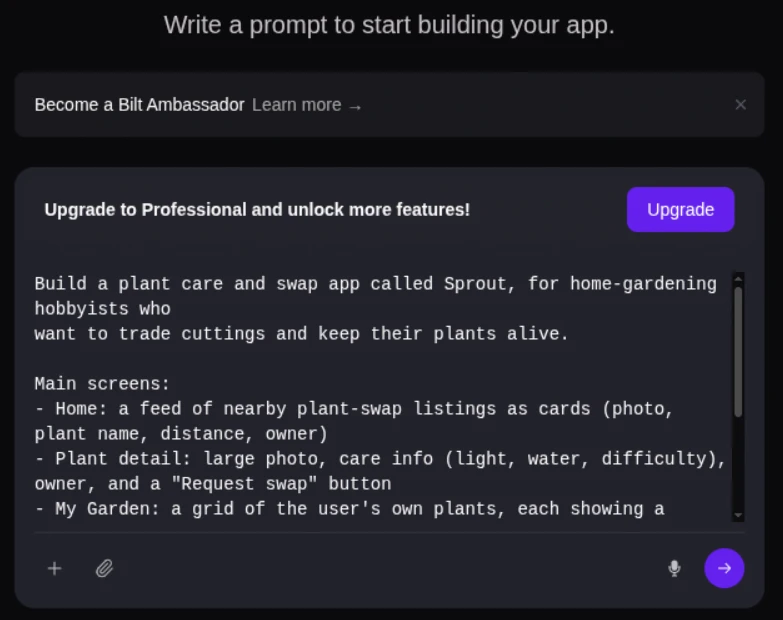
The first prompt defines the audience, learning flow, and core screens.
2. Let Bilt build, then inspect the path
Bilt turns the description into a React Native app you can refine through conversation. As each screen appears, check it against the classroom path.
A personal trainer's subscription fitness tracker was shippable after about 11 prompts over two hours.
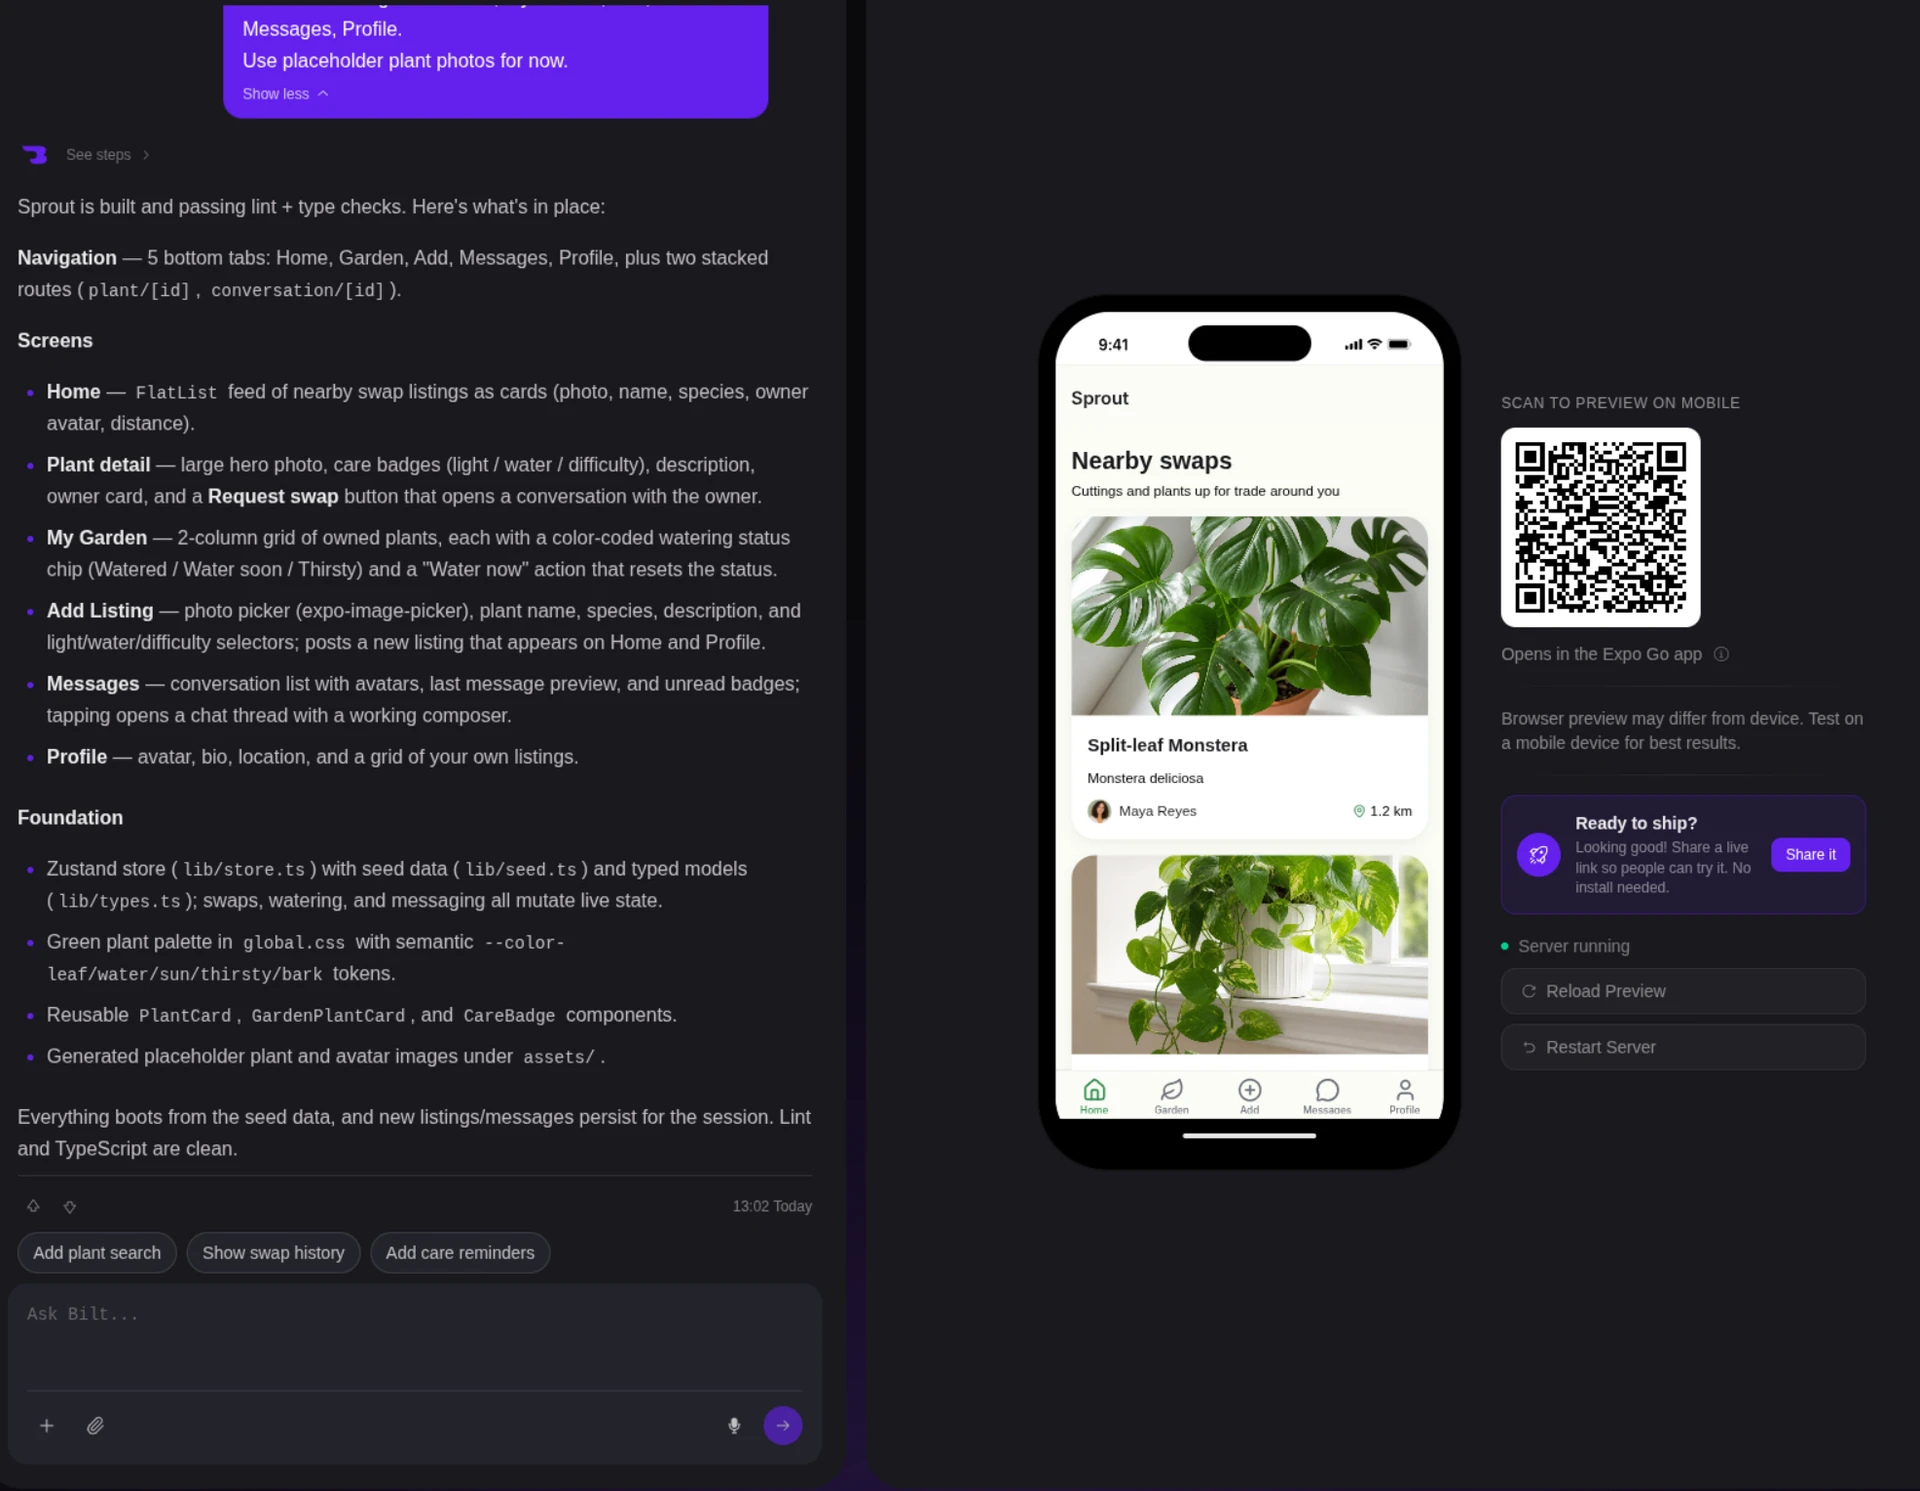
Checkpoint: Click through the lesson list, open a lesson, answer a quiz question, and confirm that the progress screen shows the expected state.
3. Keep the prototype native
Build this prototype as a React Native app for iOS and Android. Bilt generates the interface, navigation, and core logic as native code rather than placing a website inside a wrapper.
That structure gives the classroom MVP a foundation:
- Screens follow a mobile hierarchy.
- Navigation connects the learning path inside one project.
- The backend can attach to the same app in the next step.
- The React Native source remains exportable if a developer continues the work.
4. Stop at a functional classroom MVP
Finish the first pass when someone can complete the core learning path in the preview. A functional flow gives reviewers more to respond to than static mockups.
Prototype checkpoint
- The lesson list opens the correct lesson.
- Flashcards move forward and backward predictably.
- A quiz accepts an answer and returns the intended state.
- The progress screen reflects the sample activity.
Once this path is coherent, replace sample content and learner states with accounts, stored lessons, and private progress data.
6. Add accounts, content, and progress
Connect learner sign-in to course files and saved progress so students can leave a lesson and resume on another device.
1. Turn on the backend and sign-in
Connect identity before replacing sample learners with saved records. Choose a backend that supports separate teacher and learner roles.
- Define teacher and learner roles and the records each role needs to access.
- Connect the database and authentication service approved for the classroom.
- Choose a permitted sign-in method, such as passwordless email, Apple, or Google.
- passwordless email codes or magic links
- Apple sign-in on iOS
- Google sign-in on iOS and Android
Checkpoint: Create a teacher account and a learner account, then confirm that each role reaches the correct first screen in the browser preview.
2. Separate records, files, and secrets
Store structured learning data in a database and uploaded course material in private file storage. Each type of data then stays in the layer built for it.
- Courses and lessons: Keep titles, ordering, instructions, and content references in database tables.
- Enrollments and progress: Link each learner to a course, completed activity, and current position.
- Course files: Put PDFs in a storage bucket with an
application/pdfMIME filter. - Secrets: Keep API keys and service credentials on the server, outside the mobile app bundle.
Ask Bilt to create the tables and connect the existing lesson, quiz, and progress screens to them. Review the generated fields before importing classroom content.
3. Set row access before using learner data
Give each table explicit read and write rules before classroom data enters the app. Learners should access only their own progress; teachers should access only records for their assigned classes.
Define and enforce these rules on the server:
- Learners can read assigned lessons and submit their own responses.
- Learners cannot change teacher feedback, grades, or class membership.
- Teachers can assign lessons and review responses only for their assigned classes.
- Unauthenticated users cannot read classroom records or submit changes.
Put session handling and input sanitization in the acceptance criteria. Verify that service credentials stay on the server and outside the mobile app bundle.
Checkpoint: Sign in as two learners and one teacher, then confirm that learners cannot open each other's progress while the teacher sees only the assigned class.
7. Refine the classroom experience
Cut extra steps, make instructions clearer, and keep progress and playback from slowing the class down, until a live class can move without help.
1. Make one classroom change at a time
Send each classroom change as a focused follow-up. Bilt plans the edit, modifies the code, rebuilds the app, and refreshes the live preview inside the same conversation.
Use this loop:
- Name the role and current screen.
- Describe the new behavior in observable terms.
- Let Bilt rebuild and refresh the preview.
- Click through the affected path before sending the next request.
The conversation remains the working record, so a small flow change does not need a separate wireframe or development ticket.
2. Prompt the role, screen, and behavior
Say who needs the change, where it belongs, and what should happen. Bilt keeps the conversation history, so later prompts can build on earlier screen and style decisions.
For example:
- “Add a five-question quiz after each lesson and return the learner to the lesson summary when it is complete.”
- “Give teachers a class progress view with one row per learner and a link to completed lessons.”
- “Add a push-reminder setting to the learner profile.”
- “Show the teacher dashboard after teacher sign-in and the lesson list after learner sign-in.”
Review each result before combining it with another request. Small prompts make an unexpected change easier to isolate and correct.
3. Refine the moments that slow a lesson down
Target friction that appears between opening a lesson and completing it. Describe the result you want, then let Bilt update the interface and behavior together.
- Navigation: Keep one clear next action on lesson and quiz screens.
- Instructions: State the task before the input or answer choices appear.
- Progress: Show the current lesson, completed work, and next step in one view.
- Media: Keep playback controls and lesson context on the same screen to reduce extra taps.
After each change, repeat the original classroom path. A clearer screen still needs to lead to the correct saved state.
4. Review the refined flow with classroom owners
Share the browser preview with the teacher who will run the lesson and a colleague responsible for learner support. Give each reviewer one role and one path to inspect.
Ask them to confirm:
- The correct class and lesson are easy to find.
- Instructions make the expected action clear.
- Progress updates after the learner completes the activity.
- Teacher views respect the learner-data rules set in the previous step.
Turn each agreed change into one follow-up prompt, then freeze the classroom MVP once the path is clear enough for a structured pilot.
8. Plan adaptive AI tutoring
Plan adaptive tutoring now, but implement it only after teachers and learners validate the classroom MVP. Write down the skills, the learner signals, and the rules for changing hints or next items. The tutor should not replace the teacher.
After the pilot validates the MVP's basic lesson flow, add adaptive tutoring. Start with one skill or unit, then expand only after its tutoring rule works predictably.
Use a short build cycle for each change:
- Describe the learner decision the tutor should make.
- Build the smallest rule that can make it.
- Review the generated code and prompt.
- Test the result with representative lesson paths.
- Revise before adding another adaptive layer.
Collect only signals that will change feedback or select the next item.
- Attempts: Whether the learner answered correctly and how often they retried.
- Hint use: Which hint level they opened before answering.
- Time on task: How long they spent on the item or unit.
- Progress state: Which skill or lesson they completed.
For every signal, document the tutoring decision it supports, who can access it, and how long you need to keep it.
Turn those signals into a state diagram before building tutor screens. Map the full decision path:
- the starting state and each mastery state
- the hint ladder, including what changes at each level
- the rule for repeating, advancing, or changing an item
- the fallback when data is missing or the learner gets stuck
Implement data capture first, state changes second, and the learner-facing response last. Test each layer before connecting the next one.
Keep tutoring private and reviewable. Each recommendation should point back to the stored signals and the rule that produced it.
Before classroom use:
- review generated prompts, code, permissions, and data paths
- test expected answers, unexpected inputs, and missing-data fallbacks
- record which tutor version produced each test result
- assign an owner to approve rule changes and investigate failures
Treat every generated change as draft work. Review it, test it, and keep the release small enough to reverse.
9. Test with teachers and learners
Run live sessions with teachers and learners in the browser preview and on real iPhone and Android devices before a classroom pilot.
Each environment catches a different problem:
- Browser preview: Check learner and teacher paths after each change.
- iPhone: Test taps, scrolling, text size, and the complete lesson flow.
- Android: Check layouts, tap targets, saved progress, and reconnection behavior.
Move to physical iPhone and Android devices once the classroom flow works in the browser.
- Quick device preview: Use a supported preview method for interaction checks and basic device feel.
- Native build: Use TestFlight or a development build for push notifications, in-app purchases, deep links, and custom native modules.
Give each teacher a preview link instead of project access. Use sample learner records; a shared link is not a substitute for account permissions.
Before sending the link:
- Confirm that the preview contains no real student data.
- Ask one reviewer to confirm that the link opens correctly.
- Confirm that opening the link does not grant project-editing access.
Ask each tester to complete a named learner or teacher task without coaching. Log the first point where the expected flow becomes unclear or stops working.
Use one compact record:
- Task and role: State what the learner or teacher tried to finish.
- Device: Record browser, iPhone, or Android, plus screen size and orientation.
- Break point: Note the exact screen, tap, answer, or loading step that failed.
- Access: Check text scaling, keyboard use, screen-reader labels, and crowded layouts.
- Outcome: Mark whether the task was completed, abandoned, or finished with teacher help.
10. Choose pricing and procurement
Choose a commercial model that matches when learners receive value, then design how the person or school will pay.
Choose the commercial model that matches when the learner receives value.
| Model | Fits this content pattern | Buying route to design |
|---|---|---|
| Subscription | Ongoing lessons, practice, or classroom use | Recurring individual or organization billing |
| Freemium | Free core access with a paid expansion | In-app upgrade or web checkout |
| Per course or lesson | A defined unit with a clear endpoint | One-time purchase |
| Institutional license | School, university, or employer access | Quote, contract, or approved purchase route |
Write down why the chosen model fits the learning rhythm. That reason should guide packaging before you set a price.
For school or university sales, document the purchase route before inviting a classroom into the pilot.
- Teacher card: Set the spending limit, receipt process, and renewal owner.
- Purchase order: Identify the vendor forms, approver, invoice terms, and lead time.
- RFP or contract: List the required review steps and the person responsible for each response.
- Platform package: Decide whether buyers receive the standard app or paid template customization.
Use the route your target buyer already follows. A checkout page cannot replace an approval process.
Pricing is ready when a buyer can see the amount, understand what it includes, and complete the purchase through a defined route.
Confirm these points before reviewer access and the classroom pilot:
- a published individual price or a documented institutional quote
- the billing period, included access, renewal terms, and cancellation process
- whether the pilot is free, discounted, or charged at list price
- the person who can approve the purchase and the steps they must follow
11. Prepare store and reviewer access
Open the paid developer account for each store you plan to use. Create the store records, complete the listing and privacy answers, and give reviewers a working demo login if the app is gated.
Bilt can carry the native build toward publication once the store records and identifiers are ready. You still own the developer accounts and review submissions.
Store setup checklist:
- Apple: Create the App Store Connect record with the app name, bundle ID, and SKU.
- Google Play: Set the package name, service-account key, and Android upload key.
- Both stores: Freeze the identifiers before building because signing and store records must match them.
You own the listing and policy answers because they must describe how the finished app handles learner data. Complete these items before upload:
- App icon, screenshots, descriptions, support URL, and public privacy-policy URL.
- Apple App Privacy and Google Data safety answers that match the app’s SDKs and data flows.
- Age ratings and target-audience declarations, including Apple Kids Category or Google Families requirements when applicable.
- Required parental gates and permitted advertising or analytics SDKs for child-directed apps.
- Encryption and export-compliance answers, plus in-app account deletion under Apple and Google Play rules when users can create accounts.
Reviewers need a working route through every gated learner and teacher feature. Prepare that route before submitting the build.
- Create a demo account that works independently of a school roster or institutional sign-on.
- Preload one completed lesson and one unfinished learner attempt so progress screens are visible.
- List the exact taps reviewers should follow to reach gated learner and teacher screens.
- Retest the credentials before submission and name the person who will answer review questions.
On iOS, show App Tracking Transparency before any SDK tracks a user across apps or websites. Run TestFlight and Google Play internal testing before requesting production review.
What Bilt handles: Bilt generates and signs the build and automates submission to App Store Connect and Google Play Console. You provide accurate listing and privacy information and answer reviewer questions.
On Google Play: Prepare an Android App Bundle for the internal testing track. Confirm the upload and tester access in Play Console before requesting production review.
Leave time to answer reviewer questions or make a corrected build. Store review timing depends on the submission and any issues the reviewer finds.
Release proof: Mo-Haven was built solo with Bilt and is live on the App Store.
A non-technical founder also shipped with Bilt after two rebuilds and six App Store rejections with other tools.
12. Publish a classroom pilot
Release the reviewed build to a small teacher-and-class cohort with one lesson loop, consent in place, and a written note of what finished looks like. Then collect completion and friction notes before a wider rollout.
Pilot setup: Name one teacher, one class, the approved devices and accounts, and the person responsible for support. Confirm consent, privacy review, reviewer access, and the complete lesson loop before release.
Give each participant one teacher or learner task to complete without coaching. Test on physical devices and record the first point where the expected path becomes unclear, fails, or requires help.
Use one compact pilot record:
- Completion: Whether the assigned lesson and checkpoint were finished.
- Friction: The screen, tap, instruction, or loading step that caused trouble.
- Access and data: Whether permissions, saved progress, and consent behaved as expected.
- Owner and next action: Who will fix or investigate each confirmed issue.
End the pilot with one decision: fix blocking issues and repeat it, continue at the same scope, pause, or expand to another class.
13. Measure learning and ship updates
Watch completion, crashes, and teacher feedback, then cut a new build, retest, and resubmit so each release changes something you can measure about learning.
Completion data tells you where learners stop. Assessment results and session notes explain whether the app supported the intended learning objective.
Track four signal groups:
- Learning: Lesson completion, assessment accuracy, and progress toward the objective.
- Use: Starts, completions, screen-level drop-off, and repeat sessions.
- Reliability: Crashes, failed sign-ins, slow loads, and interrupted submissions.
- Feedback: Teacher observations, learner comments, workarounds, and support requests.
Pull quantitative signals from your app analytics, App Store Connect, and Play Console. Pair them with teacher and learner notes from the same release.
Turn each confirmed issue into one narrow Bilt prompt. Bilt keeps the project’s conversation context and updates the live preview as the app rebuilds.
Use this feedback loop:
- Capture the exact task, device, expected result, and observed result.
- Prioritize issues that block learning, access, sign-in, or saved progress.
- Ask for one change and state the behavior you expect after it.
- Review the browser output, then repeat the original test on a physical phone.
- If a build problem persists, ask Bilt support for help through Discord.
An approved fix still needs a new cloud build, device testing, and another store submission. Treat every update as a release, even when the prompted change looks small.
Release checklist:
- Freeze the exact change and write its version note.
- Generate the signed iOS cloud build and Android .aab.
- Put iOS in TestFlight and Android on the internal testing track.
- Retest the learner and teacher paths, plus the native capability the change touched.
- Submit the update, answer reviewer questions, and monitor the released version.
Bilt turns prompt changes into the next build and automates store submission. You still test each release and check that its listing and privacy answers remain accurate.
14. Plan annual operating costs
Build the annual budget with a separate line for every recurring cost. Stress-test the total at current, 2×, and 5× usage.
Budget for the Apple Developer Program at $99 per year and the Google Play Console at $25 once. Add distribution fees only when your chosen route requires them.
Model usage-based backend cost from the vendor's billing units, then run current, 2×, and 5× engagement cases.
Enter the monthly volume and unit rate for each billed category:
- active learner usage
- API requests
- database reads, writes, and storage
- media storage and delivery
Annual backend estimate: Add each monthly volume multiplied by its rate, then multiply the monthly total by 12.
Maintenance belongs on the sheet as staff time, contracted work, and the tools used to detect problems.
Estimate monthly hours for:
- teacher and learner support tickets
- error monitoring and incident response
- iOS, Android, and device-specific fixes
- API, library, and platform updates
- regression testing before each release
Annual maintenance labor: Multiply monthly hours by the loaded hourly rate, then multiply by 12. Name an owner for every line, even when the work is outsourced.
Add the education-specific costs that recur for your content and market:
- curriculum review and lesson refreshes
- third-party content or assessment licenses
- teacher onboarding and support materials
- required privacy and accessibility reviews
Annual operating total: Recurring fixed fees, plus 12 months of modeled usage, maintenance labor, and education-specific renewals. Keep one-time registration and setup costs in a separate column.
Education app mistakes to avoid
The most damaging mistake is launching a classroom app without a clear safety and recovery checklist.
Verify authorization separately from sign-in, review every AI-generated change, and turn on error logging before the pilot.
- Test that each signed-in role can reach only its assigned records and actions.
- Search the codebase for hardcoded credentials and deprecated libraries.
- Review generated tutor logic, data queries, and permission changes before merging them.
- Confirm that failed requests and blank-screen errors create an event the team can investigate.
Repeat these checks after changes to accounts, roles, data storage, or AI features.
Test the load you expect during the pilot, using the devices, connections, and simultaneous activity in your own plan.
Before launch:
- run load and slow-network tests at the planned pilot volume
- confirm that saved backend data appears correctly in the classroom interface
- assign owners for monitoring, support, and recovery
- complete the required procurement, privacy review, and teacher onboarding work
Name a launch owner for every open item, and give them a way to verify it is done before classroom access begins.
Build your classroom app with Bilt
Bring the brief you have now and start building free. You can shape a first version in the live preview before deciding how far to take your classroom app.
FAQs
How much does it cost to build an education app?
Education app cost depends on whether you are building a focused prototype, a classroom pilot, or a public product with accounts, integrations, and compliance work.
Start with the smallest complete learning loop, then price the backend, testing, and compliance work it requires.
Store release also requires the $99-per-year Apple Developer Program and the $25 one-time Google Play Console when publishing to both platforms.
How long does it take to make an education app?
Timing depends on whether you mean a working prototype, a classroom pilot, store submission, or a public release.
A recorded Bilt build produced a shippable fitness tracker after about 11 prompts over two hours. An education app can take longer when accounts, permissions, classroom testing, or store review enter the scope.
Do I need to know how to code?
No. You do not need to write code to build an education app. Natural-language and no-code tools generate the software from a description of what it should do.
Specify the learning flow clearly instead of writing code. You still need to test progress tracking and confirm that teacher and learner permissions work as intended.
What makes an education app actually successful?
A successful education app helps learners complete the intended task and gives teachers evidence that the learning objective was met.
The educational app research points to active, focused learning with meaningful real-world connections. Add social interaction only when it supports the lesson, then test whether learners can complete the intended task.