A working web app is only the starting point. The mobile version must feel right on a phone, keep account data intact, and meet app-store requirements.
A mobile app earns its place when it adds something the web tab cannot: push notifications, offline access, or App Store and Google Play distribution.
First, choose the right route. This 14-step guide then covers conversion, testing, store submission, acquisition, onboarding, and maintenance.
1. Assess readiness and choose a route
List what the mobile app must do, then pick a PWA, WebView wrapper, or native conversion based on those requirements. Bilt can publish an installable PWA or build native iOS and Android releases for the Apple App Store and Google Play.
Choose native conversion when retention, device APIs, durable offline storage, or app-store distribution matters. A PWA is the leaner route for browser-first products that mainly deliver content.
- Stay with a PWA when browser installation covers the full use case and the product is mainly content-focused.
- Use a WebView wrapper when the site already works well on phones and the shell adds meaningful native behavior.
- Convert to native when store distribution, device APIs, performance, or dependable offline behavior is central.
- Build manually when your engineering team needs full control over the architecture and can maintain both platforms.
Native conversion is the safer default for a high-utility mobile product. Home-screen presence alone is not enough; the route must also support the product’s daily workflows.
For the AI-assisted route, Bilt can use an existing GitHub repository as context to build a separate native React Native app for iOS and Android, rather than a WebView wrapper.
- Device APIs: Push notifications, biometric authentication, Bluetooth, and background location require deeper platform integration.
- Offline state: A durable local database and controlled synchronization are safer than relying on browser cache eviction policies.
- Store distribution: Native binaries support direct App Store and Google Play distribution, including each store’s review process.
- Repeat use: Faster startup and mobile-specific interactions matter when retention depends on frequent sessions.
A WebView wrapper can work when the website is already mobile-ready and the wrapper adds meaningful mobile behavior. Packaging the URL alone preserves the web app’s constraints.
Agency or developer work can cost $30,000-$100,000+, depending on scope. Request a written quote based on your app’s actual requirements.
Treat that range as a planning estimate, not a project quote. Custom native modules, migration work, and regulated data still need a scoped plan.
Use this final check before committing to a route:
- Native conversion: Choose it for direct store distribution, in-app purchases, device APIs, durable offline records, or fast repeat use.
- PWA: Choose it when browser installation is enough and the product is primarily content-focused.
- WebView wrapper: Choose it only when the experience can remain web-based and the shell adds enough native value for store review.
- Manual build: Choose it when your team needs architectural control and has the engineering capacity to maintain it.
Which AI builders for native apps match the needed output, code ownership, and store support?
2. Implement the PWA path
A PWA lets users install your website from their browser. Bilt can add the PWA setup, build and upload the app, then host it over HTTPS at a permanent web.bilt.me address. Set up its name and icons, offline files, and secure hosting.
A PWA needs a linked web app manifest that defines its identity, launch URL, colors, display mode, and icons. Start with a file such as /manifest.webmanifest:
{
  "name": "Acme Field Notes",
  "short_name": "Field Notes",
  "start_url": "/",
  "scope": "/",
  "display": "standalone",
  "theme_color": "#111827",
  "background_color": "#ffffff",
  "icons": [
    {
      "src": "/icons/icon-192.png",
      "sizes": "192x192",
      "type": "image/png",
      "purpose": "any maskable"
    },
    {
      "src": "/icons/icon-512.png",
      "sizes": "512x512",
      "type": "image/png",
      "purpose": "any maskable"
    }
  ]
}
Link the manifest from every installable page:
<link rel="manifest" href="/manifest.webmanifest">
<meta name="theme-color" content="#111827">
display: "standalone" removes normal browser chrome after installation. Keep the start_url inside the service worker’s scope so the installed app can load its shell offline.
Register the service worker from the main application after the page loads:
if ("serviceWorker" in navigator) {
  window.addEventListener("load", () => {
    navigator.serviceWorker.register("/service-worker.js", { scope: "/" });
  });
}
The worker below precaches an application shell, removes old caches during activation, and selects a strategy by request type:
const CACHE = "field-notes-v1";
const APP_SHELL = ["/", "/styles.css", "/app.js", "/offline.html"];

self.addEventListener("install", event => {
  event.waitUntil(caches.open(CACHE).then(cache => cache.addAll(APP_SHELL)));
  self.skipWaiting();
});

self.addEventListener("activate", event => {
  event.waitUntil(
    caches.keys().then(keys =>
      Promise.all(keys.filter(key => key !== CACHE).map(key => caches.delete(key)))
    )
  );
  self.clients.claim();
});

self.addEventListener("fetch", event => {
  if (event.request.method !== "GET") return;

  if (event.request.mode === "navigate") {
    event.respondWith(networkFirst(event.request));
    return;
  }

  const staticAsset = ["style", "script", "image", "font"]
    .includes(event.request.destination);

  if (staticAsset) event.respondWith(cacheFirst(event.request));
});

async function cacheFirst(request) {
  const cached = await caches.match(request);
  if (cached) return cached;

  const response = await fetch(request);
  const cache = await caches.open(CACHE);
  if (response.ok) cache.put(request, response.clone());
  return response;
}

async function networkFirst(request) {
  const cache = await caches.open(CACHE);
  try {
    const response = await fetch(request);
    if (response.ok) cache.put(request, response.clone());
    return response;
  } catch {
    return (await cache.match(request)) || (await cache.match("/offline.html"));
  }
}
Treat this as a starting point, not production-ready offline code. Cache only successful responses, handle cross-origin and opaque responses deliberately, and do not cache authenticated or user-specific API data by default.
Deploy the PWA over HTTPS; localhost is the development exception. Before release, verify the complete installability path:
- The manifest URL returns successfully and uses the correct content type.
- The 192x192 and 512x512 icon URLs load without redirects or errors.
- The service worker controls the manifest’s
start_urland scope. - A clean browser profile can load the app shell after the network is disconnected.
- Cache version changes remove obsolete assets during activation.
PWA limitations
Browser installation is not the same as publishing a native app-store build:
- A PWA has no direct Apple App Store or Google Play listing. Reaching a store requires a separate packaging or native route.
- Background execution and device-specific APIs are more constrained, particularly on iOS.
- Browser-managed storage can be evicted, so Cache Storage should not be treated as a durable offline database.
Choose native conversion when any limitation blocks a core user workflow. Keep the PWA route for products that can deliver their full value inside the browser.
3. Plan web-to-app acquisition
Send web visitors to the app without losing their place: the prompt, store listing, and first screen should match the page they came from.
Start with the page where the visitor sees the prompt, then preserve that page's intent through installation. The first open should continue the same task instead of dropping the visitor on a generic home screen.
- Show the right prompt. Use a Smart App Banner on Safari or an Android intent banner for a standard install path. Add custom banners to high-intent pages such as checkout or profile management.
- Create a deferred deep link. Store a safe destination and campaign source, then route new users through the correct store. Restoring that destination requires platform-specific link handling on iOS and Android.
- Match the store listing. Keep the listing copy aligned with the page that triggered the prompt. A checkout visitor should land on a listing that explains the mobile checkout benefit.
- Restore context on first open. Open the intended screen and preserve any safe, non-sensitive state. Ask the visitor to sign in before displaying account data or completing a protected action.
For example, a visitor who taps an install banner on a pricing page can return to that plan after installation when the link service and first-open routing preserve the destination. Track every handoff separately.
| Funnel stage | Event to record | Conversion rate |
|---|---|---|
| Banner click | Prompt clicked | Clicks ÷ prompt views |
| Listing view | Store page opened | Views ÷ banner clicks |
| Install | App installed | Installs ÷ listing views |
| First open | App launched | First opens ÷ installs |
| Onboarding completion | Setup finished | Completions ÷ first opens |
A large drop between listing view and install points to the store page. A drop after first open points to authentication, context restoration, or onboarding.
4. Design launch onboarding
Launch onboarding should get returning users into the app with their account intact, then teach mobile controls when they need them.
Keep the first run focused on account access, migration confirmation, and one useful next action. Introduce mobile controls only when the user reaches the relevant screen.
Use this launch checklist:
- Preserve authentication safely. Use OAuth with PKCE, a one-time token exchange, Universal Links, Android App Links, or a short-lived magic link. Never copy browser cookies, access tokens, or local storage into the app.
- Provide a fallback. Keep standard sign-in and account recovery available when session transfer or a magic link fails.
- Confirm the migration. State which account data synced before the user enters the main app.
- Teach gestures in context. Explain swipe navigation, bottom sheets, or pull-to-refresh when the relevant control first appears.
- Time permission prompts. Request notifications after the user enables an alert, and request biometrics when the user chooses faster sign-in.
- Resume interrupted setup. Save the last completed onboarding step so a dropped connection does not force a restart.
For example, a project-management app can confirm that a member's saved work and settings are ready before showing the dashboard:
Your account is ready on mobile. Your saved work, preferences, and plan came from the shared backend. Changes made on either client use the same account and APIs.
Treat the full checklist as a launch rehearsal in TestFlight or Google Play Beta. Test passwordless sign-in, account recovery, permission denial, and relaunch after an interrupted step.
Repeat the beta flow on slow and intermittent connections. The app should keep completed steps, explain pending sync clearly, and recover without duplicate records or a blank screen.
5. Connect the source repository
Connect the web repository so Bilt can inspect it while building a separate mobile project.
Before opening the connection settings, prepare the repository and account access.
- Create a Bilt mobile workspace for the new app.
- Sign in to GitHub with access to the source repository.
- Keep the current web application in a remote repository.
Then connect the repository:
- Connect your GitHub account to Bilt.
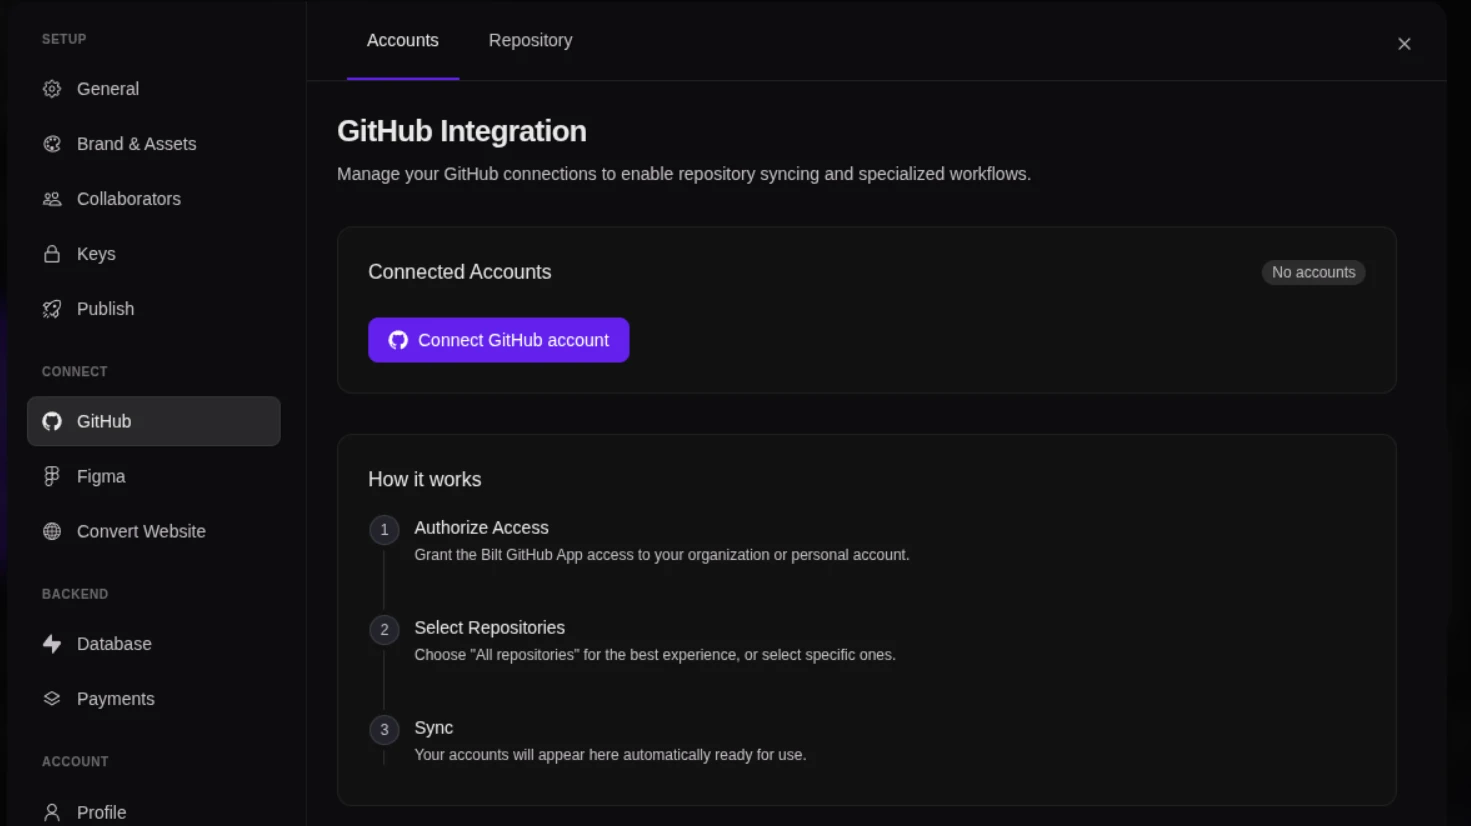
Bilt — The GitHub Accounts tab with the Connect GitHub account button (Bilt docs: Connect GitHub › Step 2: Connect a GitHub account) - Grant the Bilt GitHub App access to the specific web repository.
- Open Settings → Convert Website, then select the GitHub account and repository.
- Click Connect repository.
Each Bilt session gets an isolated copy of the repository for comparison. Bilt can read the selected source files, but it does not need you to copy them into the mobile project.
Web App Sync keeps the source web repository as a read-only reference, so Bilt never pushes mobile changes back to it.
For the mobile project, connect GitHub and click Sync to GitHub. That repository then stays in two-way sync, with Resync to GitHub available for a manual push.
6. Map reusable code and dependencies
Sort the web code into four buckets: preserve, adapt, replace, or omit.
Apply each decision to one dependency, component, or integration at a time:
- Preserve platform-neutral validation, calculations, and business rules.
- Adapt API and authentication clients that depend on browser transport or storage.
- Replace DOM components, hover controls, and browser-rendered interfaces with native components.
- Omit browser-only analytics, extension APIs, or features with no mobile role.
Treat each backend integration, component, and dependency as a separate decision. Packages that require the DOM, Node-only modules, and framework-specific browser APIs usually need an alternative. For a step-by-step migration plan for an existing Next.js product, see our guide to Next.js to React Native.
The result is a separate, standard React Native project. Sync it to its own GitHub repository, export the codebase, or clone it for local development.
7. Port screens, logic, and data
Port one complete user task at a time, rebuilding its screens for mobile while keeping its existing account and backend connections.
Start with one complete user task, such as sign-in through dashboard access. Port every screen in that path before opening another flow.
- Map the screen. Record what the view displays and which action moves the user forward. Rebuild the interface with native components and mobile navigation.
- Reconnect authentication. Port sign-in and account recovery, then test session expiry and token refresh against the existing backend.
- Reconnect APIs. Use the existing endpoints. Handle each request's loading and error paths before marking the screen complete.
- Assign state ownership. Keep transient UI state local, such as the selected tab. Store account data and shared records on the server.
- Check behavioral parity. Run the same task on web and mobile, then compare its result, loading state, and failure handling. The mobile screen can use a different layout.
For a project-management app, finish sign-in, dashboard loading, saved work, and token refresh as one flow. Bilt can compare that behavior with the web source while it rebuilds the screens for mobile.
8. Adapt the mobile experience
Turn desktop layouts into touch-first screens with a clear reading order and familiar mobile navigation.
Start by deciding what users need to see and do first. A desktop dashboard can spread filters and actions across a page; a phone cannot.
- Top navigation menu: Use bottom tabs or a compact header.
- Multi-column grid: Reorder the content into a single-column list or clear sections.
- Dropdown or popup: Use a bottom sheet or a dedicated selection screen.
- Hover-only control: Make the control visible and add tap feedback.
- Contextual action menu: Use an inline action or overflow menu.
Use tap for primary actions. Keep swipe shortcuts discoverable through visible controls, preserve a logical reading order, and make every action usable with a screen reader.
Bilt supports iterative refinement through natural-language prompts after the initial app generation. You can adjust screen styling, colors, component placement, and behavior without manually editing code.
Existing mobile designs can be imported through Bilt's Figma plugin, then selected frames can be attached to prompts as design context.
Prompt one change at a time: “On Search Results, replace the filter row with a bottom sheet and keep Apply visible.” Check navigation, loading, errors, and accessibility in the native preview before the next prompt.
9. Add native and offline behavior
Native controls and offline support make a converted app dependable when the connection or device state changes.
Build native behavior around real phone tasks, from alerting users to signing in securely.
- Push notifications: Ask after the user enables alerts or opens a feature that needs them. If permission is denied, leave the app usable and provide a route to system settings.
- Biometrics: Let users turn on Face ID or fingerprint sign-in after a normal login. Keep password or passcode sign-in available when biometric checks fail.
- Camera: Ask only when document capture or QR scanning begins. File upload or manual entry keeps the workflow available without camera access.
- Location: A location-based action is the right time to prompt. Let users search or place a pin when GPS is denied or inaccurate.
Never request every permission at launch. A prompt tied to a visible action gives the user enough context to make a decision.
Replace browser-shaped interactions with native controls wherever the mobile action has a familiar device pattern.
- Use bottom sheets for short choices that should preserve the underlying screen.
- Use overlay modals for focused input that must be completed or dismissed before returning.
- Add pull-to-refresh to feeds and account screens. Keep the current content visible and show an inline retry when refresh fails.
- Use native date and time pickers instead of generic HTML dropdowns, which are harder to operate on a small screen.
Keep the control state explicit. Show why an action is unavailable, indicate loading, and confirm when a save finishes so users know what happened after a tap.
Build offline support in stages so the app remains predictable before it starts accepting disconnected changes.
- Cache read-only data. Store static catalogs, recent records, and the current profile on-device. When the network drops, show the saved copy with a clear offline status.
- Add local drafts. Save form input and unfinished work before submission. Keep a visible pending state so the user knows which changes have not reached the server.
- Queue writes for synchronization. Send pending changes when connectivity returns, and keep the UI bound to local data so a disconnect does not blank the screen.
- Resolve conflicts by record type. Let the server win for shared records, keep unsent drafts on the phone, and ask the user when both versions changed. Give queued writes unique IDs so retries cannot create duplicates.
If synchronization keeps failing, retain the local copy, show which item needs attention, and offer retry or review. Design offline behavior per workflow rather than switching it on for every screen.
10. Optimize mobile performance
A mobile app feels fast when its first screen loads promptly and every interaction responds without delay.
Trim startup work until the first usable screen can appear without waiting on code or assets for later screens.
Startup priorities:
- Profile cold start on a physical device before changing the bundle.
- Remove unused JavaScript and inspect Metro bundle growth between releases.
- Compress and cache images, subset fonts, and avoid decoding large assets on the main thread.
- Defer analytics and data for secondary screens until the first screen is interactive.
- Check Hermes startup and memory behavior when the project uses Hermes.
Load the first screen's data separately from optional content. A slow recommendation panel should not hold the login or home screen open.
Smooth scrolling depends on limiting mounted work and acknowledging every tap before a request returns.
- Replace unbounded tables and repeating groups with virtualized lists that render only the visible window and a small buffer.
- Keep row identifiers stable so list updates do not rebuild unchanged items.
- Move sorting, filtering, and image decoding away from the immediate render path.
- Replace hover-dependent behavior with press handlers that show a pressed or loading state before any network response returns.
- Prevent duplicate submissions while an action is pending, but leave navigation and cancellation available.
When scrolling degrades as a feed grows, inspect mounted rows and image memory first. When taps feel delayed, inspect the handler before blaming the network.
Let the visible symptom choose the first performance check:
- Slow cold start: Profile startup work, deferred code, fonts, and image decoding on a physical device.
- Scrolling gets worse: Inspect mounted rows, list virtualization, image memory, and main-thread work.
- A tap feels unresponsive: Show a pressed or loading state immediately, then inspect the handler.
- A screen keeps refetching: Check the request log, cache policy, and repeated authentication calls.
Network checks:
- Cache stable data locally and refresh it in the background.
- Combine related reads or writes when the API supports a single request.
- Paginate large collections instead of downloading the full dataset.
- Perform lightweight filtering on-device when the required records are already cached.
- Keep cached content visible when refresh fails, then provide a retry without discarding the current screen.
Fewer requests mean less waiting and battery use. Start with duplicate requests and repeated authentication calls because both can delay every screen that depends on them.
11. Review compliance and accessibility
Before store review, check the app’s data practices and permission flows. Then verify that people can use it with assistive technology.
Release gate: Match every disclosure to the shipped app, including third-party SDK behavior.
Privacy and account rights
- Publish a working privacy policy URL, link it inside the app, and check the release against Apple’s App Review Guidelines.
- Complete Apple’s app privacy details and Google Play’s Data safety form from the shipped SDK configuration.
- Provide the required account-deletion routes, including Google Play’s in-app and web request paths, when users can create accounts.
- Document consent, access, correction, deletion, and retention under the laws that apply to the business. This checklist does not by itself establish GDPR or CCPA compliance.
Run security checks against the production build and backend configuration, rather than relying on development settings.
- Scan the client binary for API keys, environment credentials, and hardcoded secrets.
- Verify token storage, session expiration, sign-out, and revocation behavior.
- Apply request throttling and validate input before data reaches the backend.
- Confirm database rules restrict each account to the rows and files it should access.
- Review generated code for deprecated dependencies and logic flaws that automated scans miss.
Request each native permission when the person uses the related feature. A camera prompt belongs after tapping Scan or Take photo, not during launch.
Check the permission flow for:
- Camera, microphone, and location requests with clear purpose text.
- Denied and limited-access states, including a route to system settings when access is required.
- Show Apple’s App Tracking Transparency prompt before enabling cross-app tracking or accessing IDFA.
Build tooling can handle compilation, signing, certificates, and uploads. You still own policy URLs, legal declarations, consent choices, store questionnaires, and reviewer responses, as detailed in the release step.
Test accessibility with VoiceOver on iOS and TalkBack on Android before submission.
Accessibility gate
- Give every control an accessible name, role, state, and logical focus position.
- Keep touch targets at least 44 × 44 points on iOS, per Apple’s Human Interface Guidelines, and 48 × 48 dp on Android, per Material Design.
- Support dynamic text scaling without clipped labels, hidden buttons, or blocked scrolling.
- Meet WCAG’s 4.5:1 minimum contrast for standard text, and never rely on color alone to communicate status.
- Complete core flows with a screen reader, keyboard or switch input, and enlarged text.
12. Test devices and failure states
Test on emulators and physical devices before submission. Real-device testing exposes failures a clean demo can hide.
Use each environment for the failures it can expose:
- Simulator or cloud preview: Check screen sizes, rotation, validation messages, loading states, and navigation.
- Physical device: Check touch response, notification delivery, biometrics, camera access, backgrounding, and recovery after losing connectivity.
Use staging accounts and a separate staging database for destructive tests. Test purchases, deletion, and sync conflicts must never write to production data.
Native preview
- Bilt preview: Inspect native screens, navigation, validation, and loading states in Bilt’s integrated simulator without setting up a local mobile toolchain.
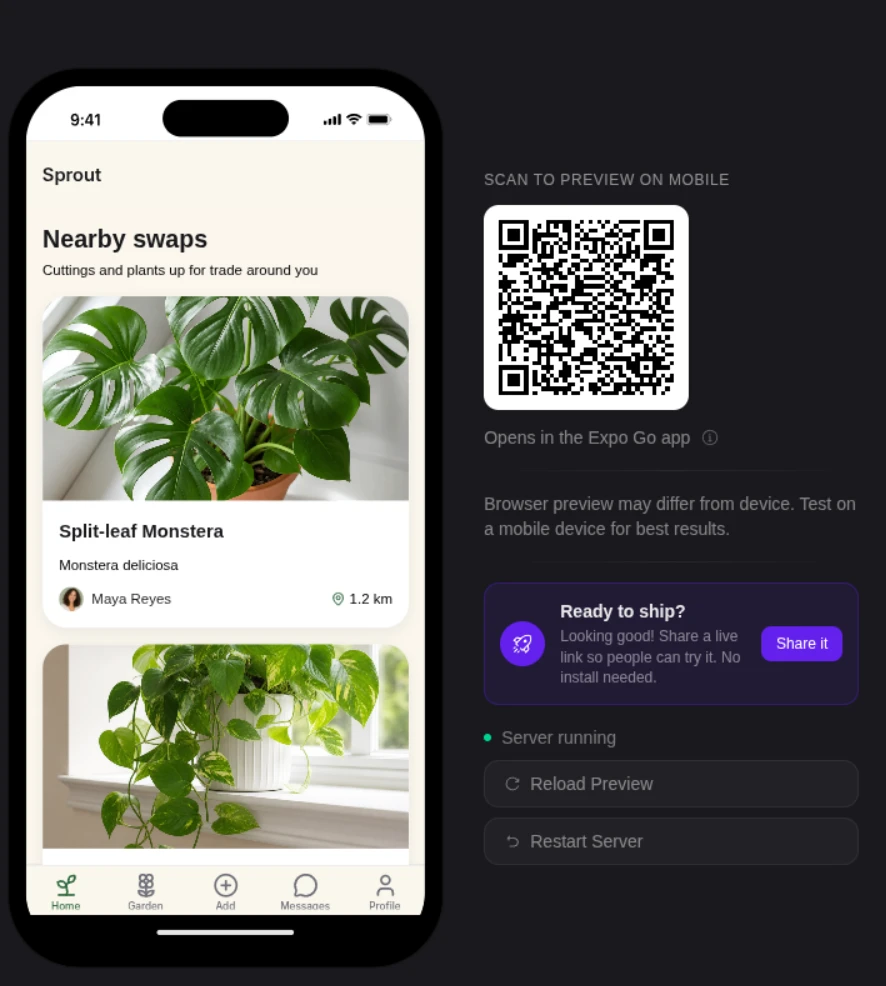
Bilt — The preview panel: phone frame, Expo Go QR code, server status, and Reload Preview / Restart Server buttons (Bilt docs: Live Preview) - Physical device: Confirm notifications, biometrics, camera behavior, background recovery, and real-world performance on supported phones. Scan the Expo Go QR code for quick testing on iPhone or Android, or use Test on iPhone for a real native binary with full APIs when a Mac and Xcode are available.
Run every supported platform through the same staging checklist, including small and large screens plus older and current supported OS versions.
- Login: Check validation and error copy in preview, then confirm session persistence after a physical-device restart.
- Payments: Test paywall and cancellation paths, sandbox purchases, restoration, and interrupted checkout. In Bilt previews and development builds, test mock purchases, restores, and entitlement gating without a sandbox account or real charge. Real StoreKit purchases require TestFlight or another native build and do not work in Expo Go.
- Offline recovery: Use airplane mode, reconnect, and confirm queued work syncs once without duplication.
- Notifications: Test routing while the app is open, backgrounded, and terminated.
- Biometrics and camera: Test fallback, denial, cancellation, capture, retake, and return from system settings.
- Deep links: Open links from email, browser, and notifications.
- Device pressure: Test low storage, background termination, and interrupted updates.
- Staging data: Confirm purchases, deletion, and conflict tests make zero production writes.
13. Build and submit the apps
For the Bilt route, Bilt builds and signs both releases, uploads the iOS build to App Store Connect, and sends Android builds to internal testing when Play publishing is ready.
The first .aab may need a manual Play Console upload. You submit each release for store review.
Creating release files manually means compiling the app, applying the correct signing identity, and matching each package to its store record. Certificate or provisioning errors can stop the release before upload.
Bilt compiles the repository and signs each binary in managed cloud tooling.
You register the Apple bundle ID and App Store Connect app, create the Admin API key, choose the Android package name, and create and authorize the Google service account.
Bilt’s benchmark for a first native build is about two minutes. Repository condition and asset readiness affect build time; product review, testing, and store review sit outside that benchmark.
Bilt handles:
- Cloud compilation and signed
.ipaand.aabfiles - Signing assets after you configure the bundle ID and package name, plus automatic App Store uploads and Android internal-testing uploads after setup. The first Play release may require a manual
.aabupload in Play Console. - Submission workflow support for App Store Connect, TestFlight, and Google Play. Bilt automatically uploads each App Store build and provides a TestFlight button that opens the app's TestFlight page after Apple processes it. For Google Play, Bilt builds the
.aaband sends it to the internal testing track.
You handle:
- A release-ready repository, approved app identity, and business-owned developer accounts
- Store copy, screenshots, privacy details, legal declarations, and reviewer messages
- Requested product or policy changes after a rejection; Bilt can rebuild, sign, and upload the corrected build. You choose or attach it and resubmit it for review in App Store Connect or Play Console.
Keep developer accounts under your business. Business-owned accounts preserve access to listings, release history, and reviewer messages if your tooling or development partner changes.
Prepare these store assets before submission:
- App name, description, and discoverability keywords
- Icons and screenshot sets for supported device sizes
- Current support contact and privacy policy
Bilt benchmarks the path from web code to completed submission in hours or days rather than months. Store review time remains outside Bilt’s control.
14. Monitor and maintain the app
Monitor each release by app version, then choose the update path that matches what changed.
App maintenance follows three release paths. Choose the path according to the layer that changed.
- Web or PWA update: Publish server-hosted assets and backend changes directly. Users receive the new version without an app-store review.
- Eligible over-the-air update: Ship compatible JavaScript bundles and assets to installed clients when platform rules allow it. Native code, permissions, SDK configuration, and review-sensitive changes still require a new binary.
- Native binary release: Start new App Store and Play Store builds in Bilt when native code, platform configuration, or bundled dependencies change. Bilt rebuilds and signs them, handles supported technical uploads, and increments the App Store build number after checking TestFlight; you create or promote the release and submit it for review.
Record the changed layer, deployed version, minimum compatible client, and rollback point. Keep backend changes compatible with clients that have not received the latest update.
Monitor production by app version, operating system, and device family. A stable web backend can still fail through a mobile network adapter or stale local data.
Use this operating checklist after every release:
- Track crash spikes, unhandled exceptions, and memory leaks by app version.
- Watch API latency separately from on-device rendering time.
- Alert on database sync failures and queued writes that never complete.
- Review App Store and Google Play feedback for repeated login or interface problems.
- Route account-access reports to support before review scores fall further.
Tie every alert and support report to a release number. Release-level records speed up rollback decisions and separate a client regression from a backend incident.
Treat major migrations as controlled releases. Test the build in TestFlight and Google Play’s beta track before promoting the same binary to production.
Before release:
- Confirm existing accounts retain login sessions and stored data through the migration.
- Assign support coverage for account-access and sync problems during rollout.
- Update dependencies and apply platform security patches.
- Check current iOS SDK and Android target API requirements.
- Document the rollback build and any database reversal steps.
After release, compare crash, latency, sync, and review signals with the previous version. Keep the beta cohort active long enough to validate the next dependency or platform upgrade.
Turn repository code into native apps
Bilt Web App Sync turns repository context into a separate React Native project, not a website wrapper. You keep the source code and can inspect the native screens in Bilt’s preview before publishing.
Ready to turn your web app into native iOS and Android apps? Start building free, preview the result, and publish when it is ready.
FAQs
How much does converting a web app to mobile cost?
Bilt has a Free plan, Professional at €25/month, Professional Plus at €50/month, Professional Max at €100/month, and Professional Ultra at €250/month.
Eligible new subscribers get 40% off the first month of any monthly paid plan. The discount does not apply to annual billing.
Store distribution also requires Apple Developer Program membership at $99/year and a Google Play Console account at $25 one-time.
Bilt plans include Bilt Cloud backend capabilities such as authentication, database, and storage. Budget for additional infrastructure only when your project uses external services or exceeds what its plan covers.
How long does the conversion take?
A wrapper may take days, while a custom native rebuild can take months. Bilt benchmarks the path from web code to store submission in hours or days, but app complexity, testing, and store review affect the full schedule.
Can any web app be converted to mobile?
Most web apps can follow a PWA, wrapper, or native-conversion path, but those routes produce different results. Backend compatibility, authentication, browser-only APIs, and unsupported dependencies matter more than the framework name.
Do I need to code to convert my web app?
No. Bilt can turn your web app into a native iOS and Android app without you writing code.
A wrapper can package a live site with little coding, while native conversion rebuilds mobile screens and reuses compatible logic. Either route still requires testing permissions, data behavior, failures, and store disclosures.
What happens to my website after launching the app?
Your website can keep running as a separate client. The website and mobile app can share the same backend, accounts, database, and APIs, while coordinated releases keep both clients compatible.