A polished prototype can still be far from launch. Real-device bugs, payments, privacy forms, store listings, and reviewer access all have to line up.
Start by choosing one clear user and one job the app must do well. Those decisions guide the build, the test plan, and the launch message.
This guide takes you from the first launch brief through store submission and post-launch updates. It covers what to prepare yourself and where Bilt can handle the technical release work.
TL;DR
- Decide who the app is for, what they need to accomplish, how the app will make money, and what success looks like.
- Build one complete native flow first. Then refine onboarding, payments, permissions, and error states.
- Test on a physical iPhone and Android phone. Desktop previews can miss keyboard, permission, performance, and billing problems.
- Prepare screenshots, privacy answers, reviewer access, and support coverage while you test. Leaving them until upload day creates avoidable delays.
Your app is ready to launch when the main flow works, payments and permissions have been tested, store assets are complete, and someone is ready to support the first users.
Before you start: what counts as a mobile app launch?
A mobile app launch covers the whole path from a clear idea to a live store listing. It ends when people can install the app and complete its main task.
Treat each phase as a gate. Move on only when you have the result in the final column:
| Phase | What happens | Ready to move on when |
|---|---|---|
| Scope | Define the user, core problem, business goal, and first release | You can explain who the app is for and what they should accomplish |
| Build | Create the main flow and connect the systems it depends on | The core task works from start to finish |
| Pre-submission | Test devices, payments, permissions, privacy, and store assets | Known launch blockers are fixed and reviewer materials are ready |
| Review | Submit the production build and respond to store feedback | The app is approved for release |
| Release | Publish store links, contact early users, and monitor support | New users can install, sign up, and complete the main action |
| Improve | Review crashes, retention, payments, and user feedback | The next update addresses a clear, observed problem |
1. Set launch foundations
Set the launch foundations before choosing screens. Name the user, the problem, and the action your first release must help them complete.
- Talk to people who match your target user.
- Write down how they solve the problem today.
- Decide what the first release must let them finish.
A useful launch brief answers these 7 questions before the first build prompt.
| Foundation item | What to define before build |
|---|---|
| Target user | Audience, buyer persona, user needs, and current workarounds |
| UX research | Workflows, pain points, desired outcomes, and usability risks |
| Value proposition | The one reason a user would install the app instead of ignoring the problem |
| Business role | Lead generation, paid product, customer retention, community access, or another clear business function |
| Monetization path | Subscription, one-time purchase, ads, freemium upgrade, or internal business value |
| Launch metrics | Activation, retention, subscription intent, feature usage, support requests, and user feedback themes |
| Build prompt | Plain-English app description that names the user, core task, and launch metric |
Use Bilt after the research, when the user problem and launch metric are specific. A plain-English prompt gives Bilt a cleaner starting point than “fitness app for beginners.”
For a beginner fitness app, the prompt should explain:
- What the beginner does each week.
- Why someone would pay for the subscription.
- What happens during the first week.
- Which behavior shows that people keep using the app.
2. Build the launch-ready app
Traditional development turns research into specs and handoffs. With Bilt, the same research can become the plain-English description used to create the first native build.
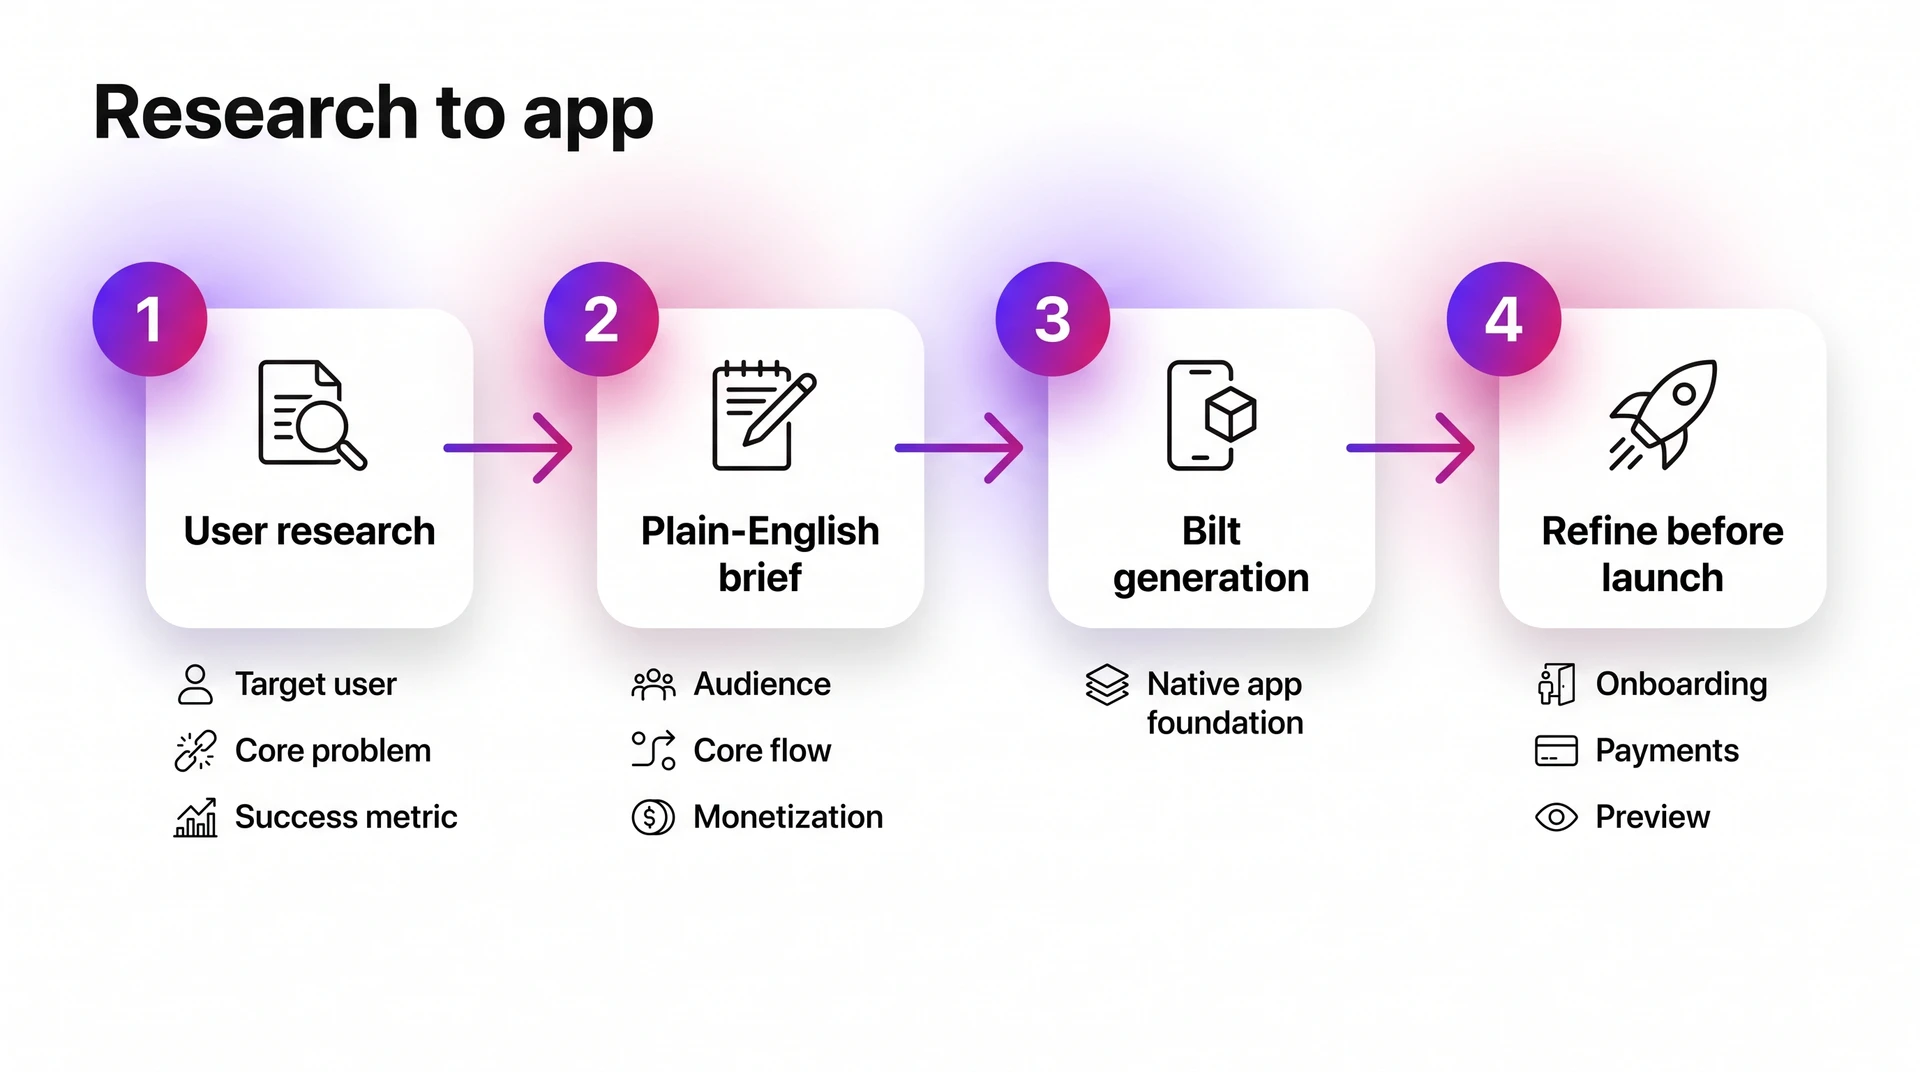
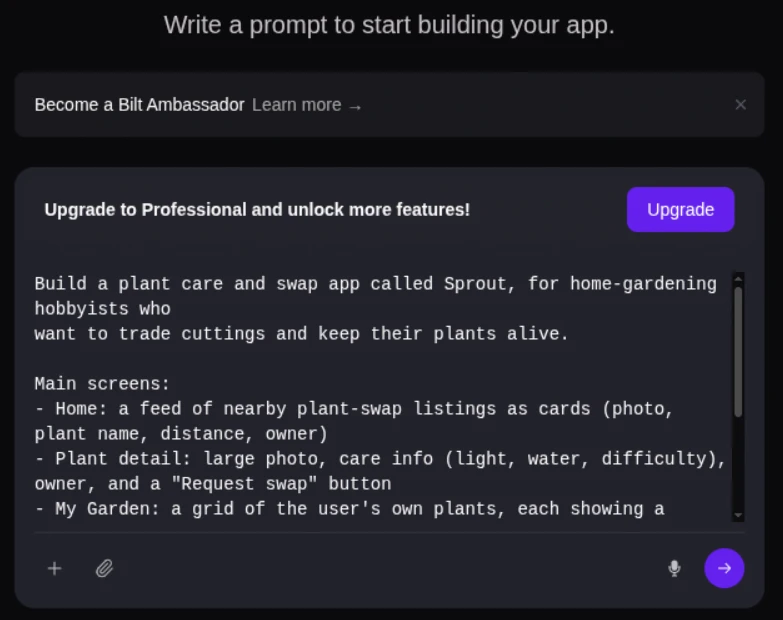
For the fitness tracker, describe the audience, onboarding flow, workout logging, progress view, and reason to subscribe. Give Bilt enough detail to build the first usable version.
Here is a copyable starting prompt:
Build a native fitness tracker for beginners. Include three guided workouts per week and progress history. Add weekly reminders and a subscription plan for advanced routines.
| Question | Traditional development | Bilt |
|---|---|---|
| Where does the work start? | Specs and team handoffs | A plain-English app description |
| How do changes happen? | More design and development work | Follow-up prompts in one conversation |
| How is research used? | A brief for the team | Direct build instructions |
| What does this step produce? | Design and development artifacts | A native app ready to preview and test |
After the first build, use follow-up prompts to tighten what users see before launch.
- Start with the foundation: Describe the user, the problem, and the main flow from start to finish.
- Refine the core flow: Tighten onboarding, setup, and the first successful action.
- Check usability: Fix unclear labels, awkward navigation, loading states, reminders, and feature priority.
- Polish the release candidate: Test the native preview, fix blockers, and prepare the build for device testing.
The first build is only one part of the timeline. Leave room for device testing, store assets, privacy answers, and store review.
Bilt lets you describe the app, preview the native build, and keep refining it in the same conversation before device testing begins.
Describe an app and watch Bilt turn it into a native app in live preview.
3. Add systems that can block launch
This starts the pre-submission phase: systems, device testing, beta, store assets, and marketing prep. Once the core app works, stop thinking only in screens and start thinking in launch risk.
For paid apps or subscriptions, set up Apple and Google billing before beta. Create product records early so the paywall, receipt, renewal, cancel, and restore flows can be tested before launch.
Create the billing records before the final QA pass. Late product setup can block paywall and renewal testing right before submission:
- App Store Connect: Add each in-app purchase or subscription product record.
- Google Play Console: Add products, base plans, and offers for Android.
- StoreKit / Google Play Billing Library: Test receipt and renewal behavior if your team codes the billing layer outside Bilt.
Group the remaining launch risks by what can fail:
- Revenue: Confirm native purchases, subscription renewals, refund states, restore purchases, paywalls, pricing, and store product records.
- Measurement: Track signups, onboarding completion, purchase starts, purchase failures, and the one action users must finish.
- Communication: Test push notifications with APNs on iOS and FCM on Android. Check timing, permission copy, and opt-out behavior before launch.
- Feedback: Add an in-app feedback path, support email, or short form so early users can send screenshots and context.
- Trust: Ask for tracking permission only when the app tracks users across other apps or websites. A surprise tracking pop-up damages trust.
If you use ad attribution, decide the data flow before screenshots and privacy forms are written. That keeps the permission prompt, privacy labels, and store answers consistent.
Privacy is still your decision, even when Bilt builds the app. Confirm GDPR, CCPA, Apple privacy labels, and Google Play Data Safety answers before submission.
Treat security as its own blocker. Keep these secrets out of the client-side app:
- Firebase service credentials
- APNs auth keys
- FCM server keys
- Internal API keys
Exposed credentials turn a launch issue into a billing or data incident.
Make payment, permission, privacy, and testing decisions before the final build. Bilt can then account for those requirements during creation instead of adding them at the end.
4. Test on real devices
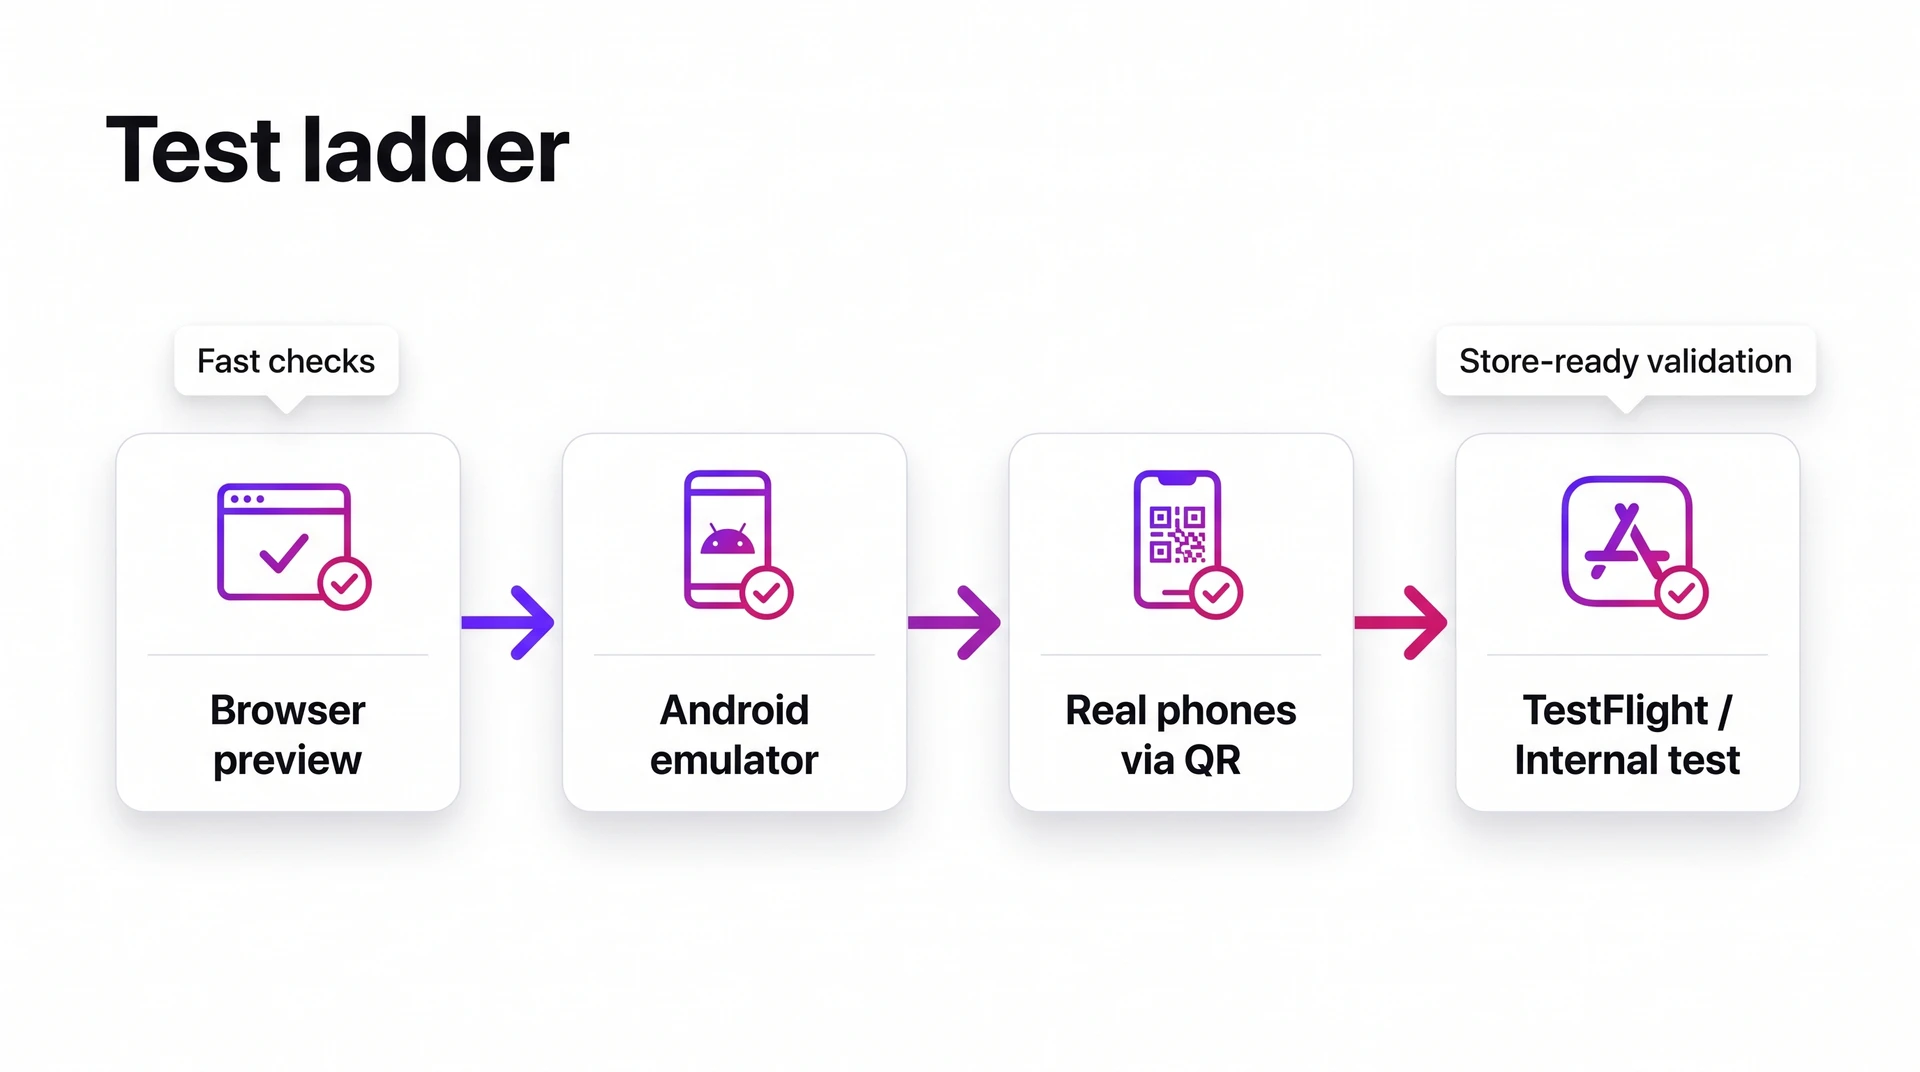
Use browser previews for speed, then test the release on a physical iPhone and Android phone. Real devices expose problems a desktop preview cannot reproduce.
Test in this order:
- Browser preview: Check screen order, copy, and layout. Complete the whole path from signup to the main result, then return home.
- Cloud Android emulator: Use it before installing Android Studio; catch Android navigation, keyboard, and loading-state issues.
- QR-code device testing: Scan the build on an iPhone and Android phone; test one-handed use, scrolling, and tap targets.
Move to TestFlight or Google Play Internal testing when you need to check installation, permissions, billing, or store-specific behavior.
Test the messy flows first:
- Sign up and reset the password.
- Buy, cancel, and restore a subscription.
- Deny notification permission and keep using the app.
- Go offline during a save or purchase attempt.
Before beta, run this short smoke test:
- Open the app cold and complete onboarding.
- Complete the primary task on Wi-Fi and cellular.
- Kill and reopen the app after the main action.
- Trigger a failure state, such as an invalid email or denied permission.
Do this before beta. Testers should react to the product idea rather than spend the first session finding broken buttons or a paywall that never loads.
5. Collect beta feedback
Share a near-final app with a small group before public release. Look for confusion, failed tasks, and repeat bugs while changes are still easy to make.
Bilt preview links are the low-friction option for the first pass: testers open a generated link in a browser without installing anything. Move to TestFlight or Google Play Internal testing when you need to test installation, permissions, billing, or store-specific behavior.
Give every tester the same brief:
- Who they are: Assign a role, such as “new subscriber” or “returning client,” so the feedback matches the intended user.
- What to try: Ask everyone to complete the same core tasks, such as signing up, saving an item, or starting a subscription.
- What to report: Ask for a screenshot, the screen name, and the words they expected to see.
- What to ignore: Set aside visual polish and unfinished side features unless they block the main task.
A simple tester prompt works well:
You are testing the app as a new subscriber. Sign up, complete your first workout, and tell me the first screen where you feel unsure what to do next.
Polite feedback can be useless. Useful feedback names the screen, the expected action, and the exact moment the tester stopped.
Review feedback by pattern, not volume. Repeated confusion on the same onboarding step is a flow problem worth fixing before launch.
Sort feedback by what it affects:
- Launch blocker: Prevents signup, purchase, the core task, or legal compliance.
- Fix before launch: Repeated confusion around labels, navigation, onboarding, or error states.
- After launch: Preference requests that only 1 tester mentions.
Use the public launch to test demand, positioning, and retention. Fix basic usability problems during beta, before they turn into poor first reviews.
6. Prepare store readiness
Prepare App Store Connect and Google Play Console before upload day. A finished build can still stall on signing, missing assets, privacy answers, or reviewer access.
Code signing proves the release build came from the right publisher.
- Certificate: proves publisher identity.
- Bundle ID: identifies the app inside App Store Connect.
- Provisioning profile: ties the certificate, app identity, and distribution type together.
If those 3 pieces mismatch, uploads can fail before review starts. If those terms are new, keep the technical path inside Bilt and focus on listing inputs.
Bilt handles the release build, code signing, certificates, provisioning profiles, and submission workflow for the Apple App Store and Google Play.
You still provide the material that tells users and reviewers what the app does.
Get the privacy policy URL, demo credentials, and main-path screenshots ready before launch week.
| Owner | Responsibilities |
|---|---|
| You | App name, descriptions, keywords, category, icon, screenshots, privacy answers, regions, reviewer access, Apple review submission, and the first manual Play upload if Google requires it |
| Bilt | Release build, code signing, certificates, provisioning profiles, iOS upload to App Store Connect, and Android .aab creation with internal-testing upload when Play publishing is ready |
| Shared | Developer account access, final version choice, release timing, and responses to review |
Treat the store listing as part of the product. Apple App Store screenshots should show the first successful user path, not only polished marketing screens.
Use Google Play screenshots the same way. Show the action and result before the user buys, especially for paid features.
Clear reviewer notes reduce avoidable back-and-forth.
Add reviewer instructions for paths reviewers cannot see immediately:
- Gated features or subscriptions
- Admin screens and demo content
- Permissions such as location, camera, or HealthKit
- Test payment steps for in-app purchases
Give reviewers the shortest path to see the app working.
7. Build the marketing engine
Prepare your launch channels before submission. Approval should not leave you scrambling for store links, screenshots, emails, or support coverage.
Choose a few channels you can monitor properly, then assign an owner to each one. Solo founders should write down the owner too, even when every row has the same name.
Launch-day rule: Use only the channels you can monitor and answer promptly.
- Prepare these launch assets:
- Launch page: Create one landing page with a signup or waitlist flow. Replace the placeholder CTA with live store links after approval.
- Message kit: Draft the launch email and social posts. Record a short demo when the product needs more explanation than screenshots can provide.
- Press kit: Prepare the app icon, screenshots, founder bio, product summary, and contact email.
- Channel plan: Start with your own audience. Add reporters, reviewers, partners, or paid channels only when someone can handle replies.
- Measurement: Track installs and signups before spending on promotion. Paid apps should track purchases or subscription starts too.
- Launch operations: Confirm the production database and release settings. Assign someone to watch errors and backups.
Example: a waitlist landing page can collect emails while review is pending. After approval, switch the primary CTA to the App Store or Google Play listing and make sure the screenshots match the first successful user path.
Wait to turn on paid traffic until install and signup events appear in production analytics.
Keep the first launch small enough to answer support quickly. App reviews are public, so a clean release with working tracking beats a noisy campaign where nobody can tell which channel drove installs.
8. Submit and release
Before App Store submission, confirm that the production build matches the App Store Connect and Google Play Console setup.
With Bilt, you can skip manual Xcode, Gradle, and signing work. You still choose the production version and provide the finished store listing.
Store review timing varies, and incomplete submissions take longer. Plan the public launch around approval rather than an expected review window.
Plan accounts before upload day:
- Apple Developer Program: $99/year
- Google Play Console registration: $25 one-time
Use TestFlight for final iOS checks when you need to verify installation, permissions, billing, or release behavior.
Submit with enough buffer to fix reviewer requests before the public launch date.
| Submission step | What Bilt compresses | What still needs owner judgment |
|---|---|---|
| Build generation | Creates the release build for store submission | Confirm the submitted version is the intended production version |
| Signing and credentials | Handles code signing, certificates, and provisioning profiles | Maintain the required Apple Developer and Google Play accounts |
| Store handoff | Builds, signs, and uploads the iOS build to App Store Connect; creates the Android .aab and sends it to internal testing when Play publishing is ready | Submit the iOS build for review in App Store Connect; manually upload the first Android release if Google requires it; provide complete listing assets, compliance details, reviewer notes, and demo credentials |
| Review window | Removes manual Xcode, Gradle, and signing work from the timeline | Leave time for App Store or Google Play review and requested changes |
| Release choice | Supports the release workflow after approval | Decide whether to release immediately, schedule a date, or use a phased rollout |
Plan the public launch around approval, not upload time. Apple and Google control review timing even when Bilt shortens the technical path.
If the app is rejected, use a narrow loop:
- Read the rejection reason word by word.
- Open Resolution Center in App Store Connect or the policy message in Google Play Console.
- Fix the exact issue, then attach evidence if the reviewer asked for it.
- Resubmit the corrected build or metadata.
Do not change unrelated screens during a rejection loop. Extra changes make the next review harder to explain.
Appeal only when the reviewer misunderstood the app or cited a policy that does not apply. Appeals are weak when the app is missing information.
After approval, download the production app from the live App Store or Google Play listing.
Check the release like a customer:
- Login works
- Payments complete
- Push notifications arrive
- Analytics records the install
- Support links open
Then announce the launch through the channels you prepared in Step 7.
9. Execute launch week
Launch week is an operations job. Store links, signup, payments, analytics, and support all need to work while real users arrive.
Copy this launch-morning runbook:
- Verify App Store and Google Play links on the live landing page.
- Send the launch note to subscribers and press contacts.
- Update the homepage and app landing page.
- Recheck every download button.
- Send the SMS prompt only if users explicitly opted in.
- Assign the support owner to tickets and reviews.
- Assign the dashboard owner to crash reports and payment failures.
Launch tip: Keep the first few days operationally boring. Staff support during likely traffic peaks instead of scheduling major feature changes.
During the first few days, watch these activation points:
- Welcome message: Send a short push notification after install when it helps the user take the next step.
- Incentive: Use a promo code or early-user reward only when the app has a natural upgrade moment.
- Review prevention: Reply to confused users before frustration turns into a 1-star review.
- Onboarding signal: Log repeated questions. They usually point to unclear copy or a missing step.
Agree on the conditions that trigger each launch response:
- Hotfix: a new crash pattern affects a core screen or a paid flow.
- Rollback: the release breaks login, payments, sign-up, or another launch-critical path.
- Message change: installs look healthy, but activation or first-session completion drops.
- Support escalation: the same issue appears across reviews, tickets, and community threads.
10. Monitor and improve
After release, watch a small set of numbers every day for the first week. Pair performance data with store reviews so the strongest feedback becomes a small update.
Read product data alongside human feedback. Installs show reach, while D1, D7, and D30 retention show whether people return.
Daily scorecard:
- Integrated analytics: Track installs and activation. Add D1/D7/D30 retention once traffic starts.
- Payment data: Watch subscription starts and failed charges. Review refunds separately.
- App-store data: Track rating changes and review themes by version.
- User reports: Tag support tickets and bug reports by screen or flow.
- Community signals: Save launch bug reports from social posts and community threads.
Fix in this order: crashes, login or payment failures, onboarding confusion, then feature requests. A loud feature request can wait if the main path is broken.
If you built with Bilt, bring post-launch feedback back into the same conversation. Describe the onboarding issue, bug report, or copy change in plain English instead of writing a developer ticket.
Keep each update small enough to measure. Validate major feature ideas with customer conversations before rebuilding a core flow.
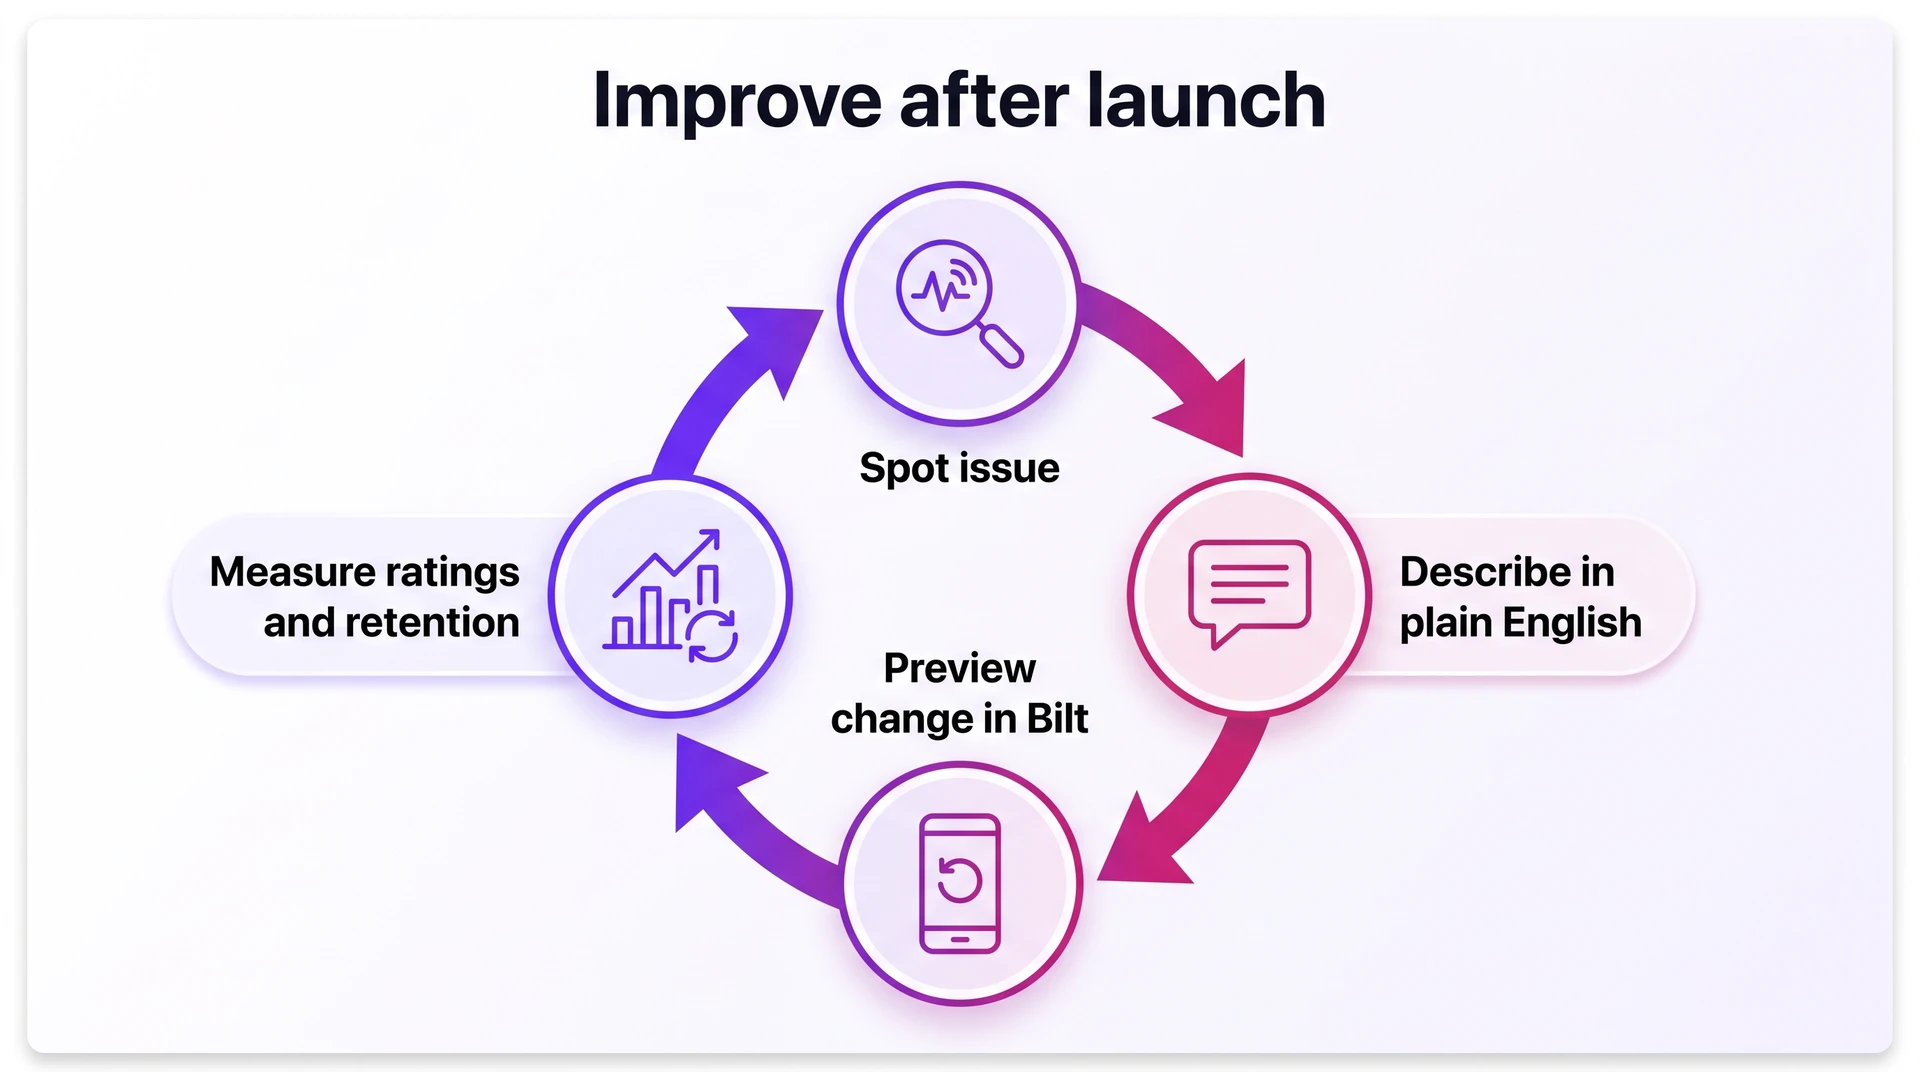
For Bilt-built apps, use this 4-step improvement loop:
- Describe the issue in plain English.
- Ask Bilt to adjust the screen, flow, copy, or feature.
- Preview the change before release.
- Watch ratings, reviews, retention, and support volume after the update.
Mobile app launch checklist: mistakes to catch before release
Most launch mistakes show up after the app is live, when every fix is more visible. Use this checklist before you send traffic to the store links.
Copy this into your launch doc:
- Prerequisite: production settings are live. Test the production build against live API keys and backend settings. Confirm permissions before launch day.
- Prerequisite: observability is live. Confirm crash reporting and basic analytics before the first public install. Add error tracking where the app supports it.
- Prerequisite: support coverage has an owner. Assign 1 person to watch tickets and reviews during the first 48-72 hours.
- Deployment: reviewer access is ready. Check the metadata, demo credentials, and reviewer notes against the submitted build. Missing access or incomplete details can delay review.
- Deployment: version migration is tested. Install the update over the current version. Check saved data and login state, then test subscriptions separately.
- Post-launch: activation is measured. Track install-to-account creation and the first key action. Treat first-session drop-off as a launch issue.
- Post-launch: retention has evidence. Compare D1/D7/D30 cohorts before changing the roadmap. Prioritize requests from users who came back.
If a rejection arrives, use the detailed loop from Step 8: read the exact reason, fix only the cited issue, and resubmit with evidence when needed.
Appeal only when you can point to a specific guideline misunderstanding, not when the app is missing information.
If you built with Bilt, paste the rejection note into the conversation as the plain-English change request. That keeps the fix tied to App Review's wording.
Minimum mobile app launch checklist
Before you announce widely, make sure these basics are true:
- The main user flow works on iPhone and Android.
- Payments, cancels, and restores work if the app charges users.
- Privacy forms, permissions, and reviewer notes are complete.
- App Store and Google Play listings have screenshots, descriptions, and live links.
- Demo credentials are tested.
- Support coverage is assigned for the first 48-72 hours.
- Analytics records install, signup, purchase, and the app’s main action.
- The launch message and store links are ready.
- The first update loop is planned.
Common questions about app launches
How long does a mobile app launch take?
A traditional full mobile app launch often takes 4 to 12+ months once you include planning, build work, real-device testing, and store review.
The build is only one part of that timeline. Payments, backend work, device testing, privacy details, and store review can each extend the schedule.
The launch timeline changes most with:
- App complexity: AI features, payments, and backend logic usually add more QA and review work than a basic content app.
- Testing scope: Use real devices before submission, because beta feedback often exposes sign-in or payment issues.
- Launch prep: Store metadata and screenshots sit outside the build itself, as do privacy details and launch assets.
Bilt can turn a clear app description into a native first build in minutes. Device testing, listing work, privacy details, and store review still sit outside that first build.
Keep these steps on the calendar even when the first build is fast:
- UX research before launch copy is final
- beta feedback on real devices
- store review and metadata fixes
- launch emails or outreach
- post-launch monitoring for crashes and retention
Avoid announcing a public release date until Apple or Google approves the build.
Should I launch on iOS and Android at the same time?
Launch on iOS and Android together when you can manage both review processes, store listings, and support queues in the same week.
Launch one store first when you want a cleaner feedback loop and fewer platform rules to manage at once.
A single-store launch makes sense when you want:
- One early rating pool to protect while you fix onboarding issues.
- One set of approval rules to learn before adding the second store.
- One beta feedback loop before taking on cross-platform support.
An iOS-first beta can still support a meaningful test group through TestFlight.
Launch both stores on day 1 when reach matters more than a tighter feedback loop.
Bilt makes dual-platform building less manual because one prompt can generate iOS and Android apps from the same idea.
Bilt also supports the submission workflow for both platforms. You still need store assets, review responses, support coverage, and feedback tracking for each store you launch.
Do I need a paid budget to launch?
Ad spend is optional. Store accounts still cost money.
Plan for $99/year for the Apple Developer Program and a $25 one-time Google Play Console registration.
Use channels you can reach today:
- Email list you can send on launch day
- Personal network willing to test the first build
- Community groups that allow app feedback posts
- Partner mentions in a newsletter or customer email
- Existing customers or followers who already asked for the app
Use paid acquisition after an owned channel produces a clear revenue signal. For a booking app, that signal is a completed booking.
Start with retargeting people who already know your brand before paying for cold installs.
| Launch budget choice | What it looks like | Main condition |
|---|---|---|
| No paid budget | Use owned channels for initial users and launch momentum | Works when you already have an audience or distribution touchpoints |
| Small paid test | Run retargeting to people who already know your brand | Measure revenue and user value before scaling |
| Broad paid acquisition | Advertise to cold audiences | Scale only when revenue per user supports the cost |
Judge paid acquisition by revenue and retention before you look at download counts.
A low-cost install that never opens again loses to a user who subscribes or books.
If you want to compare credits and support options before launch, see all plans.
Launch is bigger than upload day
A mobile app launch covers more than the upload. It starts with a clear idea and ends with a working app, a live store listing, real users, and a manageable feedback loop.
Signing, testing, payments, privacy answers, reviewer notes, and real-device bugs often cause the last delays. Plan for that work early and launch week becomes much calmer.
Bilt helps non-technical builders move from app idea to native build to store submission in one workflow. When you are ready to build something people can install, start building free.