
Your website works, and more of your visitors keep opening it on their phones. A mobile app is the natural next step, but only when it has one clear job.
A booking site might need faster scheduling. A member portal might need repeat logins and push reminders.
A WebView wrapper can be fast for simple content access. Native or cross-platform native routes such as React Native and Flutter give you more room for push notifications, offline use, and store review polish.
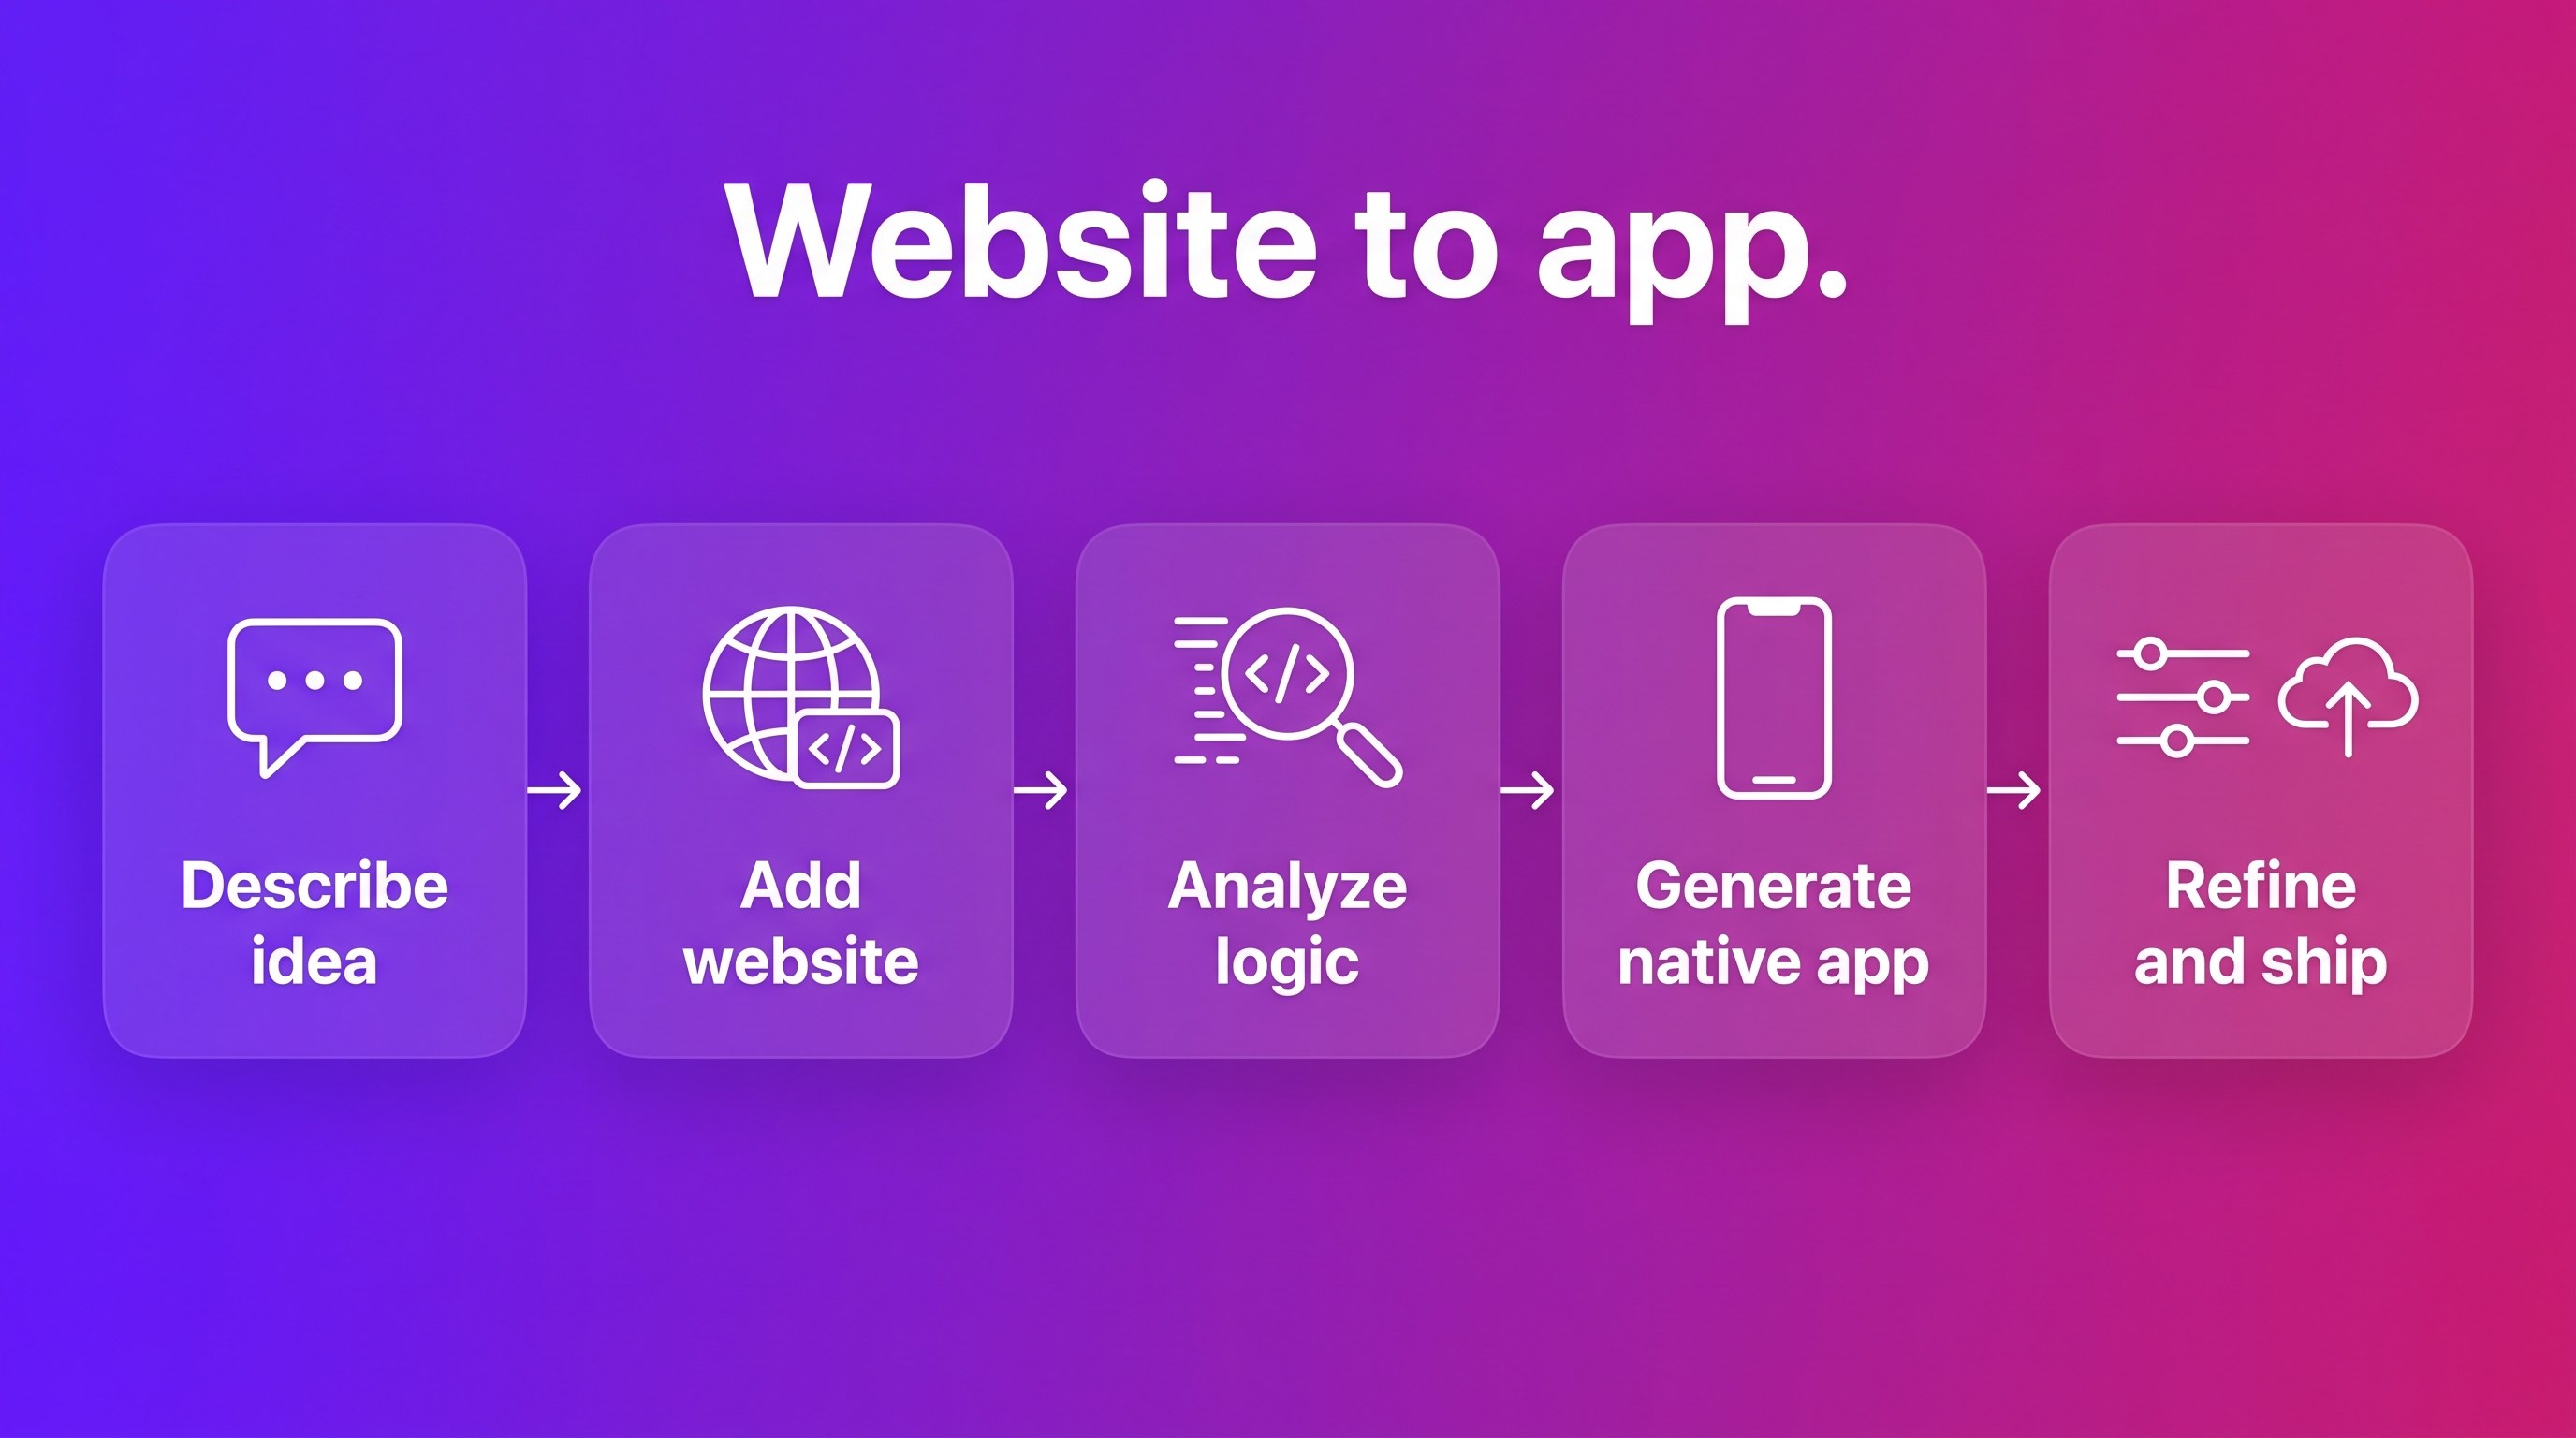
This guide shows website owners how to turn a working site into a focused native app without copying every page. We'll use Bilt as the example: describe the app, let it examine your website or code, then refine the React Native build.
Quick answer
Creating a mobile app from a website means extracting a focused, validated use case and rebuilding it as a native iOS/Android app, not copying the whole site.
The 12-step process:
- Validate the app use case.
- Choose the app route.
- Describe the requirements.
- Generate the native build.
- Connect backend features.
- Refine the mobile UX.
- Check performance and security.
- Test devices and users.
- Secure code ownership.
- Prepare store listings.
- Publish to the app stores.
- Monitor usage and improve.
Your build route depends on what the app needs to do:
- Choose native or cross-platform native when the app relies on camera access, GPS, push notifications, biometrics, smooth transitions, or App Store polish.
- Consider a wrapper only for simple content access where native performance and device features are not central to the experience.
- Consider an AI-assisted native route when you want the website's existing functionality translated into a React Native app without managing the mobile toolchain yourself.
With Bilt, that route starts with a plain-English description and your existing website as the source of truth. You can create a native companion app for iOS and Android, then refine it before submission.
Try Bilt: Start with a plain-English app brief and your existing website, then use this guide to review the React Native build before submission.
1. Validate the app use case
Start with one mobile job. A credible app use case usually ties to a repeated action, device feature, or saved state, not a smaller copy of the whole website.
- Users book or pay from a phone.
- Users check order status during repeat visits.
- Users need push reminders for time-sensitive actions.
- Users need camera access or GPS.
- Users need biometric login or offline access.
Use this validation pass before you scope anything:
- Interview 5 current users who visit on mobile. Ask how often they return, where sessions stall, and whether an app would replace a browser tab.
- Run a 5-10 question survey covering mobile frequency, desired features, download intent, and notification opt-in.
- Audit 3 direct competitors in the App Store and Google Play. Record ratings, recent review themes, and repeated complaints.
- Define one persona with a device, session length, and primary action, such as "subscriber checks renewal status on iPhone."
- Test intent with a waitlist, clickable Figma prototype, or small ad test before the full build.
After the demand check, run a brief website-readiness gate. This is not a full audit; it is a check for problems that will follow you into the app.
Your site should pass these basics first:
| Readiness check | Pass mark |
|---|---|
| Mobile layout | Core pages fit a phone screen without broken layouts or tiny desktop views. |
| Touch targets | Primary buttons and links are roughly 44x44px or easier to tap. |
| No sideways scrolling | Core flows finish without pinch-zoom or horizontal drag. |
| Forms and keyboard | Inputs, validation messages, and submit buttons remain visible when the mobile keyboard opens. |
Once demand and readiness are clear, cut the MVP down hard.
List every page and feature you want in the app, then remove anything that does not serve the primary mobile use case. The first version should prove one core flow, not recreate the entire website.
For a booking site, the first MVP can cover one path:
- The user logs in.
- The user views availability.
- The user books a slot.
- The app sends confirmation and reminders.
Once the MVP is narrow, the plain-English native app walkthrough shows how prompts become iOS and Android screens.
2. Choose the app route
Choose the route based on what the app must do, not on which tool looks easiest.
The simplest rule is this: content-only experiences can often use wrappers, but device-heavy experiences should go native. If the feature depends on the phone itself, choose a native path.
| Route | Best fit | Watch out for |
|---|---|---|
| Native app | Device features, store distribution | More build complexity |
| WebView wrapper | Content-only sites | Limited native feel |
| PWA | Browser-based mobile access | No app store presence |
| AI-assisted native | Native app without coding | Requires clear prompts |
Go native when the app needs features like:
- The app sends push notifications through APNs or Firebase Cloud Messaging.
- The app uses camera access for scanning, uploads, or verification.
- The app supports biometric login with Face ID, Touch ID, or Android biometrics.
- The app uses GPS or location services.
- The app connects to Bluetooth devices.
- The app stores data offline and syncs changes later.
These features depend on deeper access to the device. Native apps also fit when you want App Store and Google Play distribution, even though that adds review and submission work.
A WebView wrapper can still fit a simple content site.
Use a wrapper when the mobile website already handles the core action. Examples include reading articles or opening logged-in content.
A PWA is different. It can make your website feel more app-like in the browser, but it does not give you the same store presence or native-device depth.
AI-assisted native fits non-technical builders who want a real app without rebuilding every screen by hand.
With Bilt, a prompt or existing web app becomes a React Native app for iOS and Android. You refine the build through conversation.
Use the build path decision this way:
- Mainly content: start with a WebView wrapper or PWA when the mobile website already works.
- Phone features: choose native when the app depends on push notifications or camera access.
- Offline or payments: choose native when data must sync later or checkout must feel app-native.
- Store strategy: choose native when App Store or Google Play distribution matters from day one.
If the native route depends on tooling, the device-heavy AI mobile builder comparison weighs outputs, previews, publishing support, and code ownership.
| Website type | Best app route | Why |
|---|---|---|
| Blog or content library | PWA or wrapper | Content access matters more than device features. |
| Booking site | Native or Bilt | Push reminders, accounts, and fast repeat actions matter. |
| Ecommerce site | Native or Bilt | Checkout, order history, and notifications need polish. |
| Member portal | Native or Bilt | Login, saved state, and repeat use drive value. |
| Internal tool | Native, PWA, or custom | The right path depends on permissions, device needs, and team workflow. |
If you want a native iOS and Android app from an existing website without managing React Native, signing, and store submission yourself, Bilt is the AI-assisted native path.
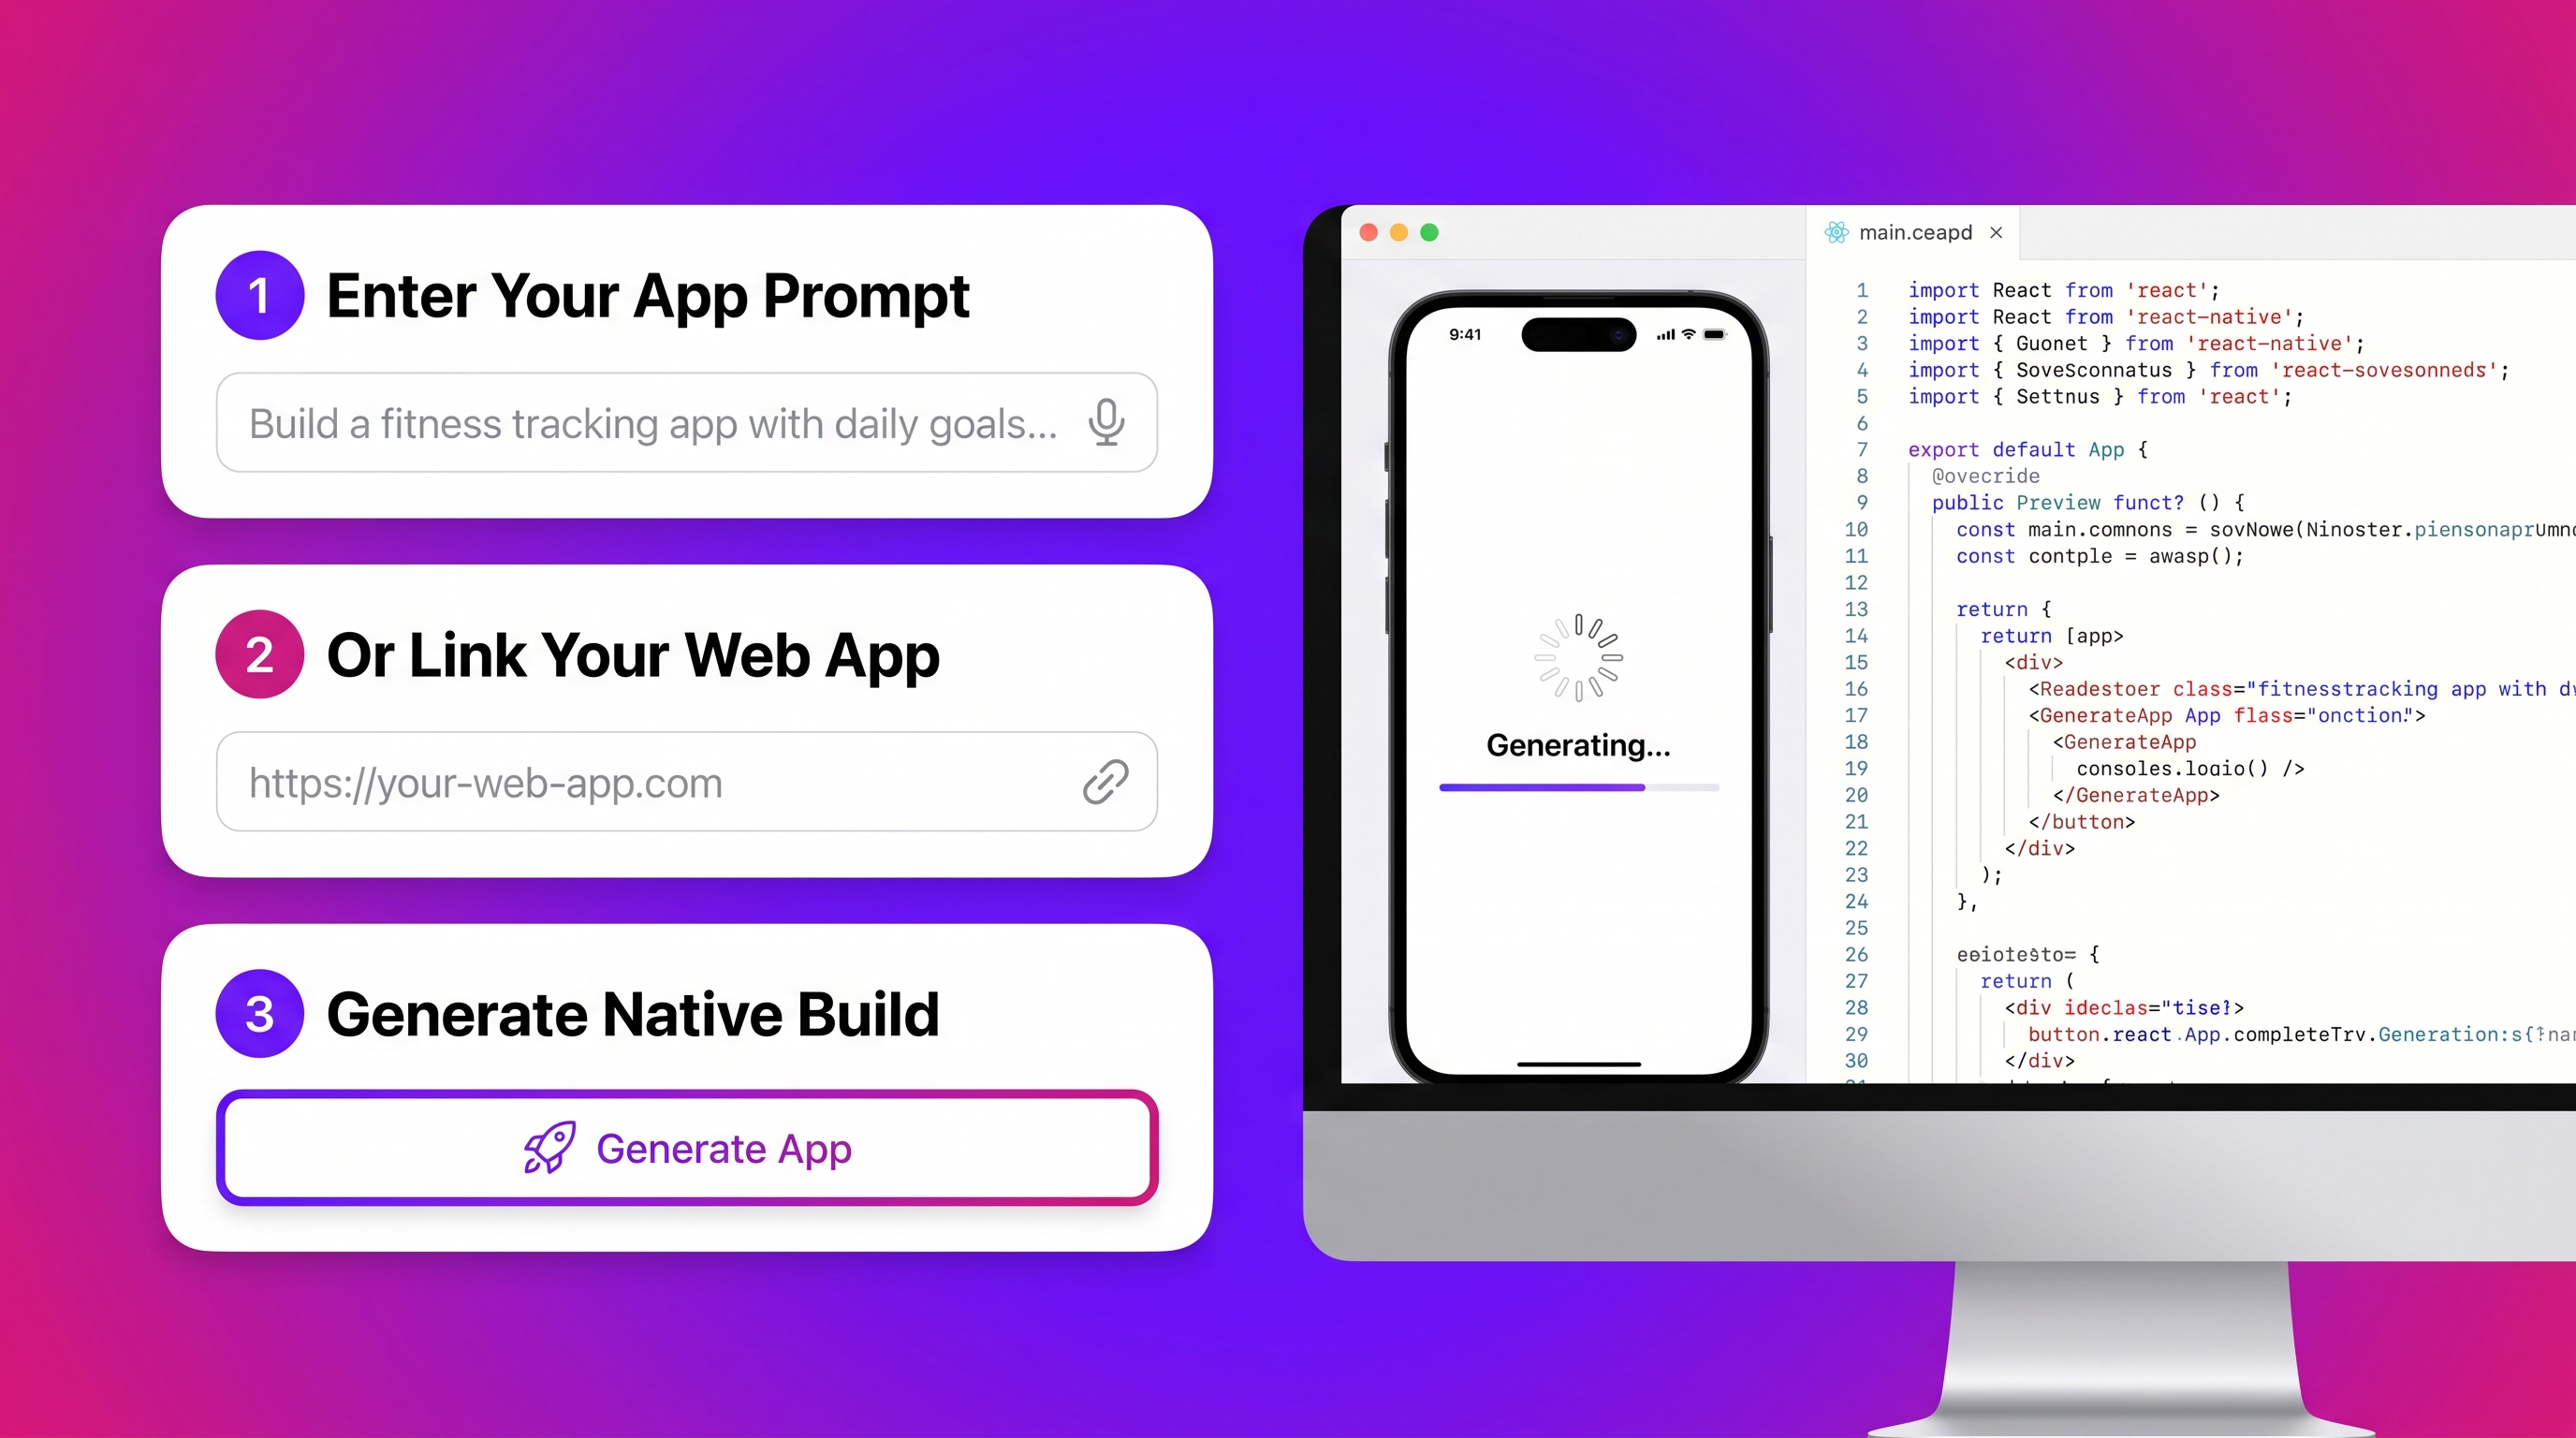
3. Describe requirements
Your requirements should tell Bilt what the mobile app must do, not mirror every page from your website.
Think of this as the app version of your site, narrowed to the actions people need on a phone.
Include these details before you generate:
- Map the primary user flow: what should a user do first, second, and third after opening the app?
- Define login and accounts: sign-up, sign-in, session length, and gated content rules.
- Name web-only exclusions: long blog archives, admin-only areas, or pages that work better on the website.
- Flag mobile redesign needs: website flows that need fewer taps, larger touch targets, or simpler navigation.
- Request native features: push notifications, camera access, location, biometrics, or other phone capabilities.
- Describe data flows: information moving between the app, your website, and tools like Stripe, Firebase, or a CRM.
Keep backend notes practical here. You only need enough detail to avoid confusion, because the next steps can handle authentication, storage, and integrations in more depth.
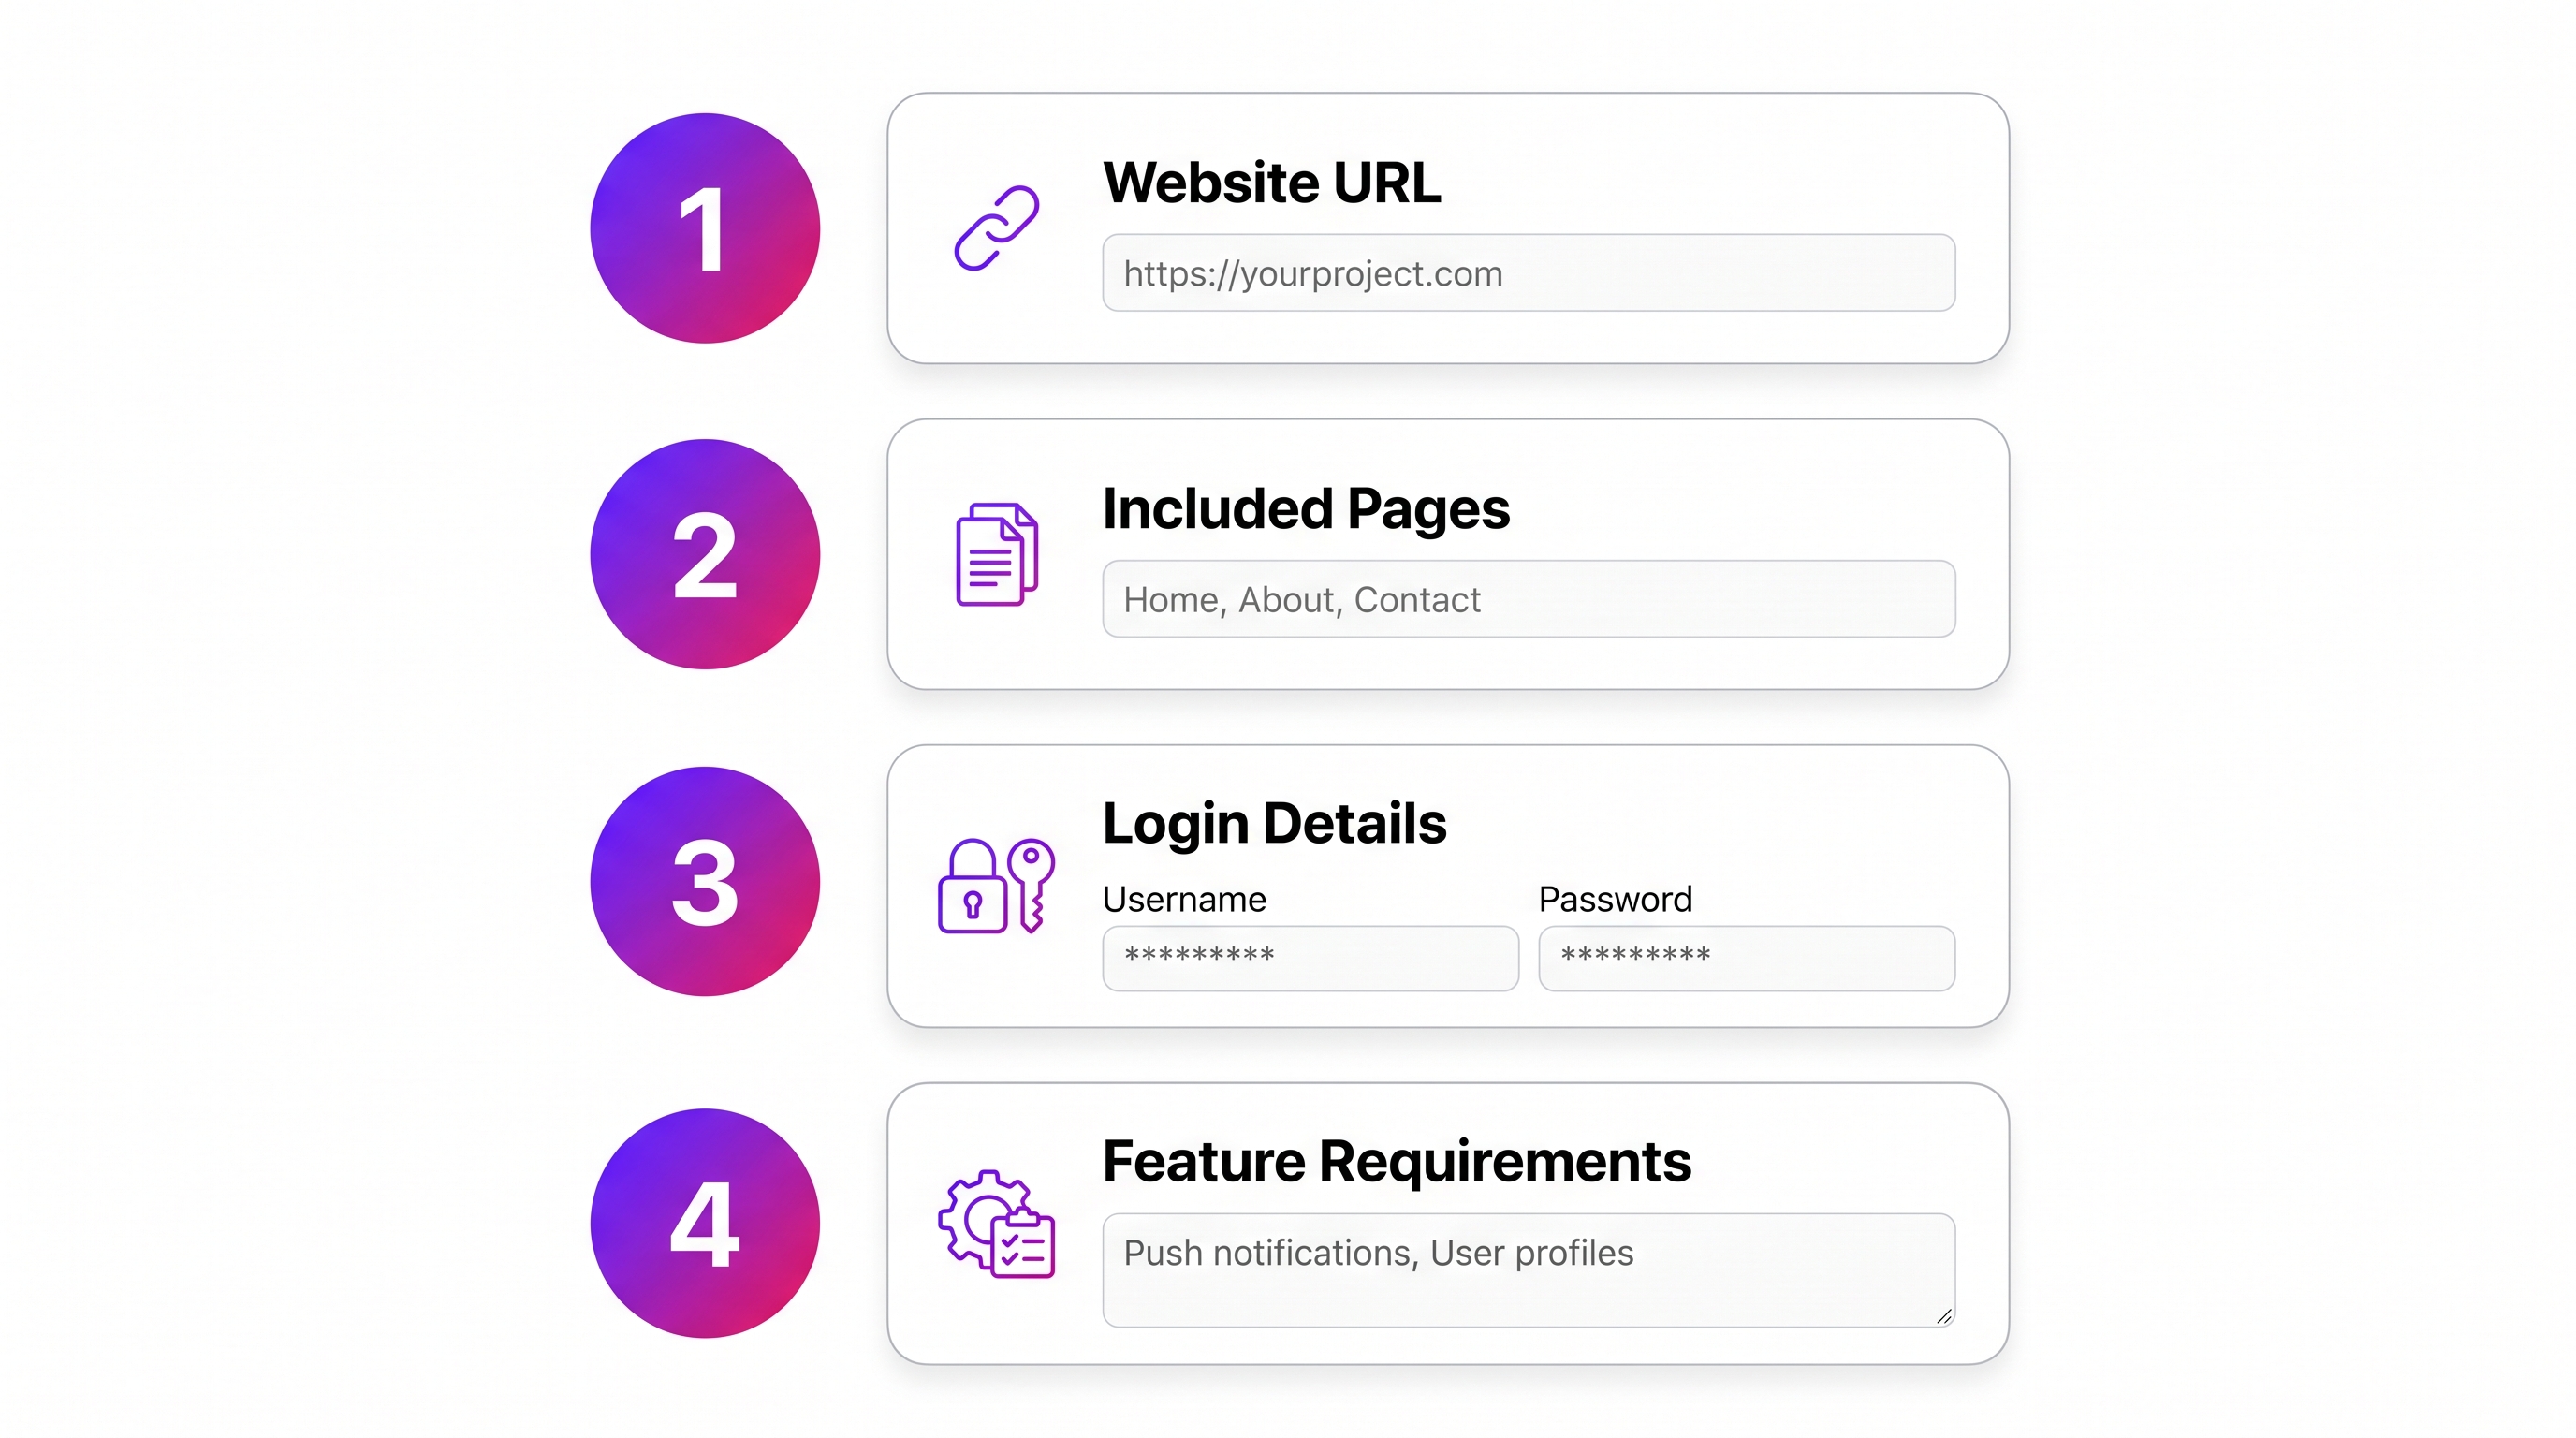
Give Bilt the website context it needs before you generate:
- Website URL: the live site or staging link.
- Pages to include: the flows that belong in the app.
- Pages to exclude: blog archives, admin screens, legal pages, or anything better left on the website.
- Test login: a safe account for gated flows.
- Current mobile flow: screenshots or notes from checkout, booking, onboarding, or the main account area.
- Backend tools: Stripe, Firebase, Supabase, WordPress, Shopify, a CRM, or a custom API.
- Brand assets: logo files, app icon ideas, colors, fonts, and screenshots that show the current style.
- Phone-specific improvements: push reminders, camera access, location, biometrics, offline access, or fewer checkout steps.
Example prompt for a website owner:
Build a mobile app version of my fitness coaching website.
The app should support this flow:
- Create an account.
- Choose a training goal.
- View a weekly plan.
- Track completed workouts.
Keep the blog, checkout pages, and coach admin dashboard on the website only.
Redesign the workout library for mobile so users can filter by goal and equipment in a few taps.
Send daily workout reminders with push notifications, and sync completed workouts back to the existing member account.
4. Generate the native build
Once the requirements are clear, ask Bilt for a native mobile build instead of a web wrapper.
A web wrapper loads your site inside a mobile browser view, such as WKWebView on iOS or Android WebView.
It can look like an app until slow screens or missing device features show up.
For the build step, ask for outputs you can actually ship:
- A React Native codebase for shared iOS and Android screens.
- An iOS project that can move through Xcode, TestFlight, and App Store Connect, or a managed build pipeline that handles that path for you.
- An Android project that can move through Android Studio and Google Play Console.
- A repeatable build step, such as Expo EAS or Fastlane, when you need signed store files.
The generated app should carry over important website behavior and reshape those flows for phone use, while leaving low-value routes behind.
For example, a members-only recipe website might become a native app with login, saved recipes, grocery lists, and push reminders. The long-form SEO pages can stay on the website.
Native generation matters in three places:
- Performance: Native screens can use mobile UI patterns and app navigation instead of rendering every interaction through a browser frame.
- Device access: Native code can support phone features like notifications, camera input, location, and biometrics when the app needs them.
A Bilt first-app walkthrough helps turn that generated foundation into a working first preview.
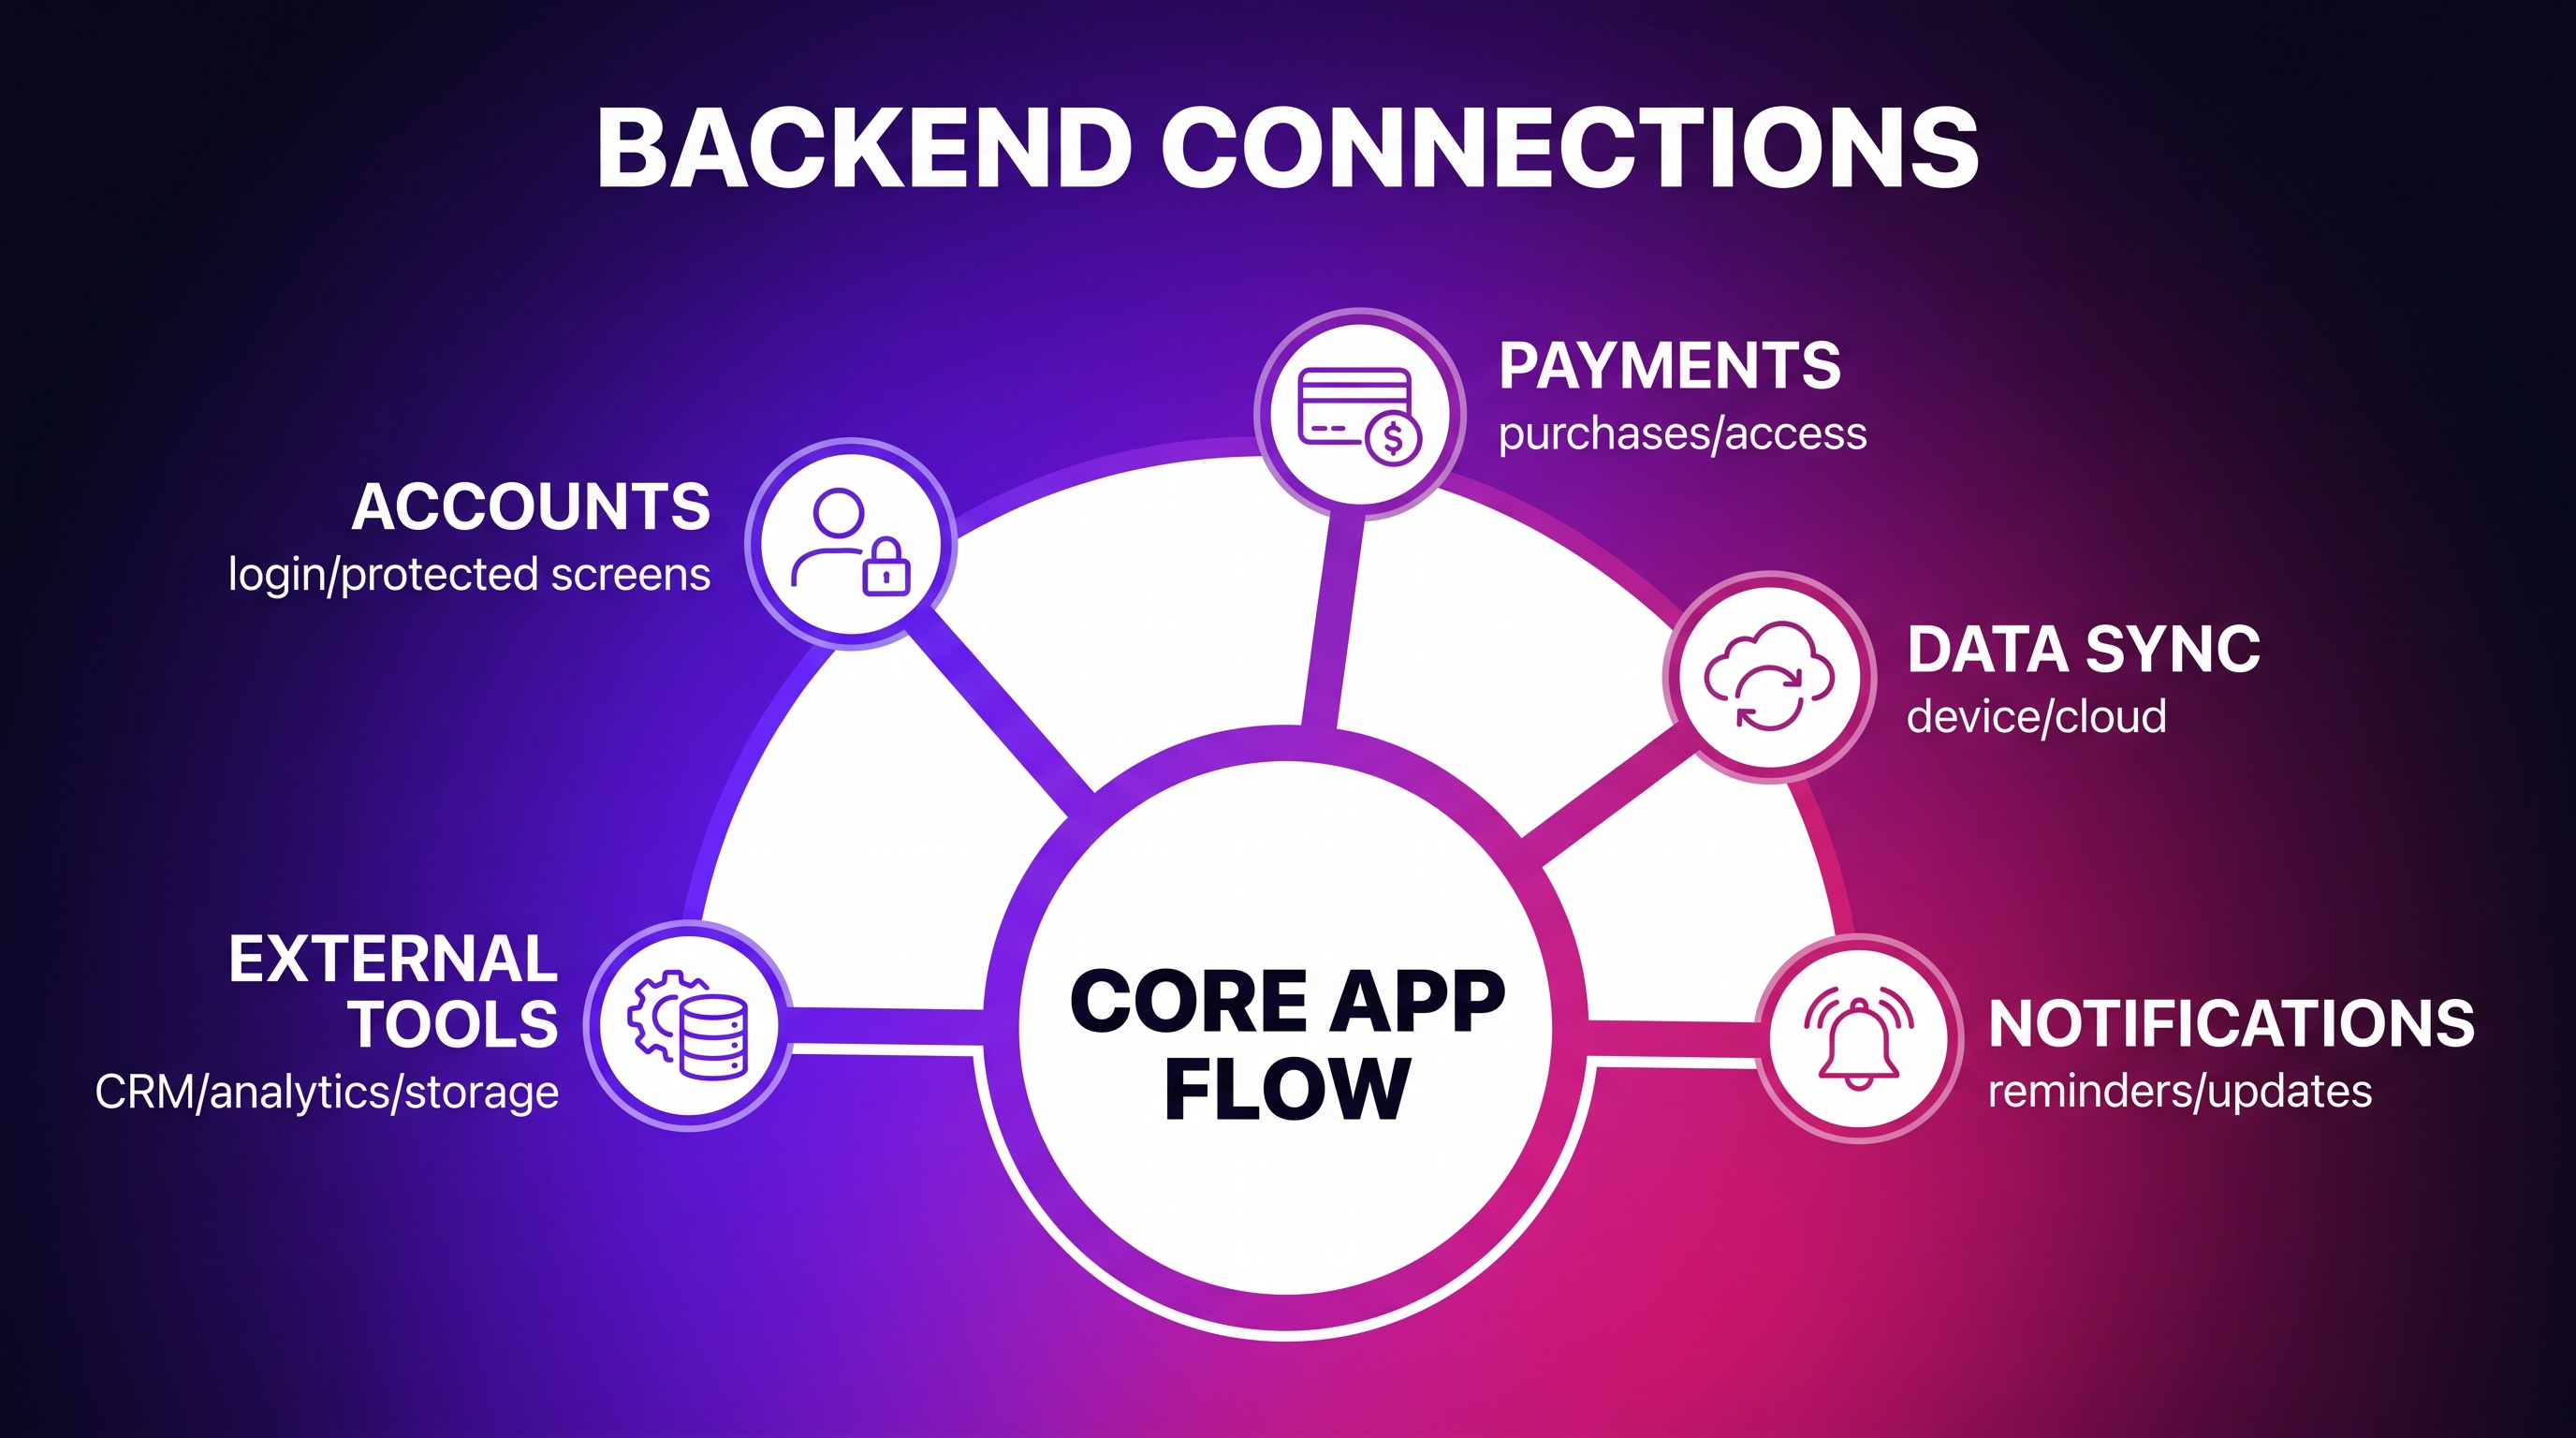
5. Connect backend features
Backend decisions affect the build itself, so describe them before generation and test them after. Each provider needs credentials, rules, and a real flow to verify.
Your job is to describe what the app needs to remember, protect, sync, and trigger. Group the work into accounts, paid access, and outside services.
Accounts and private data
Start with login, because account choices affect every private screen.
- Use existing website accounts when members already have profiles, orders, or subscriptions.
- Use Apple, Google, or email login when the app needs a simple native sign-in flow.
- Use Firebase Auth, Supabase Auth, or Auth0 when you need standard authentication infrastructure.
Use this checklist before you ask Bilt to generate the connected app behavior:
| Decision | Common examples | Why it matters |
|---|---|---|
| Logged-in features | Preferences, orders, saved items | Requires user accounts |
| Private data | Profiles, receipts, messages | Needs protected storage |
| Paid access | Subscriptions, member content | Needs purchase checks |
| Admin actions | Approvals, moderation, updates | Needs backend rules |
Device vs cloud split
Use local storage for quick personal state.
Use cloud storage for data users expect to see across phones.
A practical split looks like this:
| Store here | Use for | Example |
|---|---|---|
| On device | Fast personal state | Theme preference |
| Cloud database | Synced user data | Purchase history |
| Cloud storage | Large files | Images, videos |
| Real-time data | Live updates | Chat, feeds |
Payments and permissions
Describe what happens after a user takes an action in plain English: “When a user buys a plan, unlock premium recipes and save the purchase to the account.”
Then add the follow-up action: send a confirmation email.
That description gives Bilt the intent for the generated app behavior.
Verify the backend setup before testing:
- Authentication provider and account rules.
- Database records and storage permissions.
- Media upload limits.
- Push notification settings.
- Location and reminder rules.
Notifications, analytics, and external tools
Map outside services last. This is the annoying part because every integration adds setup work before testing.
Common connections include:
- Payments: Stripe, Apple Pay, Google Pay, StoreKit, Google Play Billing, subscriptions, and one-time purchases.
- User accounts: Sign in with Apple, Google Sign-In, email login, OAuth/OIDC, and existing website accounts.
- Notifications: Firebase Cloud Messaging, Apple Push Notification service, reminders, and order updates.
- Business systems: CRM records, GA4 or Firebase Analytics events, and email lists.
- Media and files: User uploads, profile photos, downloadable assets, Firebase Storage, Supabase Storage, or AWS S3.
If you are unsure, connect the purchase path first for an ecommerce app:
- Login.
- Product data.
- Checkout.
- Purchase history.
- Order notifications.
Backend decisions are the hinge; the backend-aware full-stack AI breakdown shows which builders cover more than screens.
6. Refine mobile UX
Mobile UX refinement means replacing desktop habits with phone-native patterns that work under thumbs, small screens, and quick sessions.
Navigation is the biggest trap.
A desktop menu with many links usually becomes a confusing mobile app. Users cannot scan wide layouts or tap tiny options on a small screen.
Use this checklist to simplify mobile navigation:
- Choose 3 to 5 primary destinations: Home, search, saved items, account, and checkout are common examples.
- Use a bottom tab bar: Put the most-used destinations where thumbs can reach them.
- Remove branching menus: Each tap should move the user closer to a goal.
- Keep secondary items hidden: Settings, help, legal, and billing can live inside Account.
- Preview on a phone: A flow that feels fine on desktop can feel slow on mobile.
A website might use a top menu with Home, Shop, Blog, About, Resources, Account, Support, and Contact. In the app, that should become a bottom bar like Home, Shop, Saved, and Account.
The same rule applies to flows. If checkout takes six screens on the website, the app should compress the path wherever possible: select item, confirm details, pay, done.
Bilt makes this iterative. Instead of rewriting specs or filing design tickets, describe the change in chat: “Move search into the bottom tab bar,” or “Make checkout two steps shorter.”
Then use live preview to check the result on a real mobile layout. Keep refining until the main actions feel obvious without explanation.
Have your brand assets ready before you polish the interface:
- Logo files: Vector or high-resolution PNG.
- Brand colors: Exact hex codes, not rough guesses.
- Design system: Type, spacing, buttons, and components, if available.
- Website screenshots: Useful references for tone, hierarchy, and visual style.
Do not copy the desktop layout just because the brand looks right there. Use the assets to make the app feel familiar, then let the mobile layout stay simple.
7. Check performance and security
Before you invite testers, run one verification pass for speed, data safety, and recovery. This is where you catch the issues that are painful to fix after real users arrive.
Keep this step focused on launch risk, not backend design. You are checking whether the app can survive normal use without exposing secrets or breaking under pressure.
Use this pre-launch checklist:
- Keep credentials server-side: API keys, private tokens, and encryption passwords should never sit inside the mobile app binary, where they can be extracted.
- Harden authentication: Confirm user sessions, password resets, logged-out states, and protected screens behave correctly before release.
- Sanitize inputs: Test forms, search boxes, uploads, and API requests with messy input so users cannot accidentally break the app.
- Limit API access: Make sure your app only talks to the services it needs, and that those services reject unexpected requests. Bilt handles the base layer; this check is for any custom integrations you added.
- Separate staging from production: Test new features against staging data first, so a broken change does not touch live users or live records.
- Run health checks: Watch load time, crashes, failed requests, and error spikes while moving through the main user flows.
- Confirm backups: Make sure you can restore important data if a release corrupts records or deletes something it should not.
- Scan dependencies: Run vulnerability checks before publishing, especially if AI-generated changes added packages quickly.
If you are building this by hand, each checklist item becomes another layer to configure and maintain.
Missing one can turn a small launch bug into exposed data, broken accounts, or a rejected app.
With Bilt, you can start from a managed security setup instead of configuring every layer from a blank project. That includes encryption, secure data transfer, compliance support, and isolated AI processing environments.
You still review the app experience, but security setup is not another blank technical project.
8. Test devices and users
Device testing answers a different question than the preview step: does the app feel right when someone actually taps through it? Test the core flows before you prepare store submission.
Bilt's live preview lets you stream an iOS simulator in the browser, so you can test the app without a Mac. Pair that preview with real-device testing before store submission.
Start with the quick device checklist:
- Open every primary screen: Check layout, navigation, loading states, and empty states on both iOS and Android.
- Run the account flow: Sign up, log in, log out, reset a password, and confirm protected areas stay protected.
- Test native behavior: Check push notifications, camera access, file uploads, location, deep links, or any device feature your app depends on.
- Try bad conditions: Use a weak connection, rotate the screen, background the app, reopen it, and confirm progress is not lost.
- Test on a physical phone: Install the app on a real device so you can catch touch, spacing, keyboard, and performance issues.
Simulators and emulators are useful for fast iteration, but they are not the finish line. They cannot fully reproduce battery drain, heat, sensor behavior, hardware-specific rendering, or real network variability.
Paywall review callout
If your app has in-app purchases, Apple Review needs an interactive purchase flow. A screenshot of the paywall is not enough.
Test the full sequence: paywall trigger, product selection, purchase confirmation, and the post-purchase state. If reviewers cannot interact with that flow, the app can be rejected even if the screen looks correct.
Before submission, hand the app to a small group of target users.
Ask them to complete the main task without coaching. Watch where they hesitate, misread labels, or abandon the flow.
Five good testers can reveal more than a large internal review. Fix the obvious issues, retest the same flow, then move to store submission assets in the next step.
9. Secure code ownership
Code ownership means you can leave with the app itself, not just a hosted account.
The painful surprise comes later: a founder asks a developer to fix one bug, and the builder can only provide a preview link.
Ownership flow
With Bilt, you get full source code access and can keep generated apps in GitHub. Put the repo under your organization so handoff starts from code rather than screenshots.
If the builder cannot export source code, switching tools usually means rebuilding the app.
That is lock-in in practical terms: pricing changes, roadmap shifts, and your exit path depends on the vendor.
Before you build too far, do a 10-minute ownership pass:
- Export the full codebase; a hosted preview is not enough.
- Put the repo in your GitHub organization before contractors touch it.
- Confirm Git history shows every iteration and rollback point.
- Ask a developer to open the repo and run the documented build command.
- Check that exportable code is not tied to one provider's private build system.
Final hygiene pass
Check these before treating exported code as production-ready:
- exposed secrets in
.envfiles or config - outdated packages
- broken login or checkout logic
Keep the review narrow. The goal is ownership, not another full security audit.
10. Prepare your store listing
App Store Optimization (ASO) is the launch work that helps website users find the app in the Apple App Store and Google Play.
Approval only gets the app listed. The store page still has to explain why the app belongs on someone's phone.
Start with one primary keyword, then fit the app name inside the 30-character limit used by Apple and Google Play.
Use App Store Connect's 100-character keyword field for Apple; use Google Play's short and full descriptions for search signals.
For a meal-planning website, “Acme” wastes the keyword slot.
“Acme Meal Planner” tells App Store Connect and shoppers what problem the app solves.
Build the store page from the top down:
- Put the primary keyword in the title only if the app name still reads like a brand.
- Use the first two lines to state the outcome before the description expands.
- Convert website features into install reasons, such as faster booking or offline access.
- Lead screenshots with the core use case, then add short captions.
- Ask trusted website users or subscribers for feedback before the wider launch.
- Trigger review prompts after a successful action, not on first open.
- Announce the app in owned channels first:
- email list
- mobile website banner
- account dashboard
- QR code at checkout, events, or in-store locations
- deep links from high-traffic web pages into app screens
Preview the listing in App Store Connect and Google Play Console before launch.
Start with existing website users because they already know the brand; ask for honest reviews after they complete the app's core action.
11. Publish to the app stores
Publishing turns the preview into a store-ready product. Separate this work into preparation, submission, review, release, and updates.
Before submission, reviewers need a signed build they can open and test.
Copy/paste this pre-submission checklist before you click Submit for Review:
- Apple Developer Program: $99/year, required before App Store submission.
- Google Play Console: $25 one-time registration fee, required before Google Play publishing.
- Store assets: confirm these are complete:
- app name and description
- screenshots and 1024×1024 app icon
- privacy policy URL and support URL
- Signed build: match the full signing chain before upload:
- signing certificate
- bundle ID
- provisioning profile
- App Store Connect app record
- Post-launch watch: check crash reports, ratings, and support messages during the first release window.
- Reviewer access: provide demo credentials for any gated area, plus a working in-app purchase path if the app sells subscriptions or digital goods.
- TestFlight pass: install the release candidate and run the same core flow a reviewer will test.
Common rejection triggers include:
- incomplete metadata or missing privacy details
- broken login, purchase, or onboarding flows
- crashes on reviewer devices
- app behavior that does not match the store description
- thin website wrappers that risk App Store Review Guideline 4.2 for minimum functionality
Apple says 90% of submissions are reviewed in less than 24 hours, but incomplete submissions can take longer.
Before choosing a submission tool, the review-ready iOS software roundup compares output type, ownership, and App Store support.
The signed-build deployment checklist details certificates, TestFlight, and submission steps beyond this release overview.
Bilt's deployment pipeline handles build generation, code signing, certificates, provisioning profiles, and store submission for iOS and Android.
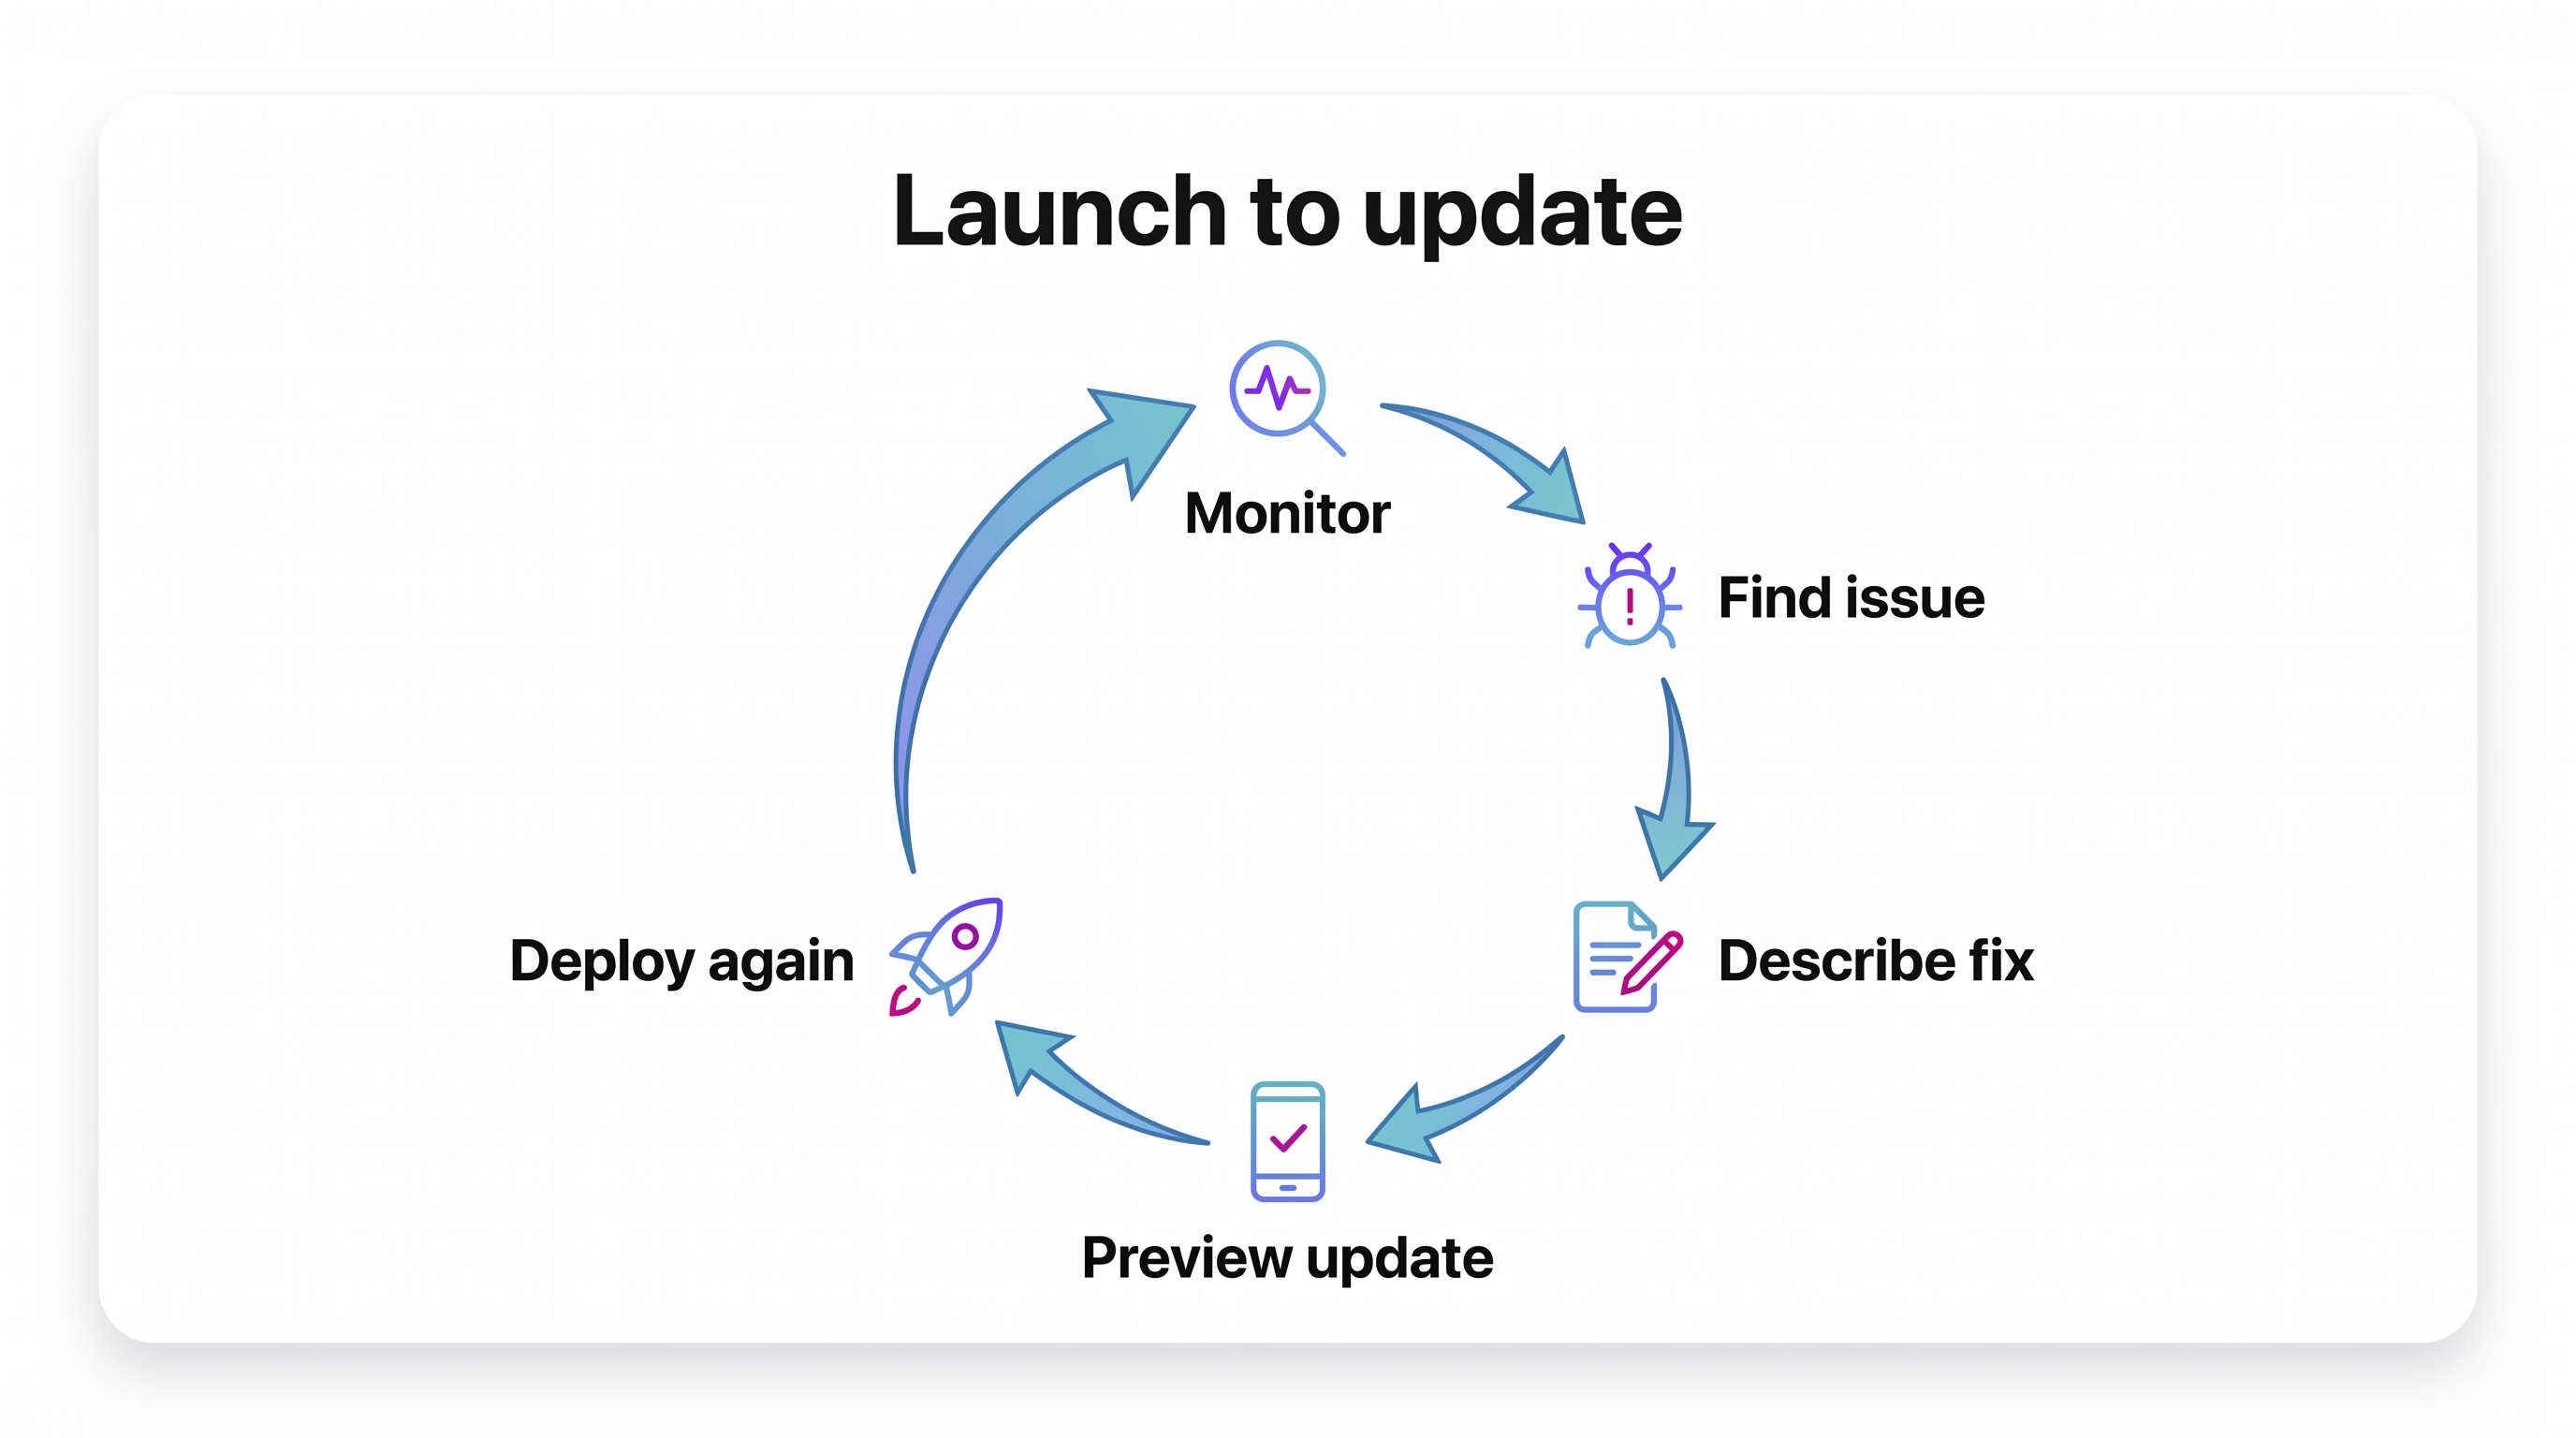
12. Monitor and improve
Post-launch work is a maintenance loop. Watch crashes and reviews, then ship clean updates before small issues become churn.
Track these first:
- Crash rate: Check crash-free sessions within the first 24 hours after each release, then compare the new version against the previous version.
- Retention: Watch Day 1 and Day 7 retention if your analytics tool supports them; sharp drops point to onboarding or value problems.
- Session length: Compare session length against the task, such as booking a class or checking order status; shorter can be fine when the task is quick.
- Feature usage: Track key actions by app version, especially checkout completion or booking starts.
- Review patterns: Tag repeated complaints by app version and device so iPhone 15 login issues do not get buried in general feedback.
Read reviews like bug reports. If five users on version 1.4 mention login confusion after an iOS update, treat login as a product issue even when analytics looks stable.
Plan maintenance around release triggers instead of a fixed calendar. Group minor fixes, but ship quickly when crashes or payment bugs appear.
Every native store update requires a new build upload and review. Metadata or privacy gaps can stall fixes, so keep release notes and store details ready.
Major version upgrades need a separate migration plan:
- Test account access before release.
- Check old data against the new version.
- Beta-test core workflows with real users.
- Prepare rollback or support instructions.
This matters most for utility apps where users rely on the app to get something done. If a migration breaks login, checkout, booking, or saved data, the issue shows up quickly in reviews.
With Bilt, you can describe the fix, preview the update, and move through the same deployment workflow again. That keeps post-launch changes tied to the app users actually have in their hands.
Costs and timelines
Budget depends less on store submission and more on build method. AI/no-code keeps costs subscription-based, while custom development adds heavier pre-release labor.
| Route | Typical cost | Timeline | Best fit |
|---|---|---|---|
| AI or no-code tools | $25-$500/month | Days to weeks | Simple to medium apps |
| Bilt | Free, $25/mo, $50/mo, custom | Minutes to hours for first builds | Native apps without coding |
| Custom development | $10k-$150k+ | 4-12 months | Complex, bespoke products |
Store accounts, screenshots, privacy policies, testing, and review time still apply with every route.
Mandatory platform fees apply regardless of build method:
- Apple Developer Program: $99/year.
- Google Play Console: $25 one-time.
For no-code and AI tools, use app complexity as the timeline driver:
- Simple app: 3 to 7 days when screens and content are already defined.
- Medium app: 2 to 4 weeks when integrations or store assets still need work.
- Complex app: 1 to 3 months when permissions and backend behavior need iteration.
For route and timeline tradeoffs, the launch-focused software roundup compares tools that stop at prototypes versus publishing.
Bilt changes the comparison when your goal is a native mobile app from an existing website or clear app idea. Treat Bilt pricing as plan-dependent, and verify current billing before you scope the project.
Common mistakes
A website-to-app project gets bloated when the app copies the whole site into a smaller screen. A useful app should give users one high-value action, such as booking a slot or checking an order.
Start with the action your site already proves people want.
- Service business: book an appointment
- Ecommerce site: reorder a product
- Membership site: check lessons or account progress
- Support portal: send a message or track a request
Common mistakes to avoid
- Copying every page: A restaurant app should make reservations or pickup orders easy before sending users through the full sitemap.
- Ignoring native UX: A desktop menu with tiny links is hard to tap on a phone. Use bottom navigation and large tap targets instead.
- Forgetting the backend: A checkout screen still needs payment state and order history. A learning app still needs progress saved to each account.
- Stopping at a preview: A browser demo leaves 2 release paths unfinished: a signed iOS build and a Google Play setup. Store assets still need to be prepared.
How Bilt helps you ship
With Bilt, you can turn a website or app idea into native React Native code with a live preview and exportable source.
You can also connect backend features like login and payments, then move toward code signing and store submission when the app is ready to ship.
Before building, run a phone test: count taps from app open to the chosen action. If the app takes more taps than the website, cut the extra screens.
Ready to turn your website into a real native app? Start free with Bilt and describe the mobile flow you want. Bilt will help you generate the iOS and Android app, preview it, refine it in chat, and move toward store submission.
Can I build an app from my website for free?
Partially. You can start with free tiers, including Bilt's free entry point, but publishing to the app stores still has mandatory platform fees.
Typical costs:
- Apple Developer Program: $99/year.
- Google Play Console: $25 one-time.
- No-code or AI builders: about $25 to $500/month, depending on the plan.
- DIY no-code MVP: often $500 to $2,000 in the first year, including builder costs, store fees, and basic assets.
Bilt is free to start with no credit card, then you can upgrade as you need. If cost is your main concern, See all plans before you build.
Do I need to know how to code?
No. You do not need coding knowledge or a Mac to turn text prompts into working mobile apps. Modern no-code and AI mobile builders handle Swift, Kotlin, React Native, and remote iOS compilation for you.
For the first build, the plain-language Bilt walkthrough shows how prompts become a testable app.
With Bilt, you describe what the app should do and the platform generates the interface, backend logic, integrations, and React Native code. You focus on the product; Bilt handles the technical structure.
Will the app update automatically when my site changes?
It depends on what changed. Content and data from a shared backend can update in the app automatically, but UI changes, new screens, navigation changes, and native features usually require a new build.
Simple rule:
- Content updates: product listings, articles, user data, and backend-driven content can refresh without store resubmission.
- Code updates: new screens, app navigation, push notifications, paywalls, and native behavior need a compiled build.
Bilt keeps backend data and authentication connected, while still giving you a native app layer when you need mobile-specific features. That balance is usually better than wrapping the whole website and hoping it feels native.
How long does it take?
Simple no-code or AI app builds often take 3 to 7 days, and more complex apps stretch to a few weeks. Traditional custom development runs 2 to 12 months depending on complexity.
For store review, Apple says 90% of submissions are reviewed in less than 24 hours. Leave a few extra days for first submissions, incomplete metadata, holidays, or a rejection fix.
Bilt compresses the early phases by replacing separate planning, design, frontend, backend, and deployment steps with one guided workflow. You describe the app, preview it, refine it through conversation, then move toward store submission.
Is a mobile app better than a PWA for my website?
Not always. A PWA can be enough for content access, simple account pages, or lightweight repeat visits.
A native app is usually better when you need push notifications, camera access, location, offline state, app-store distribution, or a more polished mobile experience. If those features matter, Bilt can help you create a native iOS and Android app instead of stopping at a browser-based experience.