To build an iOS app, define the app’s core use case, choose a build path, create the first version, add logic and data, test on simulator and real devices, prepare App Store assets, submit through App Store Connect, and monitor the release.
You can follow the manual Xcode route, or use an AI-native builder like Bilt when you want to describe the app in plain English instead of writing Swift. Either way, building the screens is only half the job.
In this guide, “native” means the app runs as an installed iPhone app, can use iOS features like push notifications and camera access, and can go through App Store submission.
TL;DR
- Choose who will build the app and how: native code, a cross-platform framework, Bilt, or a hired team.
- Define the app’s core action before you design screens or write prompts.
- You can learn and test locally for free, but App Store distribution requires the Apple Developer Program.
- Build the first tappable version before adding extra features.
- Add logic, data, accounts, payments, and permissions only when the app flow needs them.
- Test in a simulator first, then confirm the same flow on real iPhones before TestFlight.
- Prepare privacy details, screenshots, signing, metadata, and reviewer access before submission.
- After launch, watch crashes, payment issues, login problems, reviews, and support tickets before planning new features.
iOS app-building paths
Pick the build route before the first screen. Coding skill matters, but so do budget, launch timeline, app complexity, and how much release control you want.
This guide is a hybrid checklist. It shows the manual iOS path, then points out where an AI-native builder like Bilt can replace code, local setup, and some release work.
Use the table below to understand the tradeoffs before following the 12-step route:
| Build path | Best fit | Main tradeoff | Release responsibility |
|---|---|---|---|
| Swift or SwiftUI in Xcode | You need full iOS control and can write or maintain native code | Requires platform-specific setup and engineering work | You manage testing, signing, and App Store Connect |
| Cross-platform framework | A technical team wants one codebase for iOS and Android | Shared code still needs native testing and release setup | Your team manages both store workflows |
| Bilt | You want to describe and refine a native app without writing code | You still make product decisions and test the result | Bilt supports build, signing, and submission work |
| Hired team | The app needs custom architecture, regulated data handling, or ongoing engineering | Requires more budget and coordination | The team handles implementation while you retain account and product oversight |
Use this quick filter:
- Use Swift or SwiftUI when you need full native control and have iOS development skills.
- Use a cross-platform framework when you want one codebase for iOS and Android and have a technical team.
- Use Bilt when you have a clear app idea and want to build through prompts instead of code.
- Hire a team when the app has custom architecture, regulated data, or a budget for a longer build.
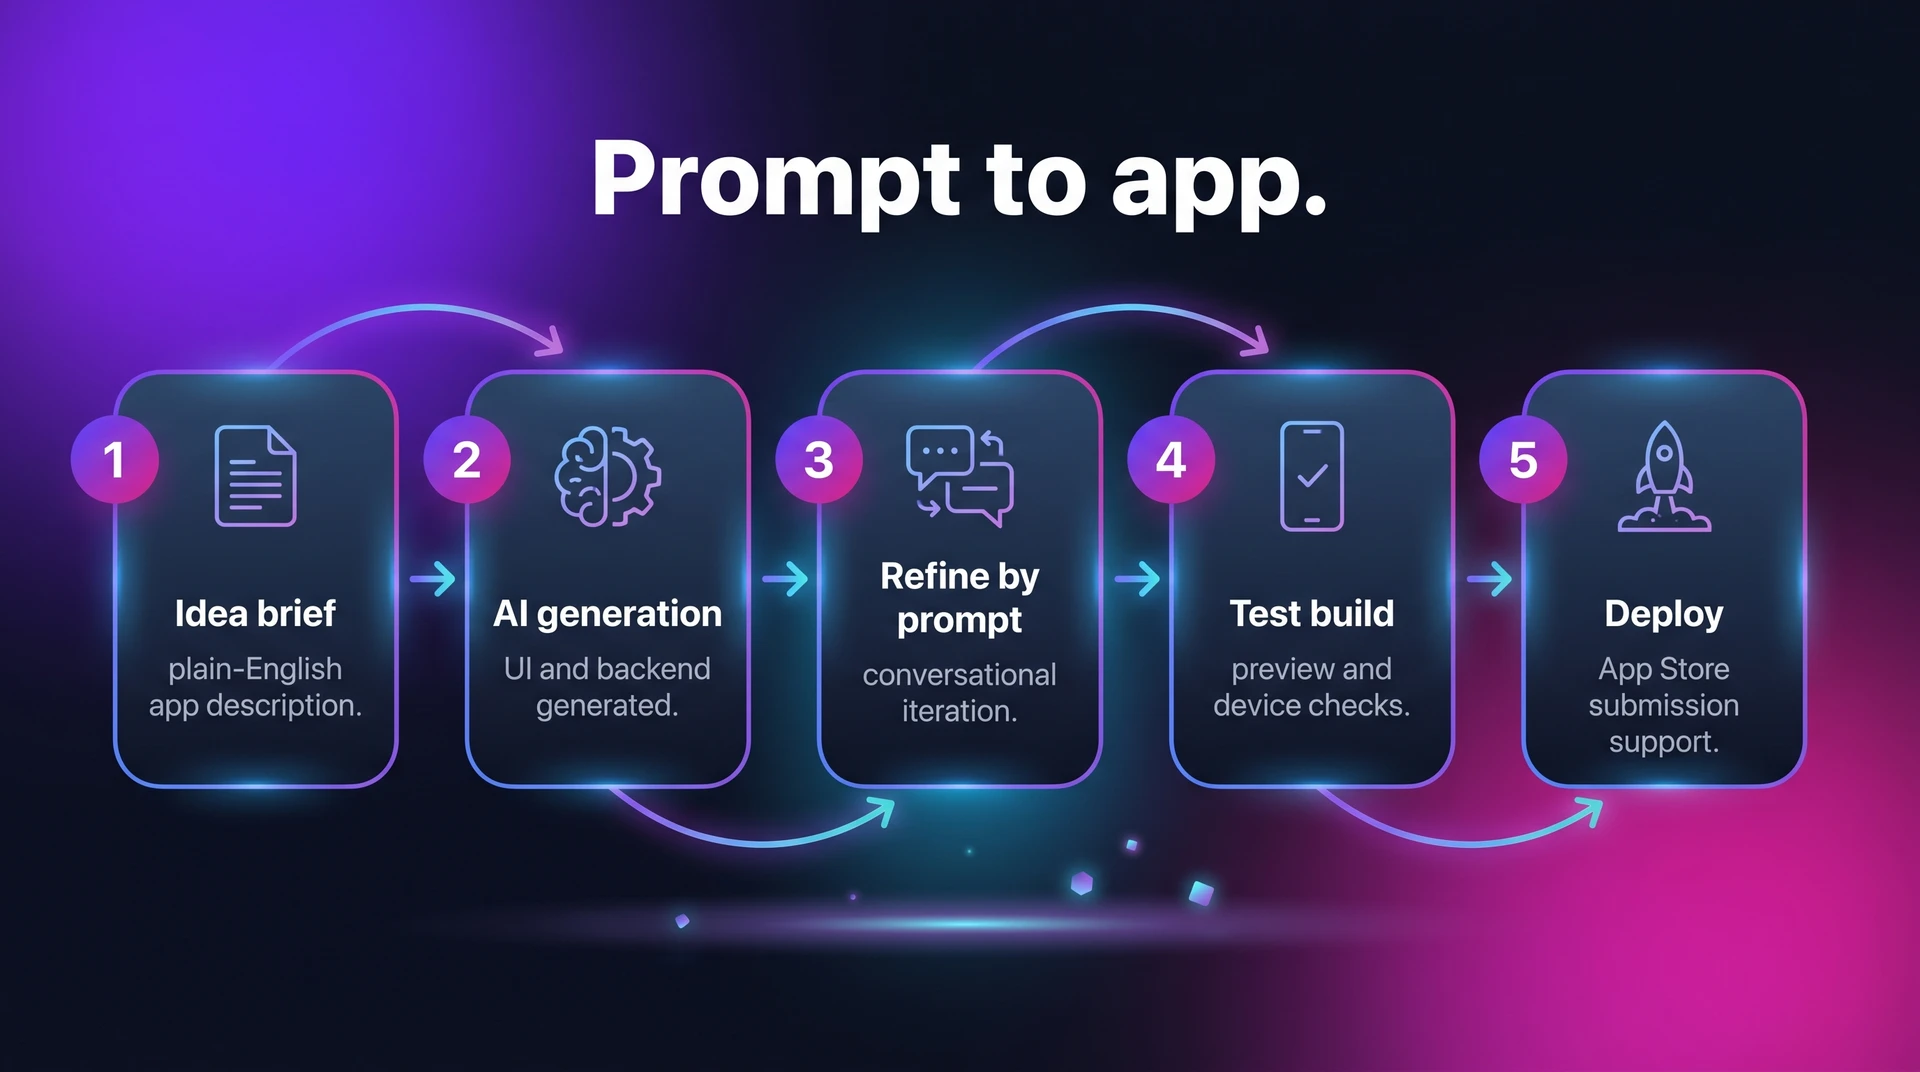
If you use Bilt, turn the Step 1 brief into your first prompt, then use the rest of this guide as your launch checklist.
1. Confirm the essentials
Write a short build brief before opening Xcode, Xcode Simulator, or an AI builder like Bilt. For a fitness tracker, name the target user and first action, plus stored data and paid-access needs.
Revenue and data choices affect the first version. A fitness tracker with paid plans may need user accounts, workout history, progress records, and a clear subscription flag before the build moves into setup.
| Essential | What to confirm now | Fitness tracker example |
|---|---|---|
| Target user | Who the app is for and the main use case | Beginners following guided weekly plans |
| Core action | The main action the first version must support | Log a workout and see progress |
| Data needs | Records, relationships, or user data the app depends on | User profile, workout sessions, plan access |
| Monetization | Whether subscriptions or paywalls are part of the plan | Paid plan unlocks premium workouts |
Make the brief copyable:
- My app is for: beginners following guided weekly plans.
- The first action users take is: log a workout.
- The app needs to save: user profiles, workout sessions, and plan access.
- The app makes money through: a paid plan that unlocks premium workouts.
- The first version is successful when: a user can sign up, choose a plan, log a workout, and see progress.
For that fitness-tracker branch, the paid-plan model comparison weighs free trials against upfront access.
2. Set up your tools
The manual path starts with Xcode, Apple’s Mac app for creating, running, and preparing iPhone apps. You will also need an Apple ID, a starter project, and Xcode Simulator for early checks.
The AI-native path starts lighter. Create a Bilt account, bring the build brief from Step 1, and add brand assets like logos, colors, icons, and fonts when you have them.
You can decide on the Apple Developer Program later, but you need it before App Store distribution.
| Setup item | What it is for | Fitness tracker example |
|---|---|---|
| Xcode | Apple’s IDE for building and preparing iOS apps | Main workspace for the native iOS project |
| Starter template | Initial structure for the first app version | A simple app shell with screens added next |
| Project details | Name, team, and organization settings | “FitTrack” under your Apple developer team |
| Bilt account | Browser-based workspace for prompting, previewing, and refining the app | Start from the Step 1 brief and add brand assets when ready |
The iOS development software comparison weighs Xcode, prompt builders, and publishing support for that setup choice.
3. Design the app flow
Map the app flow before writing code. For a subscription fitness tracker, the first pass only needs the core path:
- Create an account.
- Choose a beginner plan.
- Log the first workout.
- Review weekly progress.
- See the paywall when premium content is required.
Navigation should follow repeated actions. A fitness tracker might use four tabs: Today, Plans, Progress, and Profile.
| Approach | How flow design starts | How visuals are applied | How the flow evolves |
|---|---|---|---|
| Traditional manual path | Plan screens with Apple’s interface guidance, then assemble views screen by screen | Apply UI elements, images, colors, and typography manually | Revise each screen as requirements change |
| Bilt AI-native path | Describe the screens, actions, and app intent in plain English | Upload logos, icons, images, colors, and fonts as brand inputs | Refine the flow through prompt, preview, and testing cycles |
Use a prompt like this to turn the flow into build instructions:
“Create onboarding, plan selection, workout logging, progress, and profile screens. Use bottom tabs for Today, Plans, Progress, and Profile.”
Add brand direction before screens multiply: logo, colors, fonts, and image style. With the flow set, the next step is building the first working version.
4. Build the first version
Start with a build you can tap through. The first mobile MVP build should prove the main flow before you add edge cases or extra features.
On the manual native path, open Xcode and create a new project. Simulator is Xcode's iPhone test environment on your Mac, so you can run the starter build before using a real device.
With Bilt, start with a plain-English description of the app. Bilt uses your prompt to generate native iOS and Android builds from the requirements you provide.
Describe an app and watch Bilt turn it into a native app in live preview.
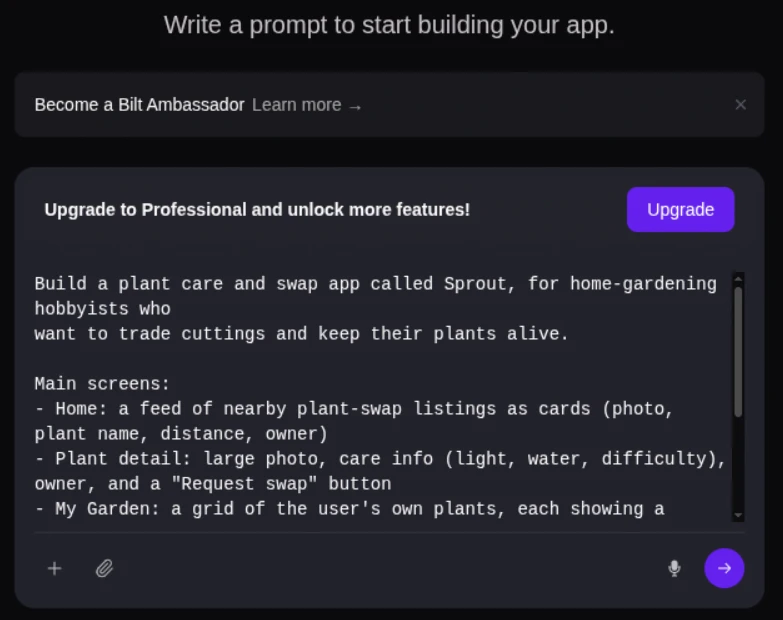
Put these details in the first prompt:
- Core users: who the app is for and what they need to do first.
- Main screens: onboarding, home, tracking, settings, profile, or any custom flow.
- Key behavior: what happens when users tap buttons, save data, or complete an action.
- Design direction: colors, tone, layout preferences, and any brand assets.
- Account needs: sign-up, subscriptions, saved history, reminders, or user profiles.
Use one prompt that includes users, screens, behavior, data, design, and monetization. Copy this structure, then swap in your own app details:
Build a subscription-based fitness tracker for busy beginners.
Users should create an account, choose a weekly goal, and log workouts.
Show streaks, progress charts, and push reminders.
Use a clean dark theme with blue accents.
Include a paywall after onboarding for monthly and annual plans.
Build native iOS and Android versions with editable profile settings.
That prompt is still a starting point. The first prompt rarely gets every screen, state, and edge case right.
In one scoped Bilt demo, the team reached a tappable fitness app after about 11 prompt turns over a few hours. The exact count matters less than the pattern: build, review, prompt, and test.
| Path | How the first build starts | What you do first | Initial output |
|---|---|---|---|
| Manual native path | Create a new project in Xcode | Set up project structure and initial screens | Starter app scaffold run in Simulator |
| Bilt AI path | Describe the app in plain English | State features, requirements, design direction, and assets | Functional native first build |
Once the first build opens, stop adding new ideas. Verify the core path before you move into logic and data.
Before choosing a build path, the native-first iOS builder roundup compares no-code options by publishing support, AI features, and pricing.
5. Add logic and data
Make the first build respond to user actions. A screen only becomes useful when the app knows what to do after each tap, form entry, save, or error.
Think in three layers:
- Connect actions to outcomes.
- Choose where data lives.
- Add native services only when the feature requires them.
On the manual iOS path, you connect buttons and fields to Swift code. With Bilt, enable Bilt Cloud or connect your own Supabase when the app needs a server-side backend, then describe the behavior and data each feature needs. Bilt can generate the app logic and backend structure from those requirements, but you still need to test account states, saved data, permissions, and purchase flows before release.
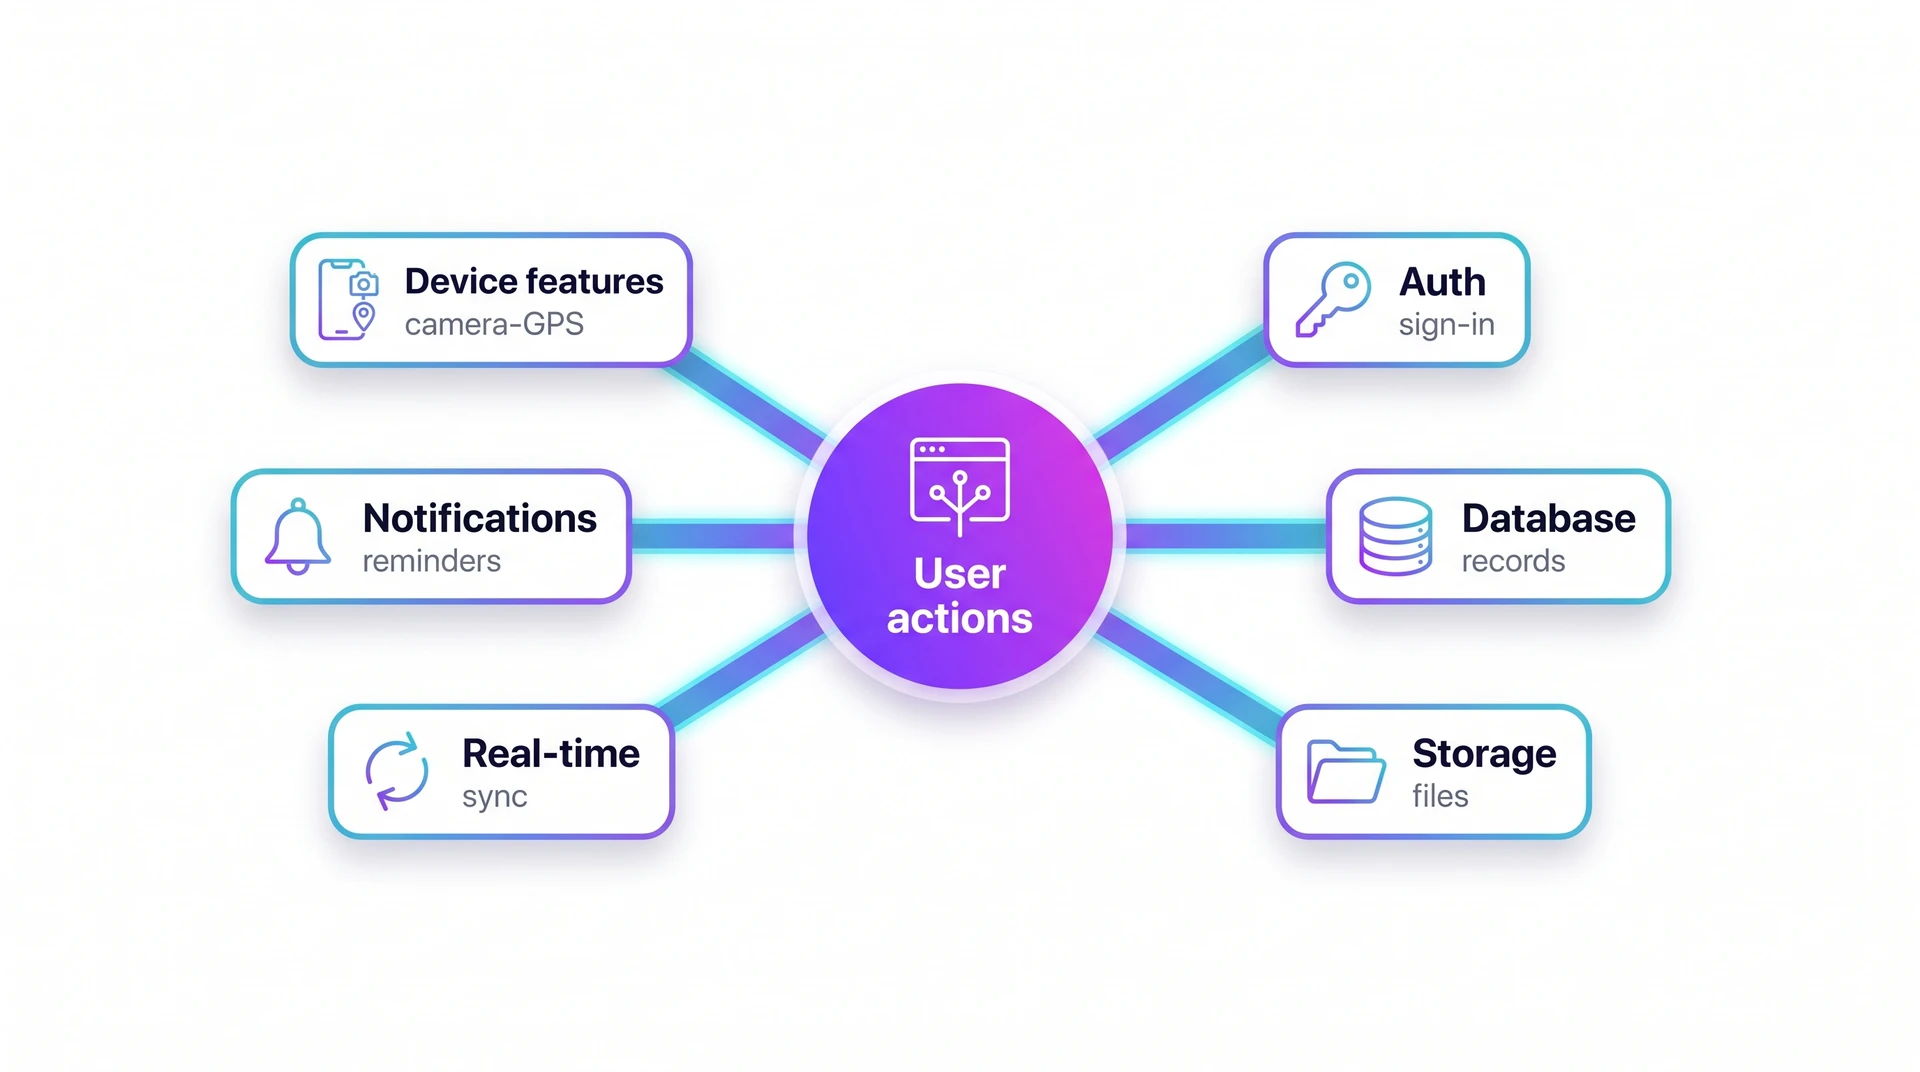
- Authentication: sign-up, login, and account state.
- Databases: saved records such as workouts, notes, or profiles.
- Cloud storage: files, images, and other user uploads.
- Real-time updates: changes that should appear without a manual refresh.
- Notifications: reminders, alerts, and scheduled prompts.
- Native device features: camera, GPS, push notifications, and other iPhone capabilities.
Map each user action to a result. This prevents vague prompts and vague code because every screen has a clear save, update, or error state:
- Sign up: create an account, validate credentials, and store the user profile.
- Save workout: write the workout entry to a database and show it in history.
- Upload image: open the camera or photo library, then store the media file.
- Send reminder: schedule a notification based on the user's selected time.
- Track location: request GPS access and save location data only when the feature needs it.
Choose storage before real users enter the app:
- Local storage: simple on-device data that does not need sync.
- Server-side database: accounts, shared data, multi-device use, and sync.
Handle sensitive data deliberately from the first build. Use the iOS Keychain for secrets such as tokens and credentials. Store user records in a secure database, and avoid keeping financial data inside the app package.
| Approach | How logic gets wired | Data and native feature scope |
|---|---|---|
| Manual iOS starter flow | Connect views to Swift or SwiftUI actions, state, and error handling | Add storage and native services as the app requires them |
| Bilt step | Backend requirements are wired automatically across auth, database, storage, and server-side logic | Includes media uploads, notifications, reminders, camera, GPS, and push notifications |
Once the app responds correctly, refine the screens so behavior and interface match.
6. Refine the app
Now tighten the app by testing one flow at a time. Your job is to find vague behavior before users do.
On the manual path, each revision moves through Xcode:
- Swift edits for behavior
- SwiftUI layout or Auto Layout fixes for screen placement
- Debugger checks for broken flows
- Xcode Instruments checks for speed or memory problems
With Bilt, refinement happens through conversation. Ask for one visible change or behavior fix at a time:
- Update a color or spacing choice.
- Add a missing screen.
- Rename or change a form field.
- Adjust what happens after a tap.
Bilt keeps earlier requirements in context, but you still need to verify each revision before stacking more changes on top.
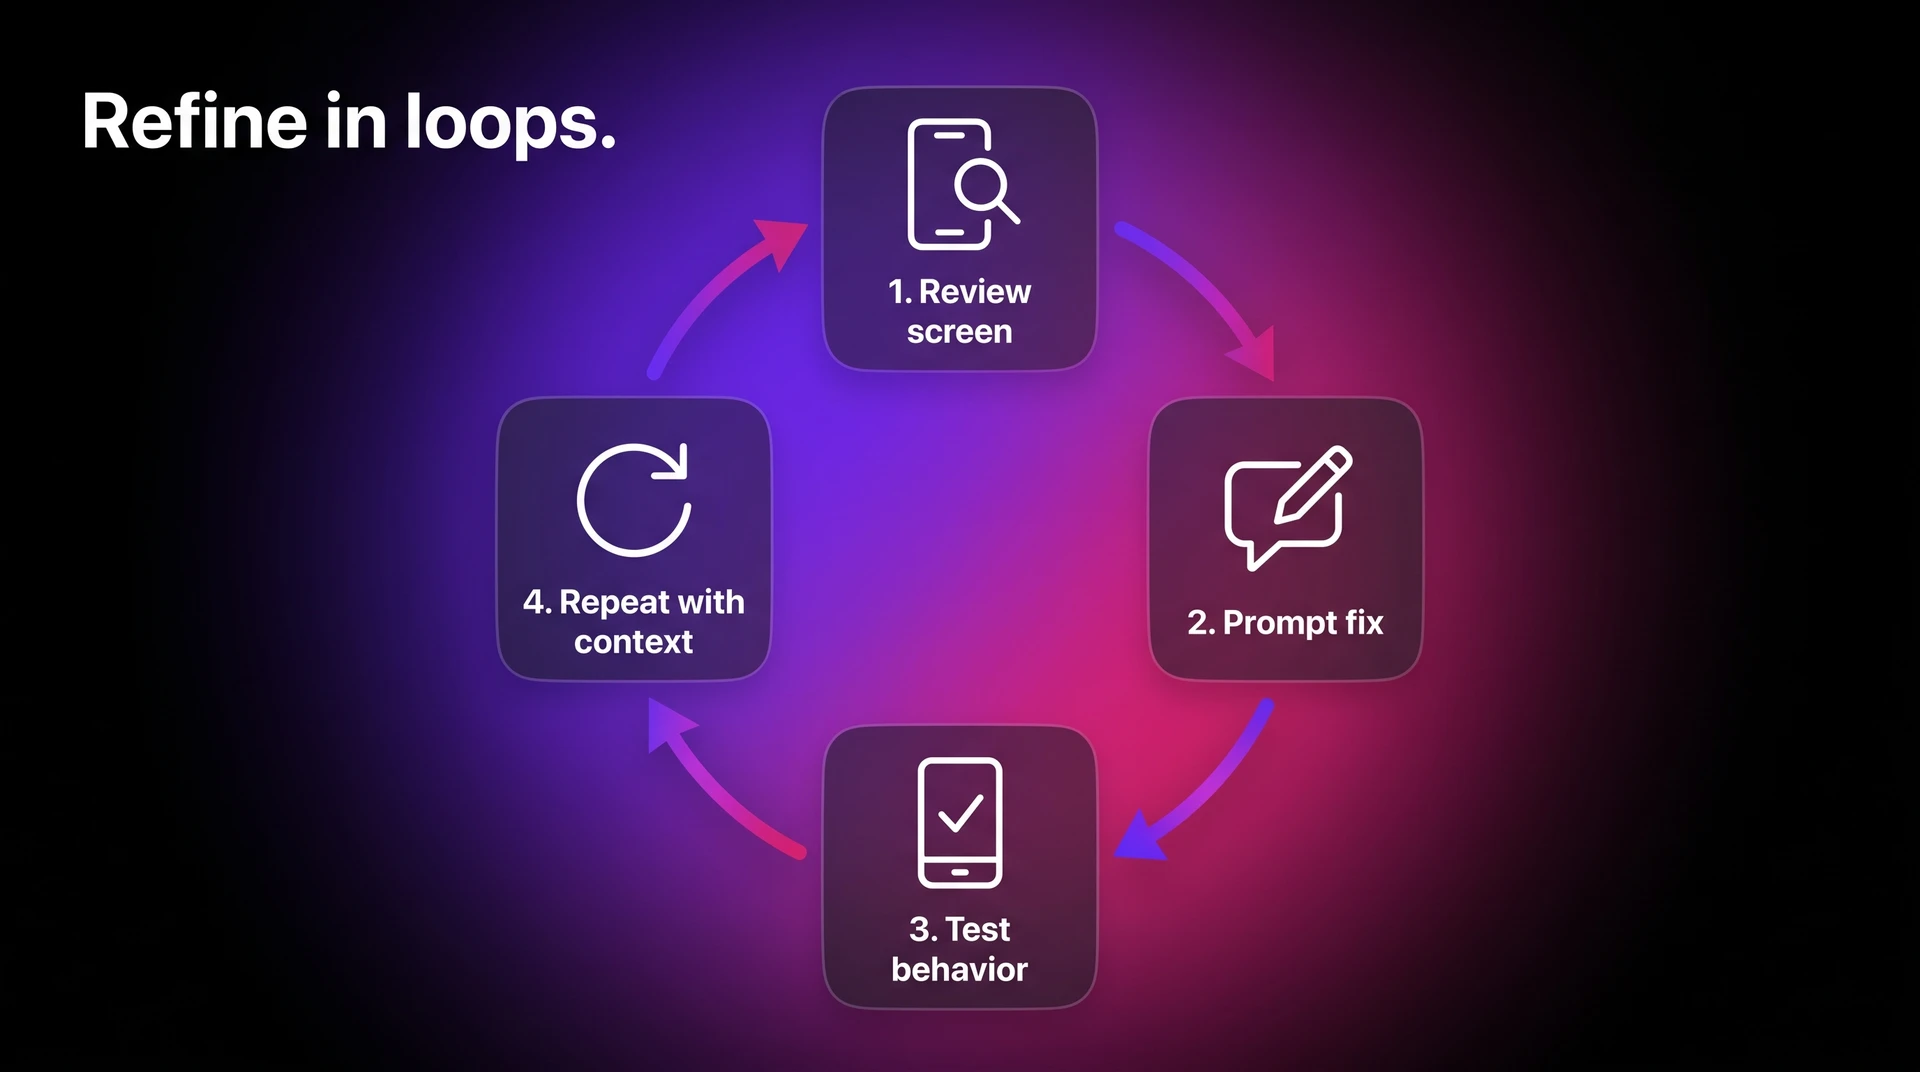
Use this loop for each change:
- Review the screen: check labels, layout, navigation, and missing states.
- Prompt the change: describe one clear fix at a time.
- Test the behavior: tap through the flow and confirm the result matches the prompt.
- Repeat with context: reference the previous version so revisions stay consistent.
Write refinement prompts like change requests, not opinions. Instead of asking to "make the dashboard better," say: "Move the weekly streak card above the workout list, show the next reminder time, and keep the dark theme."
The final polish deserves a slower pass. App Store rejections, broken permissions, and payment bugs often hide in edge cases that the main flow does not cover.
- Forms submit and save correctly
- Empty states explain what to do next
- Permissions appear at the right moment
- Edge cases do not break the main flow
After refinement, the app is ready for monetization decisions because paid access changes the core flow.
7. Add monetization
Decide how the app earns money before you finish the main flow. Paid access changes screens, account rules, and App Store setup.
Your choice affects:
- Screen flow: where free users stop and paid users continue
- Account rules: which users can access premium features or content
- App Store Connect: which in-app products must exist before release
Common iOS monetization models:
- Free: users download and use the app without payment.
- Paid: users pay an upfront App Store price before installing.
- Freemium: users download for free, then pay for optional features, content, or upgrades.
- Subscriptions or paywalls: users unlock ongoing digital access through native in-app purchases handled with StoreKit.
Design subscriptions and paywalls before the release checklist. Paid content needs access rules in the app flow and account model before you create App Store products.
For digital products, your app should use Apple's StoreKit for purchases. StoreKit talks to App Store Connect and returns purchase status.
Physical goods, services, and real-world purchases follow different payment rules. Digital access, subscriptions, credits, and premium content usually need Apple's in-app purchase system.
Use this order:
- Choose the business model for the first release.
- Create the matching product in App Store Connect.
- Wire StoreKit purchase, renewal, and restore-purchase logic inside the app.
- Test purchase states before beta feedback, including expired or canceled subscriptions.
Common mistakes to catch before submission:
- Using a paywall before the free path proves value.
- Creating App Store Connect products after the app already expects product IDs.
- Testing only successful purchases instead of restore and failed-payment cases.
App Store Connect supports these in-app purchase types:
| Product type | Best fit | Example |
|---|---|---|
| Consumable | Items users can buy more than once | Credits, coins, boosts |
| Non-consumable | One-time unlocks | Lifetime premium access |
| Auto-renewable subscription | Ongoing access | Monthly coaching plan |
| Non-renewing subscription | Fixed-term access | 3-month course access |
If your app charges for digital access, set up native in-app purchases before submission. A pricing note in the description is not enough for subscriptions or paywalls.
Two practical checks help here:
- Keep product IDs consistent between App Store Connect and StoreKit code.
- Add a visible restore-purchases option before you send the build to testers.
After monetization works in the app, test the full experience on real devices.
8. Test on real devices
Put the app on a real iPhone before you ask anyone else to test it.
Simulators catch layout problems quickly. Your first physical-device pass should follow the same order every time:
- Open the app on Wi-Fi, then repeat on mobile data.
- Complete onboarding and login.
- Complete checkout or the main conversion flow.
- Trigger each permission prompt and deny access once.
- Reopen the app and confirm saved data still appears correctly.
- Change text size and try at least two iPhone screen sizes.
Use each testing path for a different job:
| Testing path | What it catches | Access method |
|---|---|---|
| Physical iPhone | Real hardware behavior for key flows | Install a development build or use TestFlight |
| Bilt browser simulator | Fast UI checks without Apple hardware | Stream the simulator in a browser |
| Cloud real devices | Wider coverage across device models and OS versions | Remote manual or automated testing |
After layout works, test native behavior that a desktop preview cannot prove:
- StoreKit: Test purchases, subscriptions, restore purchase, and failed payment states.
- UserNotifications: Confirm permission prompts, foreground behavior, and tapped notification routing.
- CoreLocation, AVFoundation, and Photos: Check permission denial, limited access, and retry flows.
Bilt's preview tools help with the early pass.
- Browser simulation for quick UI checks.
- Live preview for edit review.
- QR-code testing for a real phone check.
That App Review risk is why the WebView-native tradeoff breakdown compares wrapper limits with native app behavior.
9. Run a beta
Choose the beta path that matches how you built the app. If you have a shareable browser preview, collect flow feedback there first; otherwise, move straight to TestFlight.
Browser previews remove installation friction, so they are useful for early comments on copy, navigation, and screen order. They cannot validate native iOS behavior.
Ask testers for specific notes:
- Which screen made you stop?
- Which label or button felt unclear?
- Which step took more taps than expected?
- Which screen looked broken on your phone?
Move to TestFlight after the flow survives that first pass.
Use TestFlight for native behavior that a browser cannot prove:
- UserNotifications permission and tap behavior
- StoreKit purchase and restore flows
- local storage after force-quitting the app
- sign-in and password reset
- camera and photo permissions
- location and file access
TestFlight runs through App Store Connect, Apple's portal for beta distribution and review. Apple supports up to 100 internal testers and 10,000 external testers.
Apple's TestFlight limits require Beta App Review before external invite links or groups can use a build.
Keep beta data separate from production data. Testers should be able to break staging records without touching live customers.
Common beta mistakes:
- Inviting external testers before the build is ready for Beta App Review.
- Letting testers use production purchases or customer records.
- Asking for vague feedback instead of naming the screen and action to test.
| Stage | What to test | Typical path | Bilt workflow |
|---|---|---|---|
| Early feedback | Flow, copy, screen order, obvious UX issues | Share a preview before installation | Browser preview link |
| Closed iOS beta | Native behavior on installed iOS builds | Upload a beta build and invite testers through TestFlight | Generate an iOS build, then distribute it with TestFlight |
StoreKit-heavy subscriptions need their own QA path; the Bilt purchase-flow deep-dive explains products, receipts, and restore states.
10. Prepare for review
Start review prep after the beta build is stable. Your job now is to make App Review's job easy.
Review prep has four buckets: privacy and data disclosure, security and backend readiness, metadata and screenshots, and reviewer access. Start with privacy because Apple asks for data-practice details, including data collected by third-party code. Apple explains those requirements in its privacy details guidance.
- Privacy policy: Explain the data lifecycle in plain language, from collection through deletion.
- Tracking permission: Use AppTrackingTransparency only when the app tracks users across other companies' apps or websites.
- SDK check: Compare privacy answers against every third-party SDK. Analytics and ads SDKs are common mismatch sources.
- Secrets: Keep server credentials out of the mobile app package.
- Transport and storage: Use encrypted network requests and secure device storage for sensitive data.
- Compliance: Confirm deletion and consent handling when the app serves regulated markets.
Then lock the release candidate:
- Run the exact build you plan to submit.
- Confirm staging and production environments are separated.
- Test memory, loading speed, and crash behavior on a real device.
- Scan dependencies and remove unused SDKs.
Then check metadata and reviewer access. The App Store listing should describe the submitted build, not the roadmap. Apple should see the same features in the screenshots, description, and installed app.
App Review checklist
- Review information: Provide a demo account or demo mode for login-gated features.
- Backend access: Keep required services live during review.
- Contact details: Confirm every support, privacy, and contact link works.
- Special setup: Explain any required hardware or reviewer account role.
Minimum Functionality: Confirm the app provides real native value beyond a repackaged website, which Apple covers under Guideline 4.2.
- Metadata accuracy: Match screenshots and copy to the current build so the listing does not promise unavailable features.
| Area | What to finalize before review |
|---|---|
| Privacy | Privacy disclosures and tracking permission only when the app tracks users across other companies' apps or websites |
| Security | No client-side secrets, encrypted transport, secure storage, and server-side input validation |
| Release hygiene | Dependency scans, staging separation, performance profiling |
Once this package is clean, App Store submission is mostly packaging, signing, and waiting for Apple's review.
11. Submit to App Store
Submission has three parts, and the route changes how much of each part you handle yourself:
- a signed build
- a complete App Store Connect version
- an App Review request
What you need before submission
The manual route uses Xcode, Transporter, signing certificates, provisioning profiles, and App Store Connect. Bilt keeps more of that release work inside the same app-building workflow.
How signing works
Signing has two pieces:
- Certificate: proves the Apple Developer account that is publishing the app.
- Provisioning profile: ties the certificate, bundle ID, and distribution type together.
Submission steps
- Create or confirm the App Store Connect app record.
- Match the app record to the correct bundle ID.
- Create the distribution signing setup.
- Archive the release build, then upload it through Xcode, Transporter, or a technical team's App Store Connect API workflow.
- Wait for App Store Connect to process the build.
- Attach the processed build to the app version.
- Complete the version metadata in App Store Connect.
- Add a demo account or clear demo mode for login-gated features.
- Submit the version for App Review and monitor Resolution Center.
Apple says 90% of submissions are reviewed in less than 24 hours. The same App Review page notes that incomplete submissions can take longer.
Common submission mistakes
- Bundle ID in the uploaded build does not match the App Store Connect record.
- Certificate or provisioning profile comes from the wrong Apple Developer account.
- Screenshots show features missing from the submitted build.
- Privacy answers omit data collected by analytics or crash-reporting SDKs.
If Apple rejects the app
Rejection handling is part of the submission loop:
- Open Resolution Center in App Store Connect.
- Read the exact guideline and reviewer note.
- Fix the issue or reply with a short clarification.
- Upload a new build when the binary changes.
- Resubmit the version for App Review.
Watch for Apple's Guideline 4.2 on minimum functionality. Apps that feel like repackaged websites need more native value before resubmission.
Use one Apple Developer account as the source of truth for signing. Mixing accounts causes avoidable upload failures.
For the complete process, see our step-by-step App Store publishing guide.
How Bilt simplifies release work
With Bilt, the release work stays inside the same app-building process.
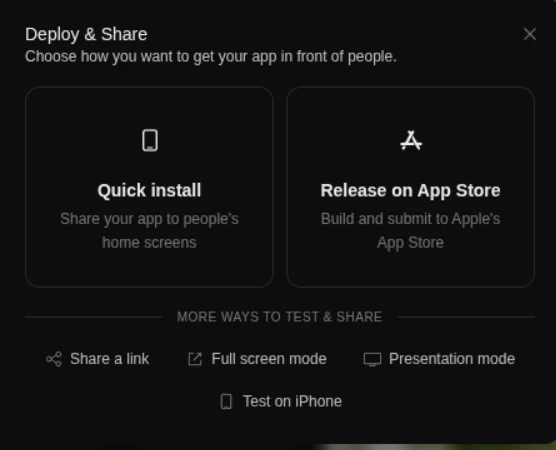
Bilt supports:
- build generation
- code signing
- certificates and provisioning
- store assets
- submission steps
- release workflows
The practical benefit is less context switching. You do not have to move a build between tools to handle cloud building, signing, and upload to App Store Connect.
| Route | Submission work included | Who handles it |
|---|---|---|
| Manual native route | Code signing, certificates, provisioning profiles, App Store Connect steps | The builder or technical team |
| AI-native automated route | Build generation, signing, certificates, provisioning, and upload to App Store Connect | Bilt handles the build and upload; you complete the listing and submit for review in App Store Connect. |
After approval, the next job is monitoring the release and planning the first update.
12. Monitor and update
Monitoring and updating starts after the first version is live. Track technical health, user behavior, store performance, and support feedback in the same release loop.
For code changes, expect another App Store Connect submission. Small fixes still need the same discipline: test the build, submit the update, and watch for problems after release.
Every app-binary update follows the same loop:
- Upload a new signed build when the update changes the app binary.
- TestFlight is optional for public release; use it for risky changes such as login or payments.
- Submit the build for review, then release the approved version manually or automatically.
- Watch crash data and support tickets closely after release.
Watch the technical signals first:
- Crashes and errors: Fix issues that block sign-up, payment, content loading, or core app flows.
- Performance: Profile memory use, bottlenecks, load times, and resource spikes.
- Backend health: Monitor authentication, database calls, file storage, notifications, and API response times.
- Version stability: Check whether a release creates account access issues or broken workflows for existing users.
Then compare those signals with user feedback. Reviews, support tickets, community posts, and social mentions often explain why a metric moved after a release.
Prioritize updates in this order:
- Release fixes for crashes, login failures, payment issues, and broken core flows.
- Fix repeated user friction that appears in analytics, reviews, or support tickets.
- Improve flows that affect retention, activation, or conversion.
- Add feature requests only when the request appears often enough to justify the release work.
Support capacity matters during major rollouts. Slow responses can turn a fixable bug into a public ratings problem.
Post-launch data can also improve App Store copy, screenshots, onboarding text, and keyword ideas. Make those changes only when reviews, tickets, or analytics repeat the same pattern.
Review App Store performance after each update:
- Ratings and reviews: Look for repeated praise, complaints, and words users use naturally.
- Conversion trends: Watch whether screenshot, copy, or feature changes improve store-page performance.
- Screenshots and copy: Update visuals when the product changes or feedback shows the current listing misses the main value.
- Release cadence: Ship improvements regularly, but base each release on analytics, reviews, and support patterns.
| Post-launch workstream | What to review | What it informs |
|---|---|---|
| Technical health | Bottlenecks, memory leaks, resource usage | Bug fixes and performance updates |
| User behavior | Navigation paths, feature usage, drop-off points | UX changes, retention work, monetization tuning |
| User feedback | Reviews, complaints, sentiment shifts | Bug prioritization, support actions, copy changes |
| Store performance | Ratings, conversion trends, keyword visibility | ASO updates and growth experiments |
Once the update loop is clear, the final question is how much time and budget to reserve for the next release.
For the full path from initial scope through post-launch updates, the build-to-release mobile launch guide connects each gate.
Costs and timeline
Costs depend on scope more than the app idea. The budget rises fastest when the iOS build needs custom integrations or late App Store cleanup.
A same-day prompt-built MVP is possible only when the app has one narrow flow and no complex backend. Treat “a few hours” as an exception for a scoped MVP.
Budget first for required publishing and review work:
- Apple account: The Apple Developer Program is $99/year for distribution; local currency and taxes may vary.
- Google Play account: If you publish the Android version too, Google Play charges a $25 one-time developer registration fee.
- Tool or platform cost: Builder subscriptions, cloud testing, analytics, and backend services depend on the route you choose.
- Review readiness: Finish store metadata and device testing before submission. Privacy details and screenshots are common late blockers.
Use the ranges below as planning bands for scoping conversations. Auth, payments, real-time data, location, camera access, integrations, and compliance are the features that stretch timelines fastest.
| Build path | Typical timeline | Cost pattern | What changes the outcome |
|---|---|---|---|
| Prompt-based native MVP | A few hours in one path-specific example | Lowest setup cost when scope is narrow | Prompt quality, feature count, data connections, review readiness |
| Basic custom app | 2 to 4 months | Higher than prompt-based builds because implementation is manual | Design depth, third-party services, polish level |
| Moderately complex app | 4 to 7 months | Mid to high budget because APIs and real-time logic increase work | Integrations, auth, state management, QA |
| Full custom project average | About 11 months | Highest budget range because scope and team size expand | Team size, backend architecture, compliance, iteration cycles |
Use these ranges to choose a build path, then check whether the result still gives you the quality, ownership, and release support your app needs.
To compare prompt-based options by publishing support and cost, use the review-ready no-code builder roundup.
The launch-ready app software comparison weighs costs, coding requirements, and publishing support across 25 tools.
Native quality and ownership
The first working version is only part of an iOS app launch. The real win is a build you can test, own, and submit without getting stuck in the last stretch.
Bilt helps you get there. Describe your app in plain English, and Bilt creates a native iOS and Android app you can keep refining.
Use Bilt when your next version needs to answer 3 practical questions:
- Can you turn your app idea into a working build without writing Swift?
- Can you test the app on a real iPhone before App Store review?
- Can you own or export the React Native source code when you need it?
Early feedback comes before the highest-stress moment: App Store review. That matters most if you have already rebuilt the app, fought signing issues, or watched a submission get rejected.
Book a free expert call if you want a Bilt expert to sanity-check your iOS app path before another rebuild or App Store rejection.
Common questions
Is it free to develop an iOS app?
Yes, for learning and local testing. You only pay Apple when you want to publish through the App Store.
You can build the app and test basic behavior in the iOS Simulator without paying Apple. That is enough to learn the workflow before you decide to publish.
Apple lists Developer Program membership at $99/year for individuals and organizations on its membership comparison page. That membership is the account you use for App Store Connect and release management.
| Stage | Free or paid | What it covers |
|---|---|---|
| Learning and prototyping | Free | Coding, simulator use, early feature testing |
| Local testing | Free | Running and checking the app before release |
| App Store distribution | Paid | Developer account, signing, submission, release workflow |
Can I build an iOS app without a Mac?
Yes, if the iOS build or simulator work runs in the cloud instead of on your computer.
Apple’s standard workflow uses Xcode, and Xcode runs on macOS. Browser-based tools get around the local Mac requirement by running iOS remotely.
Bilt lets you stream an interactive iOS simulator in the browser, so you can test from Windows or Linux. A Mac still sits in the build infrastructure, just not on your desk.
| Standard approach | Non-Mac workaround |
|---|---|
| Local Xcode on macOS | Interactive iOS simulator streamed in a browser |
| Requires a Mac | Works without a physical Mac |
| Apple-supported local development path | Remote browser-based testing path |
Can I build an iOS app with no coding experience?
Yes. AI-native tools can turn plain-English requirements into native iOS app code.
You describe the app in plain English, then refine the generated screens and logic with prompts. Bilt can also help with backend and deployment steps.
No coding experience still leaves a few technical decisions. Pay close attention when the app reaches these areas:
- Authentication: Decide who can sign in, what each user can see, and how account recovery works.
- Payments: Subscriptions and in-app purchases need the correct Apple flow before launch.
- Databases: The data model should match how users add and find information.
- Deployment: Signing, store metadata, and updates still matter after the first build.
Bilt can handle production steps that appear after the first generated draft:
- App signing and deployment
- Camera access
- GPS
- Push notifications
Does an iOS app run on iPad too?
Yes, when the project includes iPad support. In Apple’s setup, that usually means a universal app or Universal device target.
You usually do not need a separate iPad app. One executable can support both iOS and iPadOS when the layout adapts to the larger screen.
Plan extra iPad work when the app needs iPad-specific behavior:
- Split View or Slide Over
- Multitasking layouts
- Larger-canvas screens
- External display support
| Question | Answer |
|---|---|
| Can an iOS app run on iPad? | Yes, if it includes iPad support or is built as a universal app. |
| Need a separate executable? | Not necessarily. Apple says the same executable can support both. |
| What setting signals dual-device support? | The Universal device option in app setup. |